


TL;DR: As a Front-end developer, one of the most crucial skills to possess is how to manage state in your applications. The ability to synchronize application state with data changes and manage shared state amongst different components is a strong requirement in building modern frontend applications. Several state management libraries have been developed with certain frameworks having a de-facto state management library that they naturally work well with (e.g., Redux for Reactjs).
In this tutorial, you will learn how to perform state management in Svelte applications using Svelte's built-in state management Stores.
What We'll Build
In this tutorial, you will be implementing state management in a shopping cart built with Svelte. You will begin with a pre-built e-commerce application that sells different types of wares. However, this application is not yet complete, as its shopping features for adding products to the cart and managing cart items have not been implemented. Using the Svelte store, you will be adding the following features to the application:
- Load the products from a central state store
- Add items to the shopping cart
- Display items added to the shopping cart
- Calculate the total price of items in the cart
- Increase and decrease the quantity of the items in the cart
- Remove items from the cart
Prerequisites
There are a few requirements to follow along with this exercise:
- Node.js installed on your system. You can visit the website and install a suitable version for your operating system here.
- Basic knowledge of Svelte and using Svelte components.
With all these in place, you can proceed with the exercise.
Cloning the Demo E-commerce Project
To begin, you will clone the starting point for the project and run it. Run the following command to clone a copy of the e-commerce project unto your machine:
git clone --single-branch --branch base-project https://github.com/coderonfleek/svelte-storeOnce you have the project on your system, go into the root of the project and install the dependencies with the following commands:
cd svelte-store
npm install
With all dependencies installed, you can then run the project using the following command:
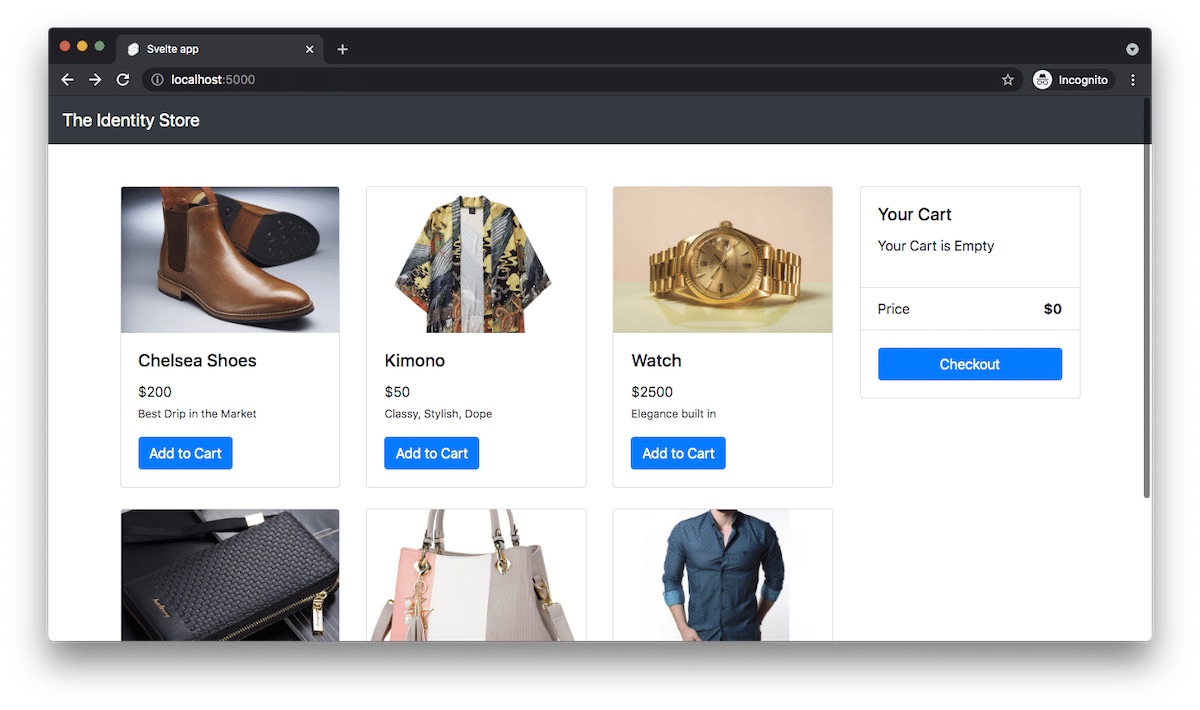
npm run devThis command will boot up a local development server at http://localhost:5000. Navigate to this address on your browser, and you will see the page displayed below:

At the moment, when you click Add to Cart on any of the products, the button does nothing. The source code for the homepage is located in the file src/views/Home.svelte. The products are currently loaded from a products array on the page using a Product component to display the products:
<main>
  <div class="home container">
    <div class="row">
      <div class="col-md-9 pt-5">
        <div
          class="row row-cols-1 row-cols-sm-2 row-cols-md-3 row-cols-lg-3 row-cols-xl-3"
        >
          {#each products as product}
          <Product {product} />
          {/each}
        </div>
      </div>
      <div class="col-md-3 pt-5">
        <Cart />
      </div>
    </div>
  </div>
</main>
On the right column, a Cart component is used to display items that have been added to the cart and their respective quantities, which is also hard-coded into the component at the moment. The Cart component also consists of a Checkout button which will navigate to the full shopping cart details page shown below when clicked:
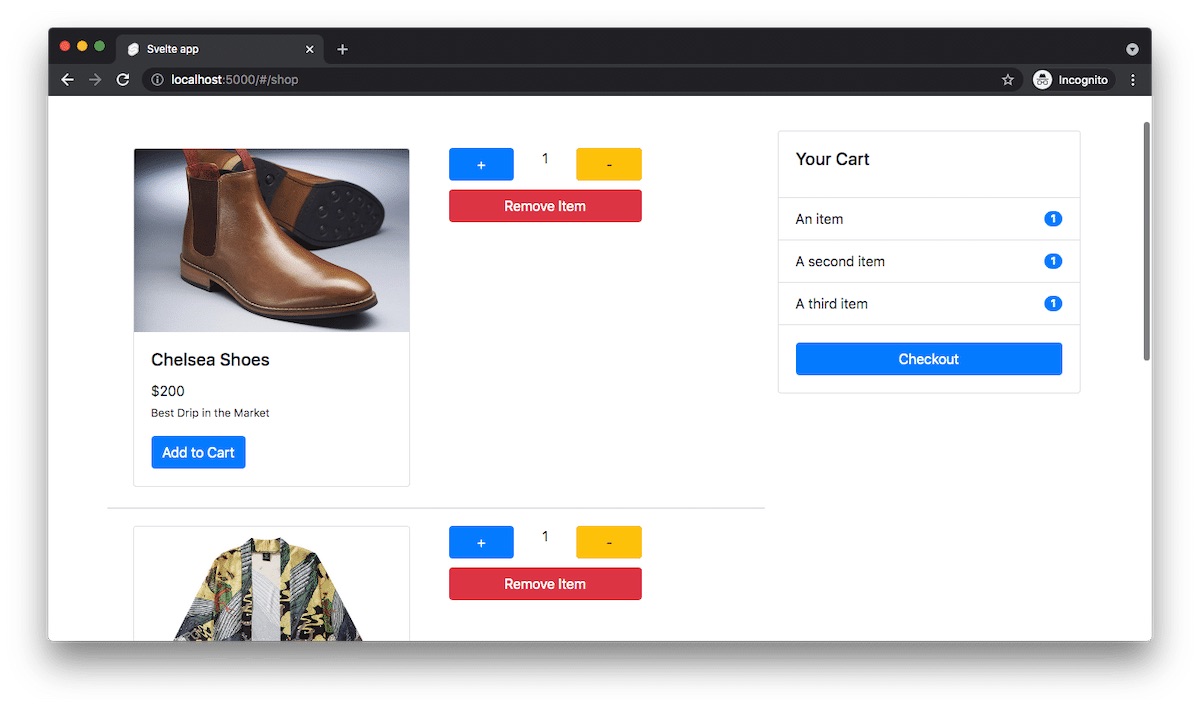
The cart details page source code can be found in src/views/ShoppingCart.svelte. It uses a CartItem component to display any item added to the cart with buttons to increase or decrease the quantity of the item in the cart or remove it completely. The Cart component is also displayed on the right column, just as it was on the homepage. At the moment, these buttons do nothing when clicked.
<main>
  <div class="home container">
    <div class="row">
      <div class="col-md-8 pt-5">
        {#each cart as product}
        <CartItem {product} />
        {/each}
      </div>
      <div class="col-md-4 pt-5">
        <Cart />
      </div>
    </div>
  </div>
</main>
The cart items displayed on this page are loaded from a cart array and are currently hard-coded on the page. What's more, clicking any of the buttons does nothing at the moment. All components used in the application are contained in the src/components folder.
Creating the State Management Store
To begin implementing the features listed in the above section, you will need to set up a central state management store in the application. Create a store.js file inside the src folder, then add the following code:
import { writable, derived } from "svelte/store";

export const products = writable([
  {
    id: 1,
    name: "Chelsea Shoes",
    price: 200,
    shortdesc: "Best Drip in the Market",
    url: "images/chelsea-shoes.png"
  },
  {
    id: 2,
    name: "Kimono",
    price: 50,
    shortdesc: "Classy, Stylish, Dope",
    url: "images/kimono.png"
  },
  {
    id: 3,
    name: "Watch",
    price: 2500,
    shortdesc: "Elegance built in",
    url: "images/rolex.png"
  },
  {
    id: 4,
    name: "Wallet",
    price: 80,
    shortdesc: "Sleek, Trendy, Clean",
    url: "images/wallet.png"
  },
  {
    id: 5,
    name: "Lady Handbags",
    price: 230,
    shortdesc: "Fabulous, Exotic, Classy",
    url: "images/handbag.png"
  },
  {
    id: 6,
    name: "Casual Shirts",
    price: 30,
    shortdesc: "Neat, Sleek, Smart",
    url: "images/shirt.png"
  }
]);

export const cart = writable([]);
The store above contains two writable properties:
- The
productsproperty holds all products contained in the e-commerce application. In a production scenario, you would want to load products from a remote API. - The
cartproperty is an array that holds the items a user adds to their cart. This is empty by default.
These properties are all that is needed to implement the features listed above.
Loading Products to the Home Page from the Store
The first task is to ensure that the products are loaded from the store instead of being hard-coded on the Home.svelte homepage. Locate src/views/Home.svelte and replace its content with the following code:
<script>
  import Product from "../components/Product.svelte";
  import Cart from "../components/Cart.svelte";
  import { products } from "../store";
</script>

<main>
  <div class="home container">
    <div class="row">
      <div class="col-md-9 pt-5">
        <div
          class="row row-cols-1 row-cols-sm-2 row-cols-md-3 row-cols-lg-3 row-cols-xl-3"
        >
          {#each $products as product}
            <Product {product} />
          {/each}
        </div>
      </div>
      <div class="col-md-3 pt-5">
        <Cart />
      </div>
    </div>
  </div>
</main>
In the update above, the products variable has now been replaced with store property products that references the store to load the products. Now refresh your homepage, and you will not see any change, but you know that your products are now being loaded from the store.
Adding Items to the Shopping Cart
The next task is to implement the functionality that allows users to click Add to Cart on a product on the homepage and see it added to the cart widget on the right column. As mentioned earlier, products displayed on the page are managed using a Product component. Locate this component at src/components/Product.svelte and replace its content with the following code:
<script>
  import { cart } from "../store";
  export let product;

  let inCart = false;

  $: {
    $cart.forEach((item) => {
      if (item.id == product.id) {
        inCart = true;
      }
    });
  }

  function addToCart() {
    if (!inCart) {
      let updatedCart = [...$cart, { ...product, quantity: 1 }];

      cart.set(updatedCart);
    } else {
      alert("Item already added to Cart");
    }
  }
</script>

<main>
  <div class="col mb-4">
    <div class="card">
      <img src={product.url} class="card-img-top" alt="..." />
      <div class="card-body">
        <h5 class="card-title">{product.name}</h5>
        <p class="card-text">
          ${product.price}
          <br />
          <small>
            {product.shortdesc}
          </small>
        </p>
        <button
          on:click={() => addToCart()}
          class="btn btn-primary"
          disabled={inCart}>{inCart ? "Added" : "Add to Cart"}</button
        >
      </div>
    </div>
  </div>
</main>
The updates to this file add two properties to the component:
- A reference to the
cartproperty in the store - The
inCartchecks if the product using this component has been added to the store or not
The addToCart function adds an item to the cart when the Add to Cart button is clicked by updating the cart property in the store with the new item. This function first checks if the product is already in the cart. If so, an alert is displayed indicating that the product has already been added. If not, the product is added to the cart.
The inCart property is also used in the template to disable the Add to Cart button if the product has already been added.
Next, the Cart component needs to display the products that have been added to the cart and also the total price. Locate the src/components/Cart.svelte file and replace its content with the following code:
<script>
  import { link } from "svelte-spa-router";
  import { cart } from "../store";

  $: totalPrice = $cart.reduce((total, next) => {
    console.log($cart);
    return total + next.quantity * next.price;
  }, 0);
</script>

<main>
  <div class="card">
    <div class="card-body">
      <h5 class="card-title">Your Cart</h5>
      {#if $cart.length == 0}
        <p>Your Cart is Empty</p>
      {/if}
    </div>
    <ul class="list-group list-group-flush">
      {#each $cart as item}
        <li
          class="list-group-item d-flex justify-content-between align-items-center"
        >
          {item.name}
          <span class="badge badge-primary badge-pill">{item.quantity}</span>
        </li>
      {/each}
      <li
        class="list-group-item d-flex justify-content-between align-items-center"
      >
        Price <b>${totalPrice}</b>
      </li>
    </ul>

    <div class="card-body">
      <a use:link href="/shop" class="btn btn-primary btn-block">Checkout</a>
    </div>
  </div>
</main>
The update to this file first replaces the hard-coded cart items with reference to that cart state in the store. A totalPrice property is also used to evaluate the total cost of all items currently added to the shopping cart. In the template, the length of cart is used to display a message to the user to add items to the shopping cart when the cart is empty.
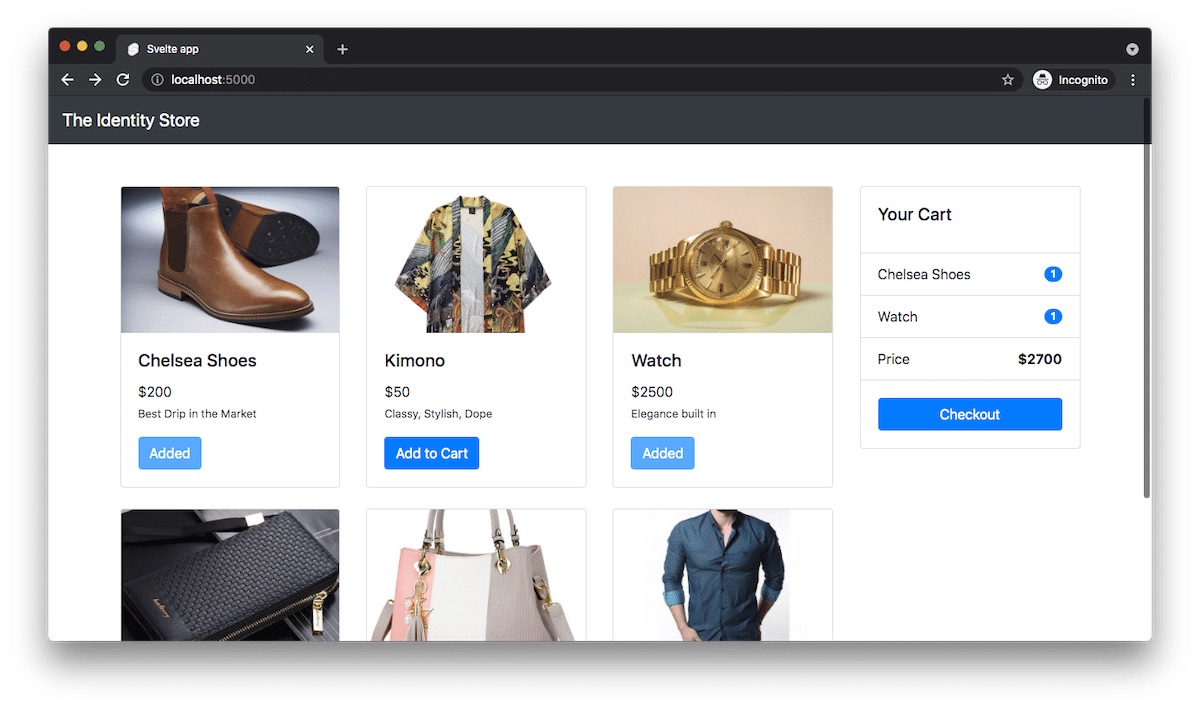
Return to the browser and reload the homepage if it hasn't been reloaded. You will see the view below. Notice the new look of the cart widget on the right column:
Now click on Add to Cart to add at least 2 items to the cart and observe the cart widget update based on your selections like below:
Changing Items Quantity and Removing Items from the Cart
Notice how the default quantity of each product added to the cart is set to one (1)? This is because every count has to start from 1. In a proper shopping cart application, users should be allowed to increase the quantity of each selected item.
The next task is to add features for increasing and decreasing the number of cart items. You will also add the ability to completely remove an item from the cart.
From the shopping cart details page shown earlier, each cart item displayed with buttons to manage its quantity uses the CartItem component. Locate this component at src/components/CartItem.svelte and replace the code in it with the following:
<script>
  import Product from "../components/Product.svelte";
  import { cart } from "../store";

  export let product;

  let itemQuantity = 0;

  $: {
    let get_product = $cart.filter((item) => item.id == product.id);

    itemQuantity = get_product[0].quantity;
  }

  function changeQuantity(action = "add") {
    if (action == "add") {
      product.quantity = product.quantity + 1;

      updateCart(product);
    } else {
      if (product.quantity > 1) {
        product.quantity = product.quantity - 1;
        updateCart(product);
      } else {
        //Remove the item

        removeItem(product);
      }
    }
  }

  function removeItem(product) {
    let removedItemCart = $cart.filter((cartItem) => {
      return cartItem.id != product.id;
    });

    cart.set(removedItemCart);
  }

  function updateCart(product) {

    let updatedCart = $cart.map((cartItem) => {
      if (cartItem.id == product.id) {
        return product;
      }

      return cartItem;
    });

    cart.set(updatedCart);
  }
</script>

<main>
  <div class="row cart-item-row">
    <div class="col-md-6">
      <Product {product} />
    </div>
    <div class="col-md-4">
      <div class="row">
        <div class="col-md-5">
          <button
            on:click={() => changeQuantity()}
            class="btn btn-primary btn-block">+</button
          >
        </div>
        <div class="col-md-2 text-center">{product.quantity}</div>
        <div class="col-md-5">
          <button
            on:click={() => changeQuantity("remove")}
            class="btn btn-warning btn-block">-</button
          >
        </div>
      </div>
      <div class="row cart-remove-button">
        <div class="col-md-12">
          <button on:click={() => removeItem()} class="btn btn-danger btn-block"
            >Remove Item</button
          >
        </div>
      </div>
    </div>
  </div>
</main>

<style scoped>
  .cart-item-row {
    border-bottom: 1px solid #ccc;
    margin-top: 20px;
  }
  .cart-remove-button {
    margin-top: 10px;
  }
</style>
This update adds two computed properties, cart, which is a reference to the cart state property in the store, and itemQuantity, which gets the current quantity of the item in the shopping cart.
Three methods are also added which do the following:
changeQuantity: takes in anactionargument that is either set toaddordecreaseto determine whether to increase or decrease the item quantity by 1. If the current quantity is 1 and the function is asked to decrease the item, the item would be removed completely.removeItem: completely removes an item from the shopping cart.updateCart: A utility function for reusing the update logic forcartin the store
Next, locate the shopping cart details page at src/views/ShoppingCart.svelte and replace its content with the following code:
<script>
  import Cart from "../components/Cart.svelte";
  import CartItem from "../components/CartItem.svelte";

  import { cart } from "../store";
</script>

<main>
  <div class="home container">
    <div class="row">
      <div class="col-md-8 pt-5">
        {#each $cart as product}
          <CartItem {product} />
        {/each}
      </div>
      <div class="col-md-4 pt-5">
        <Cart />
      </div>
    </div>
  </div>
</main>
This update replaces the hard-coded cart items with reference to the cart property in the store.
Running the Application
With these changes, your app should be reloaded once again. Add a few items to the shopping cart if the reload has reset the cart back to being empty, then click "Checkout" to go to the shopping cart details page. On this page, increment and decrement some of the items in the cart and try removing one of them by clicking "Remove". You will see the cart widget update accordingly on the right column like below:

Perfect!
Conclusion
In this tutorial, you have been able to implement state management in a Svelte application using a shopping cart demo application.
State management involves a design thinking process where you have to decide which state properties are global (reside in the store) and which state properties are to be localized to the respective components that make use of them. Knowing which state should be local and which state properties should reside in the central store will help you make good design decisions.
If any part of your demonstration is not working as expected, I advise you to go through the article once again to see if there is any step you may have missed. If you need additional help, feel free to reach out in the comments.
Happy coding :)


