GistPad is a Visual Studio Code extension that allows you to edit GitHub Gists and repositories from the comfort of your favorite editor. You can open, create, delete, fork and star gists and repositories, and then seamlessly begin editing files as if they were local, without ever cloning, pushing or pulling anything. It's like your very own developer library for building and referencing code snippets, commonly used config/scripts, programming-related notes, knowledge bases and interactive samples.
- Getting Started
- Gist Management
- Repository Management
- CodeSwing
- Contributed Commands
- Configuration Settings
-
Install this extension from the marketplace, then run
Developer: Reload Window. -
Open the
GistPadtab (look for the notebook icon in the activity bar). From there, you can open a gist or GitHub repo by ID/URL, or sign in with a GitHub account in order to manage your gists and repositories. To sign-in, simply click theSign Inbutton and follow the provided flow in order to authenticate with your GitHub account.
You can create and edit gists, repositories, wikis and runnable code samples. Have fun, and let us know how we can make your knowledge-management experience even more awesome! 🙌
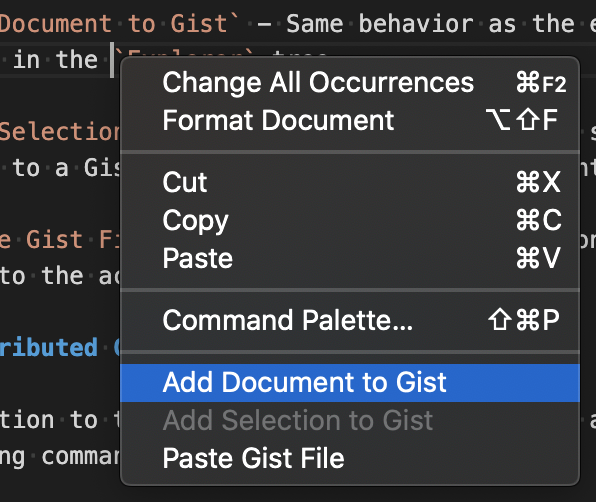
In order to create a new gist, simply open the Gists tree in the GistPad tab, and click the + icon in the toolbar. Specify the description and files to seed it with (including support for directories!). Additionally, you can create gists from local files or snippets by right-clicking them in the Explorer tree, or by right-clicking an editor window/tab and selecting Copy File to Gist, Add Selection to Gist, or Paste Gist File Contents (details).
Alternatively, you can run the
GistPad: New GistandGistPad: New Secret Gistcommands.
From here, you can edit gists by expanding the gist and clicking on the desired file. You can open, rename, delete, etc. gists by right-clicking them in the tree and selecting the desired command.
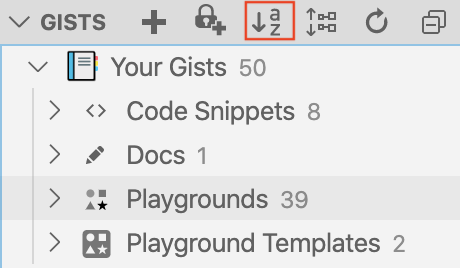
By default, the Gists tree sorts gist by their update time, which allows you to focus on your most recently used gists. If you'd like to sort your gists alphabetically, click the Sort toggle button on the Gists tree's toolbar.
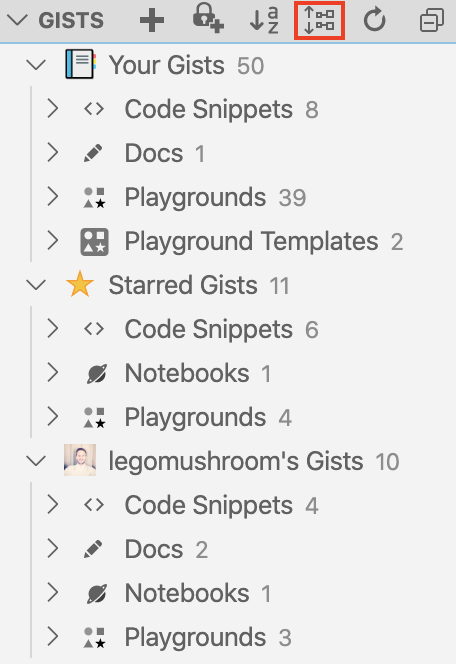
By default, your gists are displayed as a flat list. If you'd like to group them by type, you can click the group toggle button on the Gists tree's toolbar.
When grouping is enabled, gists are grouped into the following built-in types:
- note - Gists that are composed of nothing but
.txt,.md/.markdownor.adocfiles - notebook - Gists that are compose of nothing by Jupyter Notebook files (
.ipynb) - code-swing - Gists that include either a
codeswing.jsonfile and/or anindex.htmlfile. Read more about swings here. - code-swing-template - Swings whose
codeswing.jsonfile sets thetemplateproperty totrue. Read more about swing templates here. - code-swing-tutorial - Swings whose
codeswing.jsonfile specifies atutorialproperty. Read more about tutorials here. - code-tour - Gists that include a
main.tourfile, and were created by exporting a CodeTour. - diagram - Gists that include a
.drawiofile. - flash-code - Gists that include a
.deckfile. - code-snippet - Gists that don't match any of the above more-specific types.
If you want to group gists by your own custom types, add a tag to the end of the gist's description in the format #tag or #tag-name. Then, when you enable grouping, your gists will be grouped by both the aforementioned types, as well as by your custom tags. You can identify tag groups by the # icon.

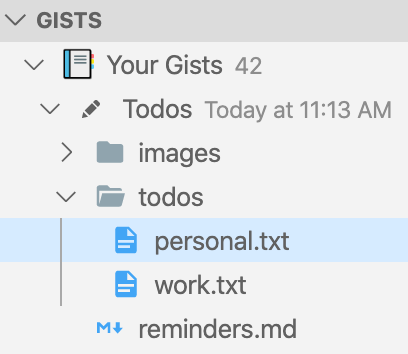
When you create a gist with the New Gist or New Secret Gist commands, you can specify a comma-separated list of file names to seed the gist with. Furthermore, you can add / to your filenames to add them to a sub-directory within the gist.
For example, if you create a new gist, and specify reminders.txt,todos/personal.txt,todos/work.txt, the gist will include a reminders.txt file at the root of the gist, and files called personal.txt and reminders.txt in a directory called todos.
You can add new files to a gist or directory from the Explorer at any time by right-clicking them and selecting Add New File(s) or Upload File(s). You can also rename/delete directories as well, by right-clicking them in the tree and selecting the appropriate command. If you'd like to move a file from one directory to another, simply right-click the file, select Rename File and edit the directory name that it's in. It's that simple!
Gist comments are exposed within the editor at the bottom of open gist files. If a gist includes multiple files, then the comment thread will be displayed at the bottom of them all (duplicated and synchronized).

If you're not authenticated, you can view existing comments, but you can't reply to them. If you are authenticated, you can add/reply, as well as edit/delete your own comments. In order to control the behavior of how gist comment threads are displayed, refer to the GistPad > Comments: Show Thread config setting.
In order to make it easy to author Markdown and HTML/Pug files that include image assets, you can copy images into your clipboard (e.g. taking a screenshot, clicking Copy Image in your browser, etc.) and then paste it directly into a gist file by right-clicking the editor and selecting Paste Image, or with ctrl + shift + v (Windows/Linux), or cmd + shift + v (macOS).
By default, when you paste an image into a gist file, it's uploaded as a .png to the gist, and the appropriate reference is added to it from the document (e.g. inserting an <img />). However, this behavior can be changed by using the GistPad > Images: Paste Format and/or GistPad > Images: Paste Type settings. Refer to the config settings section below for more details.
By default, when you paste an image, it is uploaded to a directory called images within the gist. However, if you'd like to change this (e.g. to assets instead), you can set the GistPad > Images: Directory Name setting.
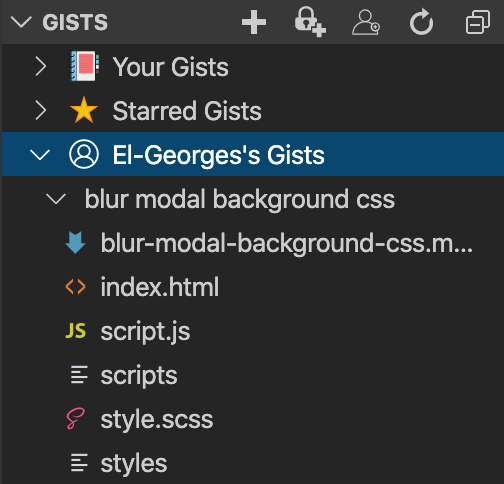
GitHub Gists already allows you to star other user's gists, and when you do that, those will appear in the Gists tree, underneath a Starred Gists node. However, if you want to follow a GitHub user, and easily browse all of their current and future gists (without having to star each one!), you can run the GistPad: Follow User command and specify their GitHub user name. Once you've done that, you'll see a new node in the Gists tree which displays all of their public gists, and allows you to open/fork/clone/star them just like any other gist.
At some point, your code/notes might outgrow the feature set offered by Gists (e.g. when you want to start collaborating on the content with other developers). In that event, you can simply right-click the gist, and select the Export to Repository command in order to create a new GitHub repository, that contains the content of your gist. The created repo will be public or private, depending on the public/private state of the exported gist.
To make it easy to capture ephemeral/fleeting notes as you learn new things throughout the day, GistPad allows you to create "scratch notes" by clicking the New scratch note... command under the Scratch Notes node in the Gists tree (or running the GistPad: New Scratch Note command). A scratch note is simply a text document named be default for the time it was created.
By default, scratch notes are Markdown documents, but you can customize that behavior (e.g. to create text/AsciiDoc/etc. files) by customizing the GistPad > Scratch Notes: File Extension setting. Furthermore, scratch notes are created per day, but you can customize this by setting the GistPad > Scratch Notes: Directory Format and GistPad > Scratch Notes: File Format settings.
In order to help differentiate scratch notes from Notes in the Your Gists node, scratch notes appear as children of a top-level Scratch Notes node in the Gists tree. This makes it easy to view your outstanding scratch notes, so you can periodically audit them and migrate meaningful content to a more appropriate location (e.g. a new or existing gist).

You can create as many scratch notes as you need, and when you're done with them, you can delete individual notes and/or clear all of your notes by right-clicking the Scratch Notes node in the tree and selecting Clear Scratch Notes.
Behind the scenes, scratch notes are simply files that are managed within a "special" secret gist on your behalf. This way, you can focus entirely on the ephemeral nature of the notes, and not worry about creating/deleting gists.
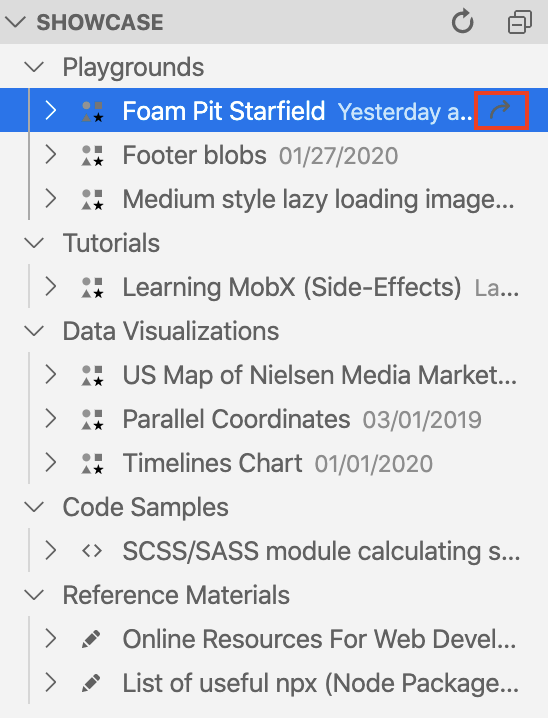
To see what can be done with gists and code swings, and to keep up with the cool stuff that folks in the community are building, check out the Showcase view in the GistPad tab. This is a list of categories intended to highlight different use-cases for gists, along with examples. Simply click the Open button for any gist in order to explore it, or expand the gist to see its file contents. If you have a gist that you think is worth showcasing, please open an issue and let us know about it. We'll keep the showcase updated periodically to highlight new and interesting things, so stay tuned!
GistPad also allows you to create and edit GitHub repos without needing to clone anything locally. To get started, run the GistPad: Open Repository command, and specify/select the name of the repo you'd like to start managing. If you want to create a new repo, then select the Create new repo or Create new private repo options, then specify the name of the repo.
After running this command, you'll see a new Repositories tree in the GistPad tab, which displays the selected repo(s). From here, you can add/upload/edit/delete/rename files, and behind the scenes, your edits will be translated into commits on the respective repo. GistPad will automatically keep your data in sync with GitHub, so you never have to think about pushing or pulling. You can just focus on editing 🚀

Note: Once you're managing at least one repository, you can create/manage new repositories by clicking the
+icon in the toolbar of theRepositoriestree.
In order to create new directories, simply add a new file and include the directory names in the specified file's path (e.g. foo/bar/baz.md). GistPad will then create any necessary directories as part of the file-creation process. Furthermore, if you want to move a file from one directory to another, simply right-click the file in the Repositories tree, select Rename File, and then specify the new directory name in the filepath.
In addition to creating a new repo "from scratch", you can also create a repository from a a template. To do this, simply run the GistPad: Open Repository command and select the Create new repo from template or Create new private repo from template options. You'll be presented with some "well-known" repo templates to select from, but you can also specify the name of an arbitrary repo template as well.
By default, when you create/manage a repository, GistPad will assume you're interested in editing the master branch. However, when managing a repo, you can specify a different branch by appending #<branch> to the specified repo name (e.g. vsls-contrib/gistpad#featureA). When you're managing a non-master branch, the repo node in the Repositories tree will display the branch name.
If at any time, you want to switch branches, simply right-click the repo node in the Repositories tree and select Switch Branch. This will let you pick one of the repo's remote branches, as well as create a new branch. When you're done with a branch, simply right-click the repo and select either Delete Branch or Merge Branch. The later will perform a "squash merge" against master. Using branches allows you to "batch" change sets together, and then apply them in a single/semantic commit.
Just like gists, you can copy images into your clipboard (e.g. taking a screenshot, clicking Copy Image in your browser, etc.) and then paste them directly into a markdown file by right-clicking the editor and selecting Paste Image, or using one of the following keyboard shortcuts: ctrl+shift+v (Windows/Linux),cmd+shift+v (macOS).
By default, when you paste an image into a repo file, it's uploaded as a .png to the repo, and the appropriate reference is added to it from the document (e.g. a [title](url) link). However, this behavior can be changed by using the GistPad > Images: Paste Format and/or GistPad > Images: Paste Type settings. Refer to the config settings section below for more details. Furthermore, when you paste an image, it is uploaded to a directory called images within the gist. However, if you'd like to change this (e.g. to assets instead), you can set the GistPad > Images: Directory Name setting.
By default, when you create/manage a GitHub repository, GistPad will let you edit it like a remotely accessible "file system". However, if you'd like to use the repo as a Roam/Obsidian-like wiki, that's composed of bi-directionally linked markdown pages, then you can indicate that the repo is a wiki in one of the following ways:
- Including
wikiin the repo's name (e.g.lostintangent/gistpad-wiki) - Adding a
gistpad.jsonor.vscode/gistpad.jsonfile to the repo itself
Note: For interoperability with Foam, GistPad will also identify a repo as a wiki if it includes a
.vscode/foam.jsonfile.
Wikis are composed of "pages", which are markdown files that are identified using their # Heading, not their underlying file name. As a result, when you add a new page to a wiki, you simply give it a title/heading (e.g. Todo List), as opposed to a file path. Behind the scenes, GistPad will create a new markdown file and pre-populate file name and # Heading using the specified title.
Additionally, to make it really simple to add a new wiki page, you can either run the GistPad: Add Wiki Page command, or click the notebook icon in your status bar.

Note: While wikis add a "pages" abstraction layer on top of repos, they are still repos behind the scenes. As a result, if you like to add an arbitrary file or directory to your wiki, you can right-click it's node in the tree and select
Add New File.
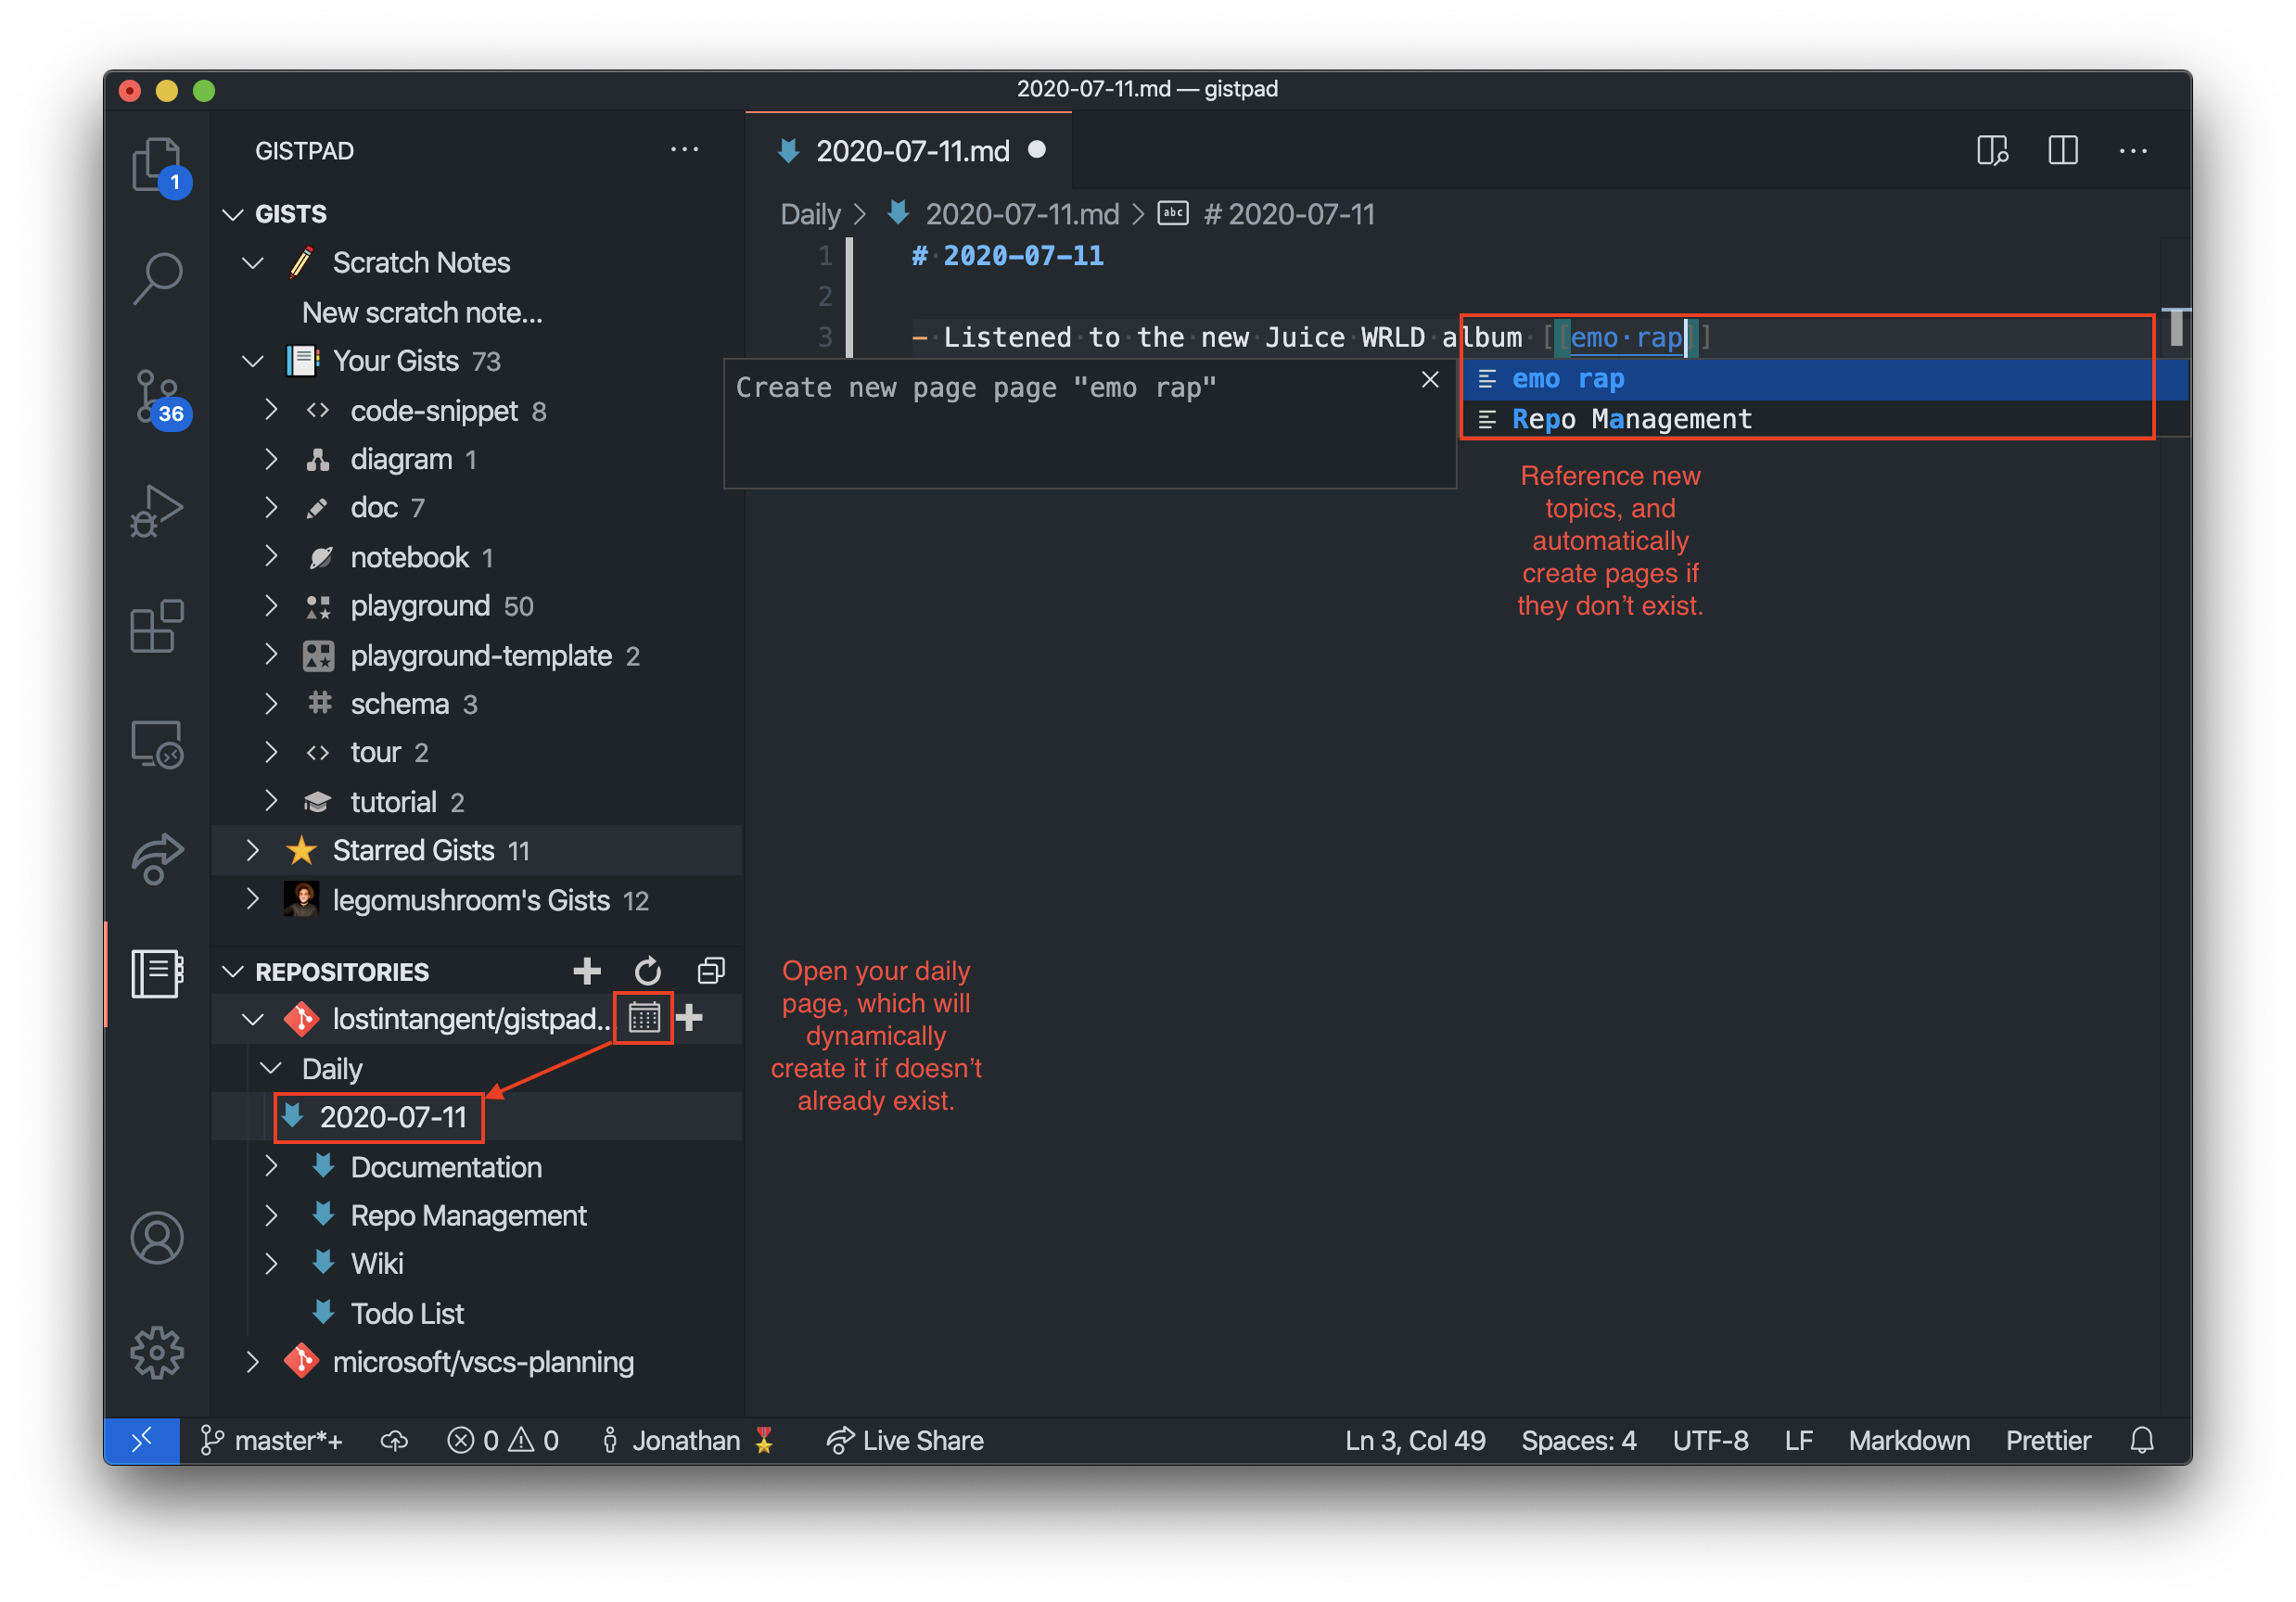
In addition to being able to create topic-oriented pages, GistPad allows you to open your "today page" at any time, which makes it easy to keep track of your daily progress and/or journal. To open your current daily page (that represents today), simply click on the calendar icon to the right of the repo node in the Repositories tree. This will open a new page, that is titled based on the current date (e.g. June 24, 2020), and placed in a directory named Daily. If this page doesn't exist, GistPad will create it, otherwise, it will open the existing one.
Additionally, to make it really simple to open your "today page", you can either run the GistPad: Open Today Page command, or click the calendar icon in your status bar.
If you'd like to change the name of the directory that daily pages are stored in, you can set the
GistPad > Wikis > Daily: Directory Namesetting. Furthermore, if you want to change the format that is used to title daily pages, you can set theGistPad > Wikis > Daily: Title Formatsetting.
In order to create connections between pages, you can add [[links]] to a page. When you type [[, GistPad will display a completion list of the name of all existing pages. Furthermore, you can type a new topic/page title, and GistPad will automatically create that page for you.
When a page includes [[links]], they will be syntax highlighted, and you can hover over them to quickly see the context of the referenced page. Furthermore, you can cmd+click the link in order to directly jump to that page. If the page doesn't already exit, then cmd+clicking it will automatically create the page before opening it. This workflow makes it easy to author and navigate the set of pages within your wiki.
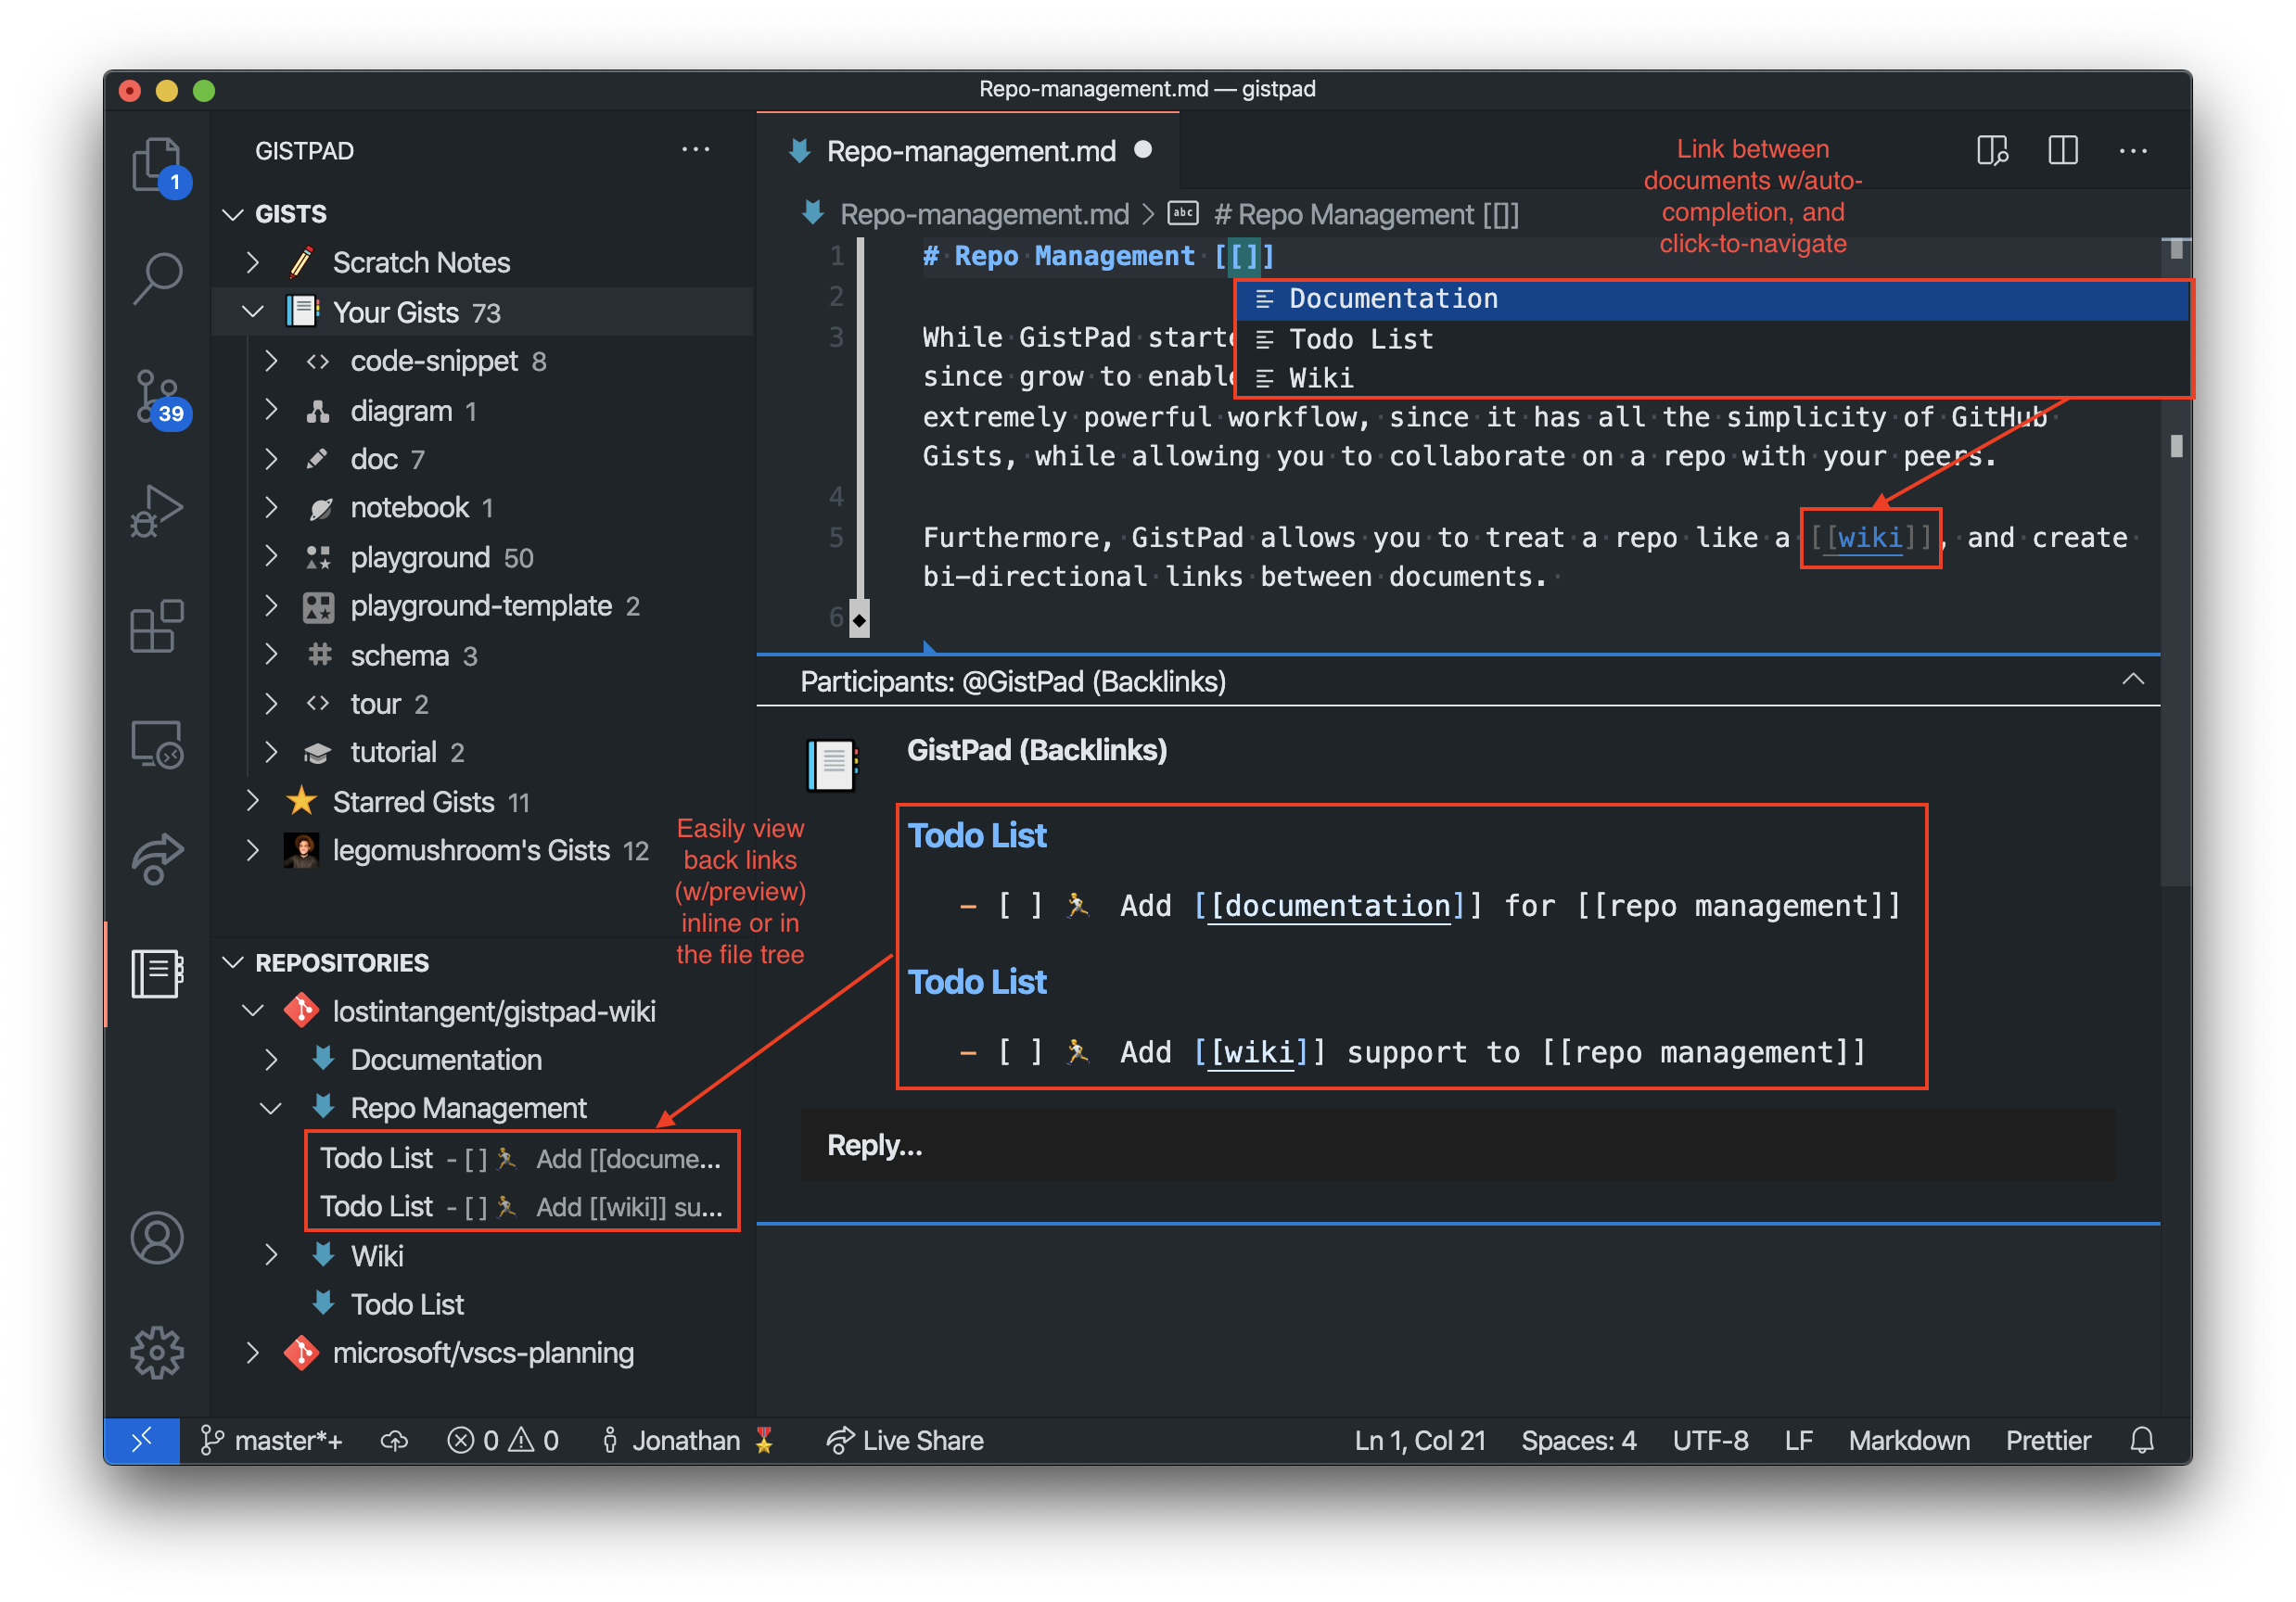
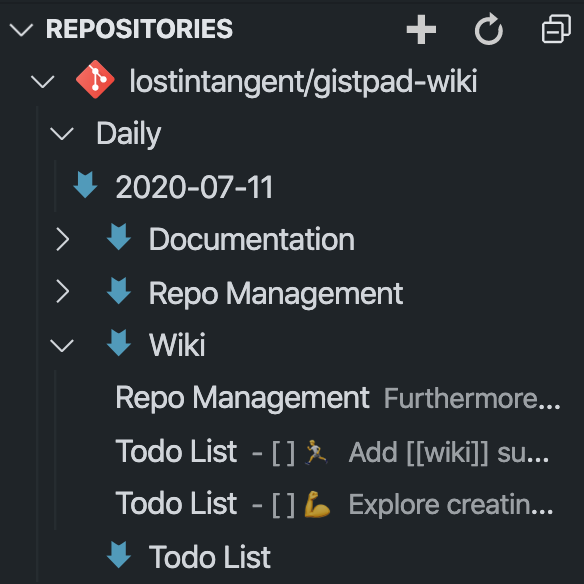
When you add [[links]] to a page, the referenced page automatically detects the "back link", and displays it as a child node of the page in the Repositories tree. This allows you to navigate [[links]] bi-directionallly, and allows your wiki to form a "network" of information. Each back link displays a line preview of the reference, and when clicked will automatically navigate you to the page location that references the selected page.
Furthermore, when you open a page that contains backlinks, the set of backlinks will be displayed at the bottom of the page, including a line preview of the backlink. This makes it possible to have pages that don't actually include content themselves, but rather, are simply "topic aggregators" to view the connections between pages in the same wiki.
In addition to adding links to pages, it's sometimes valuable to embed the contents of another page directly into a note, so that you can easily read them together. To do this, you can use the ![[link]] syntax, where you'll recieve auto-completion support just like regular links. When you use an embed link, the target page's contents will be displayed within the note whenever you view it's markdown preview.
If you're building web applications, and want to create a quick playground environment in order to experiment with HTML, CSS or JavaScript (or Sass/SCSS, Less, Pug and TypeScript), you can install the CodeSwing extension, in order to have a CodePen-like web experience, integrated into VS Code. GistPad provides an integration with CodeSwing, and so once it's installed, you can right-click the Your Gists node in the GistPad tree and select New CodeSwing or New Secret CodeSwing. This will create a new gist, seeded with the selected template fiels, and then provide you with a live preview Webview, so that you can iterate on the code and visually see how it behaves.
When you create a new swing, you'll be asked to select a template, which is simply a way to get started quickly, using the libraries and languages you intend to use (e.g. React.js, Vue.js). Since the swing is backed by a Gist, your changes are saved and shareable with your friends. Additionally, as you find other swings that you'd like to use, simply fork them and create your own swings. That way, you can use Gists as "templates" for swing environments, and collaborate on them with others just like you would any other gist. When you're done with a swing, simply close the preview window and all other documents will be automatically closed. If you no longer need the swing, then delete it just like any other gist 👍
In addition to the Gists view, GistPad also contributes an Copy File to Gist command to the context menu of the Explorer file tree, which allows you to easily add local files to a new or existing Gist.

In addition to the Explorer file tree commands, GistPad also contributes the following commands to the editor's context menu:
-
Add Selection to Gist- Allows you to add a snippet/selection of code to a Gist, instead of the entire document -
Paste Gist File- Allows you to paste the contents of a Gist file into the active editor -
Paste Image- Allows you to paste an image from your clipboard into a markdown, HTML or Pug file. The command will automatically upload the image and then add a reference to it.
The Copy File to Gist command is also available on the editor tab's context menu.
In addition to the commands added to the editor context menu, GistPad also contributes the following commands to the editor's title bar menu (click the ... in the upper right section of an editor window):
Rename File- Allows you to rename the current file.
In addition to the Gists view, this extension also provides the following commands:
-
GistPad: Delete Gist- Allows you to delete one of your Gists. If you have a gist workspace open, it will delete that and then close the folder -
GistPad: Follow User- Follow another GitHub user, which allows you to browser/access/fork their Gists from within theGistsview. -
GistPad: Fork Gist- Forks the currently opened Gist, and then opens it as a virtual workspace. -
GistPad: Open Gist- Displays your list of Gists (if you're signed in), and then opens the files for the selected one. You can also specify a gist by URL,username/id, or ID, which doesn't require being signed in. -
GistPad: Open Gist as Workspace- Same behavior as theGistPad: Open Gistcommand, but will open the selected gist as a workspace, instead of "loose files". -
GistPad: New Gist- Creates a new public Gist, and then opens its associated files. If you'd like to seed the gist with multiple files, you can specify a comma-separated list of names (e.g.foo.txt,bar.js). -
GistPad: New Scratch Note- Creates a new "scratch note", which is a file whose name is derived from theGistPad > Scratch Notes: ExtensionandGist > Scratch Notes: Formatsettings. -
GistPad: New Secret Gist- Same behavior as theGistPad: New Gist (Public)command, except that it creates a secret Gist. -
GistPad: New CodeSwing- Creates a new CodeSwing. -
GistPad: Refresh Gists- Refreshes the gist data and reloads theGiststree. -
GistPad: Sign In- Sign-in with a GitHub account, in order to view/edit/delete your Gists. -
GistPad: Starred Gists- Lists your starred Gists, and then opens the files for the selected one. -
GistPad: Paste Gist File- Allows you to paste the contents of a gist file into the active editor
-
Gistpad: Tree Icons- Specifies whether to show the gist type icons in the gists tree. -
GistPad > Comments: Show Thread- Specifies when to show the comment thread UI whenever you open a gist file. Can be set to one of the following values:always: Always display the comment thread whenever you open a gist file. You can manually collapse it as needed.never: Never automatically open the comment thread when you open a gist file. You can manually expand it as needed.whenNotEmpty(default): Automatically display the comment thread whenever there are actually comments in a gist file. Otherwise, leave it collapsed.
-
Gistpad > Images: Paste Format: Specifies the markup format to use when pasting an image into a gist file. Can be set to one of the following values:markdown(default): Pastes the image reference usingMarkdownformat (e.g.).html: Pastes the image reference usingHTMLformat (e.g.<img src="link" />). Note, when you paste an image into an HTML file, it will always use this format type, regardless what the setting is.
-
Gistpad > Images: Paste Type: Specifies the method to use when pasting an image into a gist file. Can be set to one of the following values:file(default): The pasted image is uploaded as a.pngto the gist, and a reference is added to file it's pasted into.base64: The pasted image is base64-encoded and then embedded into the gist file.
-
Gistpad > Images: Upload Directory Name: Specifies the name of the directory to upload images to. Defaults toimages. -
GistPad > Scratch Notes: Directory Format- Specifies the moment.js format string to use when generating directories for new scratch notes. Defaults toLL(e.g.March 6, 2020). -
GistPad > Scratch Notes: File Extension- Specifies the file extension to use when generating new scratch notes. Defaults to.md. -
GistPad > Scratch Notes: File Format- Specifies the moment.js format string to use when generating new scratch notes. Defaults toLT(e.g.2:52 PM). -
GistPad > Scratch Notes: Show- Specifies whether or not to display the scratch notes node in the gists tree view. Defaults totrue. -
GistPad > Showcase URL- Specifies the URL to use when displaying the showcase entry. This allows teams/classrooms/etc. to create their own showcase and share it amongst themselves. -
GistPad > Tracing > Enable Output Channel- When enabled, creates an Output trace channel at VSCode startup.