After Wordle overtook the world and my Twitter feed, I, like the rest of the world, became somewhat obsessed. I became so obsessed that I was struck with the idea of making an app, similar but with a focus on numbers. Two weeks later, Numble was born — a Wordle for numbers.
The Rules of Numble
It really is quite simple: guess the three-digit multiple of three.
You have four guesses, and after each guess the colors of each digit change depending its position and whether it’s actually in the Numble.
- Green: the digit is in the right place.
- Yellow: the digit is in the Numble but in the wrong place.
- Grey: the digit isn’t in the Numble at all.
If you’ve forgotten from school, the rule for knowing whether a number is a multiple of three, is if the digits add up to a multiple of three.
For example: 123 is a multiple of three because 1 + 2 + 3 = 6.
Nanny State
To make building Numble easier, I used a small library called Nanny State. It’s written by Darren Jones, in case you missed it he wrote an article introducing it recently. It stores all the app data in a single object called State and then re-renders the HTML view automatically depending on any changes made to the State. For it’s speed and efficiancy and no new syntax, it’s remarkably simple and easy to learn.
First things first, we need to import Nanny State and set up State, View and Update.
To import it you just need to copy this line of code into the very first line of your program:
import { Nanny,html } from 'https://cdn.skypack.dev/nanny-state'
If you want to learn a little bit more about what you’re importing and how the structure of everything is working, make sure to check out the link above. Next, we need to create the View:
const View = state => html`
<h1>Numble</h1>`
The View is a function that returns a string that is basically the HTML that will be displayed on our page. This is a basic layout to get us started and once everything is in place, a heading of ‘Numble’ should appear. It takes State as a parameter, giving us access to the data stored in the single object.
Now we need to create the State object, and this is where any data will be stored, but for now the only porperty it needs is View, linking them together.
const State = {
  View
}
And finally, we need to call the Nanny function. This will render the initial view. We also assign the variable Update to the return value. This will allow us to update the state later on.
const Update = Nanny(State)
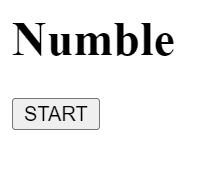
Your page should look like this:
Here’s what the code should look like altogether:
Now Nanny State is set up, we can start making the game, which by the end should be a fully functioning ‘Guess the Number’ game.
Every End has a Start
A few things before we start, one of the benefits of the View function is that it uses template literals, which means we can add logic within the HTML itself. This comes in very handy when you want to include different views based on the State. Unfortunately, a standard if Statement won’t work and instead we will need to use ternary operators.
If you aren’t familiar already, ternary operators work in the same way as an if else statement: condition ? what to do if true : what to do if false. In short, trade the if for a ? and the else for a :.
For example, here’s a great one I saw on Twitter the other day:
const toDo = amIHungry ? "🍰" : "😴"
This is equivalent to:
if (amIHungry){
    const toDo = "🍰"
}
else{
    const toDo = "😴"
}
Ternary operators are about to become your best friend so it’s pretty vital that you understand how they work.
A start button is a great way to add some structure to a game, especially one like Numble, and so in order to do this we’ll need to add a property to State, started. The value of started needs to be false, as the first thing we want the user to see is the menu page (which, for now, will consist of the start button and the heading).
State should now look like this:
const State = {
    started: false,
    start, finish,
    View
}
The View is what changes the most here and we can use our first and main ternary operator.
Notice that it includes two variables called start and finish. These are references to the event handlers that we will be writing soon.
In Nanny State, any event handlers need to be referenced inside the State object.
We basically want two different views: one for when the user has started (in other words, the game itself) and one for when the user hasn’t started (a menu page, perhaps). So we can use our Boolean property of started to do this.
const View = state => html`
<h1>Numble</h1>
${state.started ?
 html`<button onclick=${state.finish}>END</button>`
:
 html`<button onclick=${state.start}>START</button>`
}`
As you can see, the heading is above the ternary operator – this means it will remain visible for both pages of the program. So for the ternary operator, you might be able to see exactly what it’s doing already, but if not, don’t worry, it’s very simple.
It follows exactly the same logic as the cake/hungry example above: it checks if state.started is true. If it is, a button called ‘End’ is displayed. If not, a button called ‘Start’ is displayed instead.
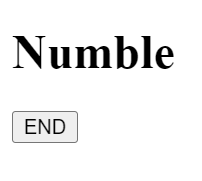
The buttons themselves have inline event listeners: the ‘Start’ button has one that calls the function start and the ‘End’ button has one that calls the function finish. Obviously, these functions don’t exist yet, which leads us on to our next job: creating the event handlers.
We’ll do the start function first. It’s very simple, as all we need to do is update the started property to true. The code should look like this:
const start = event => Update({started: true})
This uses the Update function we wrote earlier, and changes the State so that the value of started is now true. When this happens, the View will be re-rendered, displaying the ‘End’ button as a result of our ternary operator.
You may want to have a go at writing the finish event handler yourself, as it works almost identically to the start function, the only difference is what the Update function is changing.
Here’s what the finish function should look like:
const finish = event => Update({started: false})
Amazing! You’ve now got the world’s most boring game!
In all seriousness, you can now have a go at pressing the start and end buttons and interacting with your game, even if it isn’t the most riveting experience.
Again, here’s an example of what the code should look like:
Step 2: Generating a Random Number
We can now make our game a little bit more exciting with one of the most important aspects of Numble: the number itself.
This step involves a bit of maths and logic, but it’s really not too hard once you get your head around it. The function itself should look like this (and I’ll explain what’s going on below):
const generateNumber = () => (3*Math.ceil(Math.random()*299+34)).toString()
This is an arrow function that returns a three-digit, multiple of three as a string.
Looking specifically at Math.ceil(Math.random()*299+34), this generates a random number between 1 and 299 using Math.random() and rounds it up using Math.ceil. 34 is added and then this is multiplied by three, making sure that the number is a multiple of three between 102 and 999, i.e. a 3-Digit multiple of 3, or a ‘numble’.
Finally, the whole thing is wrapped in a .toString() function, turning it into a string. It might seem stange to store a number as a string, but this will make it easier to color each individual digit later in the game.
Our next challenge is to display a number every time the user presses ‘start’.
The best way to do this is add a property to the state object called number. However, we don’t need to do this in the original State, we just need to do this when the ‘Start’ button is pressed, so in the start event handler.
This will change our start function to look like this:
const start = event => Update({
    started: true,
    number: generateNumber()
  })
The value of the new property, number, is the return value of the function we just created generateNumber(): the random three-digit, multiple of three.
In order to display this, we need to add a line to View, specifically in the HTML section of when state.started is true, making View now look like this:
const View = state => html`
<h1>Numble</h1>
${state.started ?
 html`<div id="number">${state.number}</div>
 <button onclick=${state.finish}>END</button>`
:
 html`<button onclick=${state.start}>START</button>`
}`
All we’ve done here is add a <div> with an id of "number", that displays state.number which is the randomly generated three-digit, multiple of three.
If you test out the code now, you will be able to see a different number every time you click the ‘Start’ button, and if you add up the digits you’ll find that the numbers are multiples of three!
Check your code against my CodePen demo.
Step 3: Inputs and Keyboards
It starts to get a little trickier now, and before we begin it’s probably a good idea to check that you are familiar with the Array.map() function. Like ternary operators, they are going to become you’re best friend in this step and in the next article, because Numble requires a lot of mapping over arrays to process the data in the state.
If your Array.map() skills are a little rusty or you haven’t even heard of it, don’t worry, they’re quite easy to understand and you can read more about them here.
There are three main parts to this step:
- Create a virtual keyboard
- Display the user’s guess
- Checking if the user’s guess is right
Even though they all depend upon each other, it’s much easier to understand if you break everything up into smaller chunks.
First, we need to add the functions we are going to use and three more properties in State:
const State = {
  started: false,
  digits: Array(10).fill("grey"),
  guess: Array(3).fill(null),
  count: 0,
  start, finish, remove, check, appear,
  View
}
Working through them in that order, the value of digits is now an array of length 10, with each space filled with the string “grey”. This is because we will be using this to keep track of what color each digit should be in the game and the index of the array will represent each possible digit from 0-9.
The initial value of guess is also an array of length 3, each space filled with null.
And finally, count is set to 0, and this will be used to keep a count of how many digits the player has guessed.
We’re going to map over the digits array to create our onscreen keyboard, so we’ll need to add a few things to View. Although before we do that, we need to get rid of the <div> that shows the number, otherwise that would just defeat the whole point of the game.
const View = state => html`
<h1>Numble</h1>
${state.started ?
 html`<div id="guesses">
${state.guess.map(number => html`<div>${number}</div>`)}
</div>
<div id="keyboard">
 ${state.digits.map((digit,index) => html`<button onclick=${appear(index)}>${index}</button>`)}
 <button onclick=${remove}>DELETE</button>
 <button onclick=${check}>ENTER</button>
</div>
<button onclick=${finish}>END</button>`
:
 html`<button onclick=${start}>START</button>`
}`
In place of the <div> that showed the number, we now have two <div>s one with an id of "guesses" and one with an id of "keyboard".
Within the ‘guesses’ <div> we have the first of many .map() functions, and it maps over the array of length 3, creating a separate <div> for each item in the array, displaying the item. This means that at the start, when the value of all the items in the array is null, there will be three empty spaces displayed.
Here is an example of what it should look like (with my CSS):
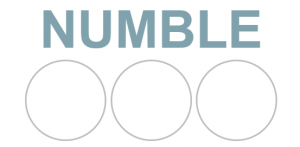
Eventually, when the value of each item in the array changes, what’s displayed will also be changed to match.
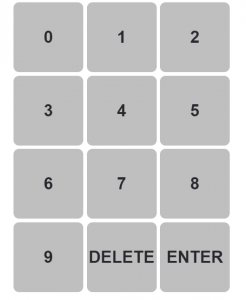
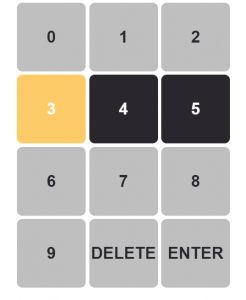
And within the ‘Keyboard’ <div> we have three things:
${state.digits.map((digit,index) => html`<button onclick=${state.appear(index)}>${index}</button>`)}
This maps over the array of length 10, creating a button for each item and displaying the index of each item. In other words, the digits 0 to 9. Each button also has an inline event listener that calls the event handler appear and provides index as an argument. However, we will fully explore this in a moment.
Then, we have two buttons, one called ‘Delete’ and the other called ‘Enter’.They both have inline event listeners that call their respective event handlers remove and check. And again, we will fully explore these in a moment.
Firstly, this is an example of what you’re keyboard could look like:
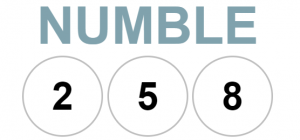
Looking at the appear event handler, we want this function to display the digit the player clicks into the first space of the guess.
const appear = guess => event => {
  Update(state => ({
    guess: state.guess.map((digit,index) => index === state.count ? guess : digit),
    count: state.count + 1
  }))
}
First of all, the only difference between this event handler and the ones we made before is that this function has an extra parameter guess. This is the index of the digits array that was provided as an argument. In other words, it’s the digit that the player clicked on.
The Update function looks a bit different. This is because it needs access to the state, so it is provided with an arrow function that maps the old state to the new state (Nanny State calls these ‘transformer functions’)
In terms of what it’s actually updating, the guess property maps over the original array of three nulls and if the index of the item is equal to the count (the position of guess), the value of null is replaced with the guess (which will be the number of the button the user clicked). If the index is not equal to count, the value of the item is left as it was: null.
It then increments count by 1, allowing the user to input their second guess into the second space.
This is what the row will look like once the user has clicked a few numbers:
The remove event handler is (ironically) almost identical:
const remove = event => {
  Update(state => ({
    guess: state.guess.map((digit,index) => index === state.count - 1 ? null : digit),
    count: state.count - 1
  }))
}
Following the logic of the appear function, you should be able to work out what’s going on here, but don’t worry if not. It updates guess by mapping over the original array, and if the index is equal to the previous number of guesses (i.e. the count – 1), it replaces the value of the item with null, effectively deleting the guess.
And this time, it decrements count by one, allowing the user to continue to make guesses.
Just the check function to go.
The event handler for the ‘Enter’ button is called check, and we want this to (surprise) check whether the user’s guess is correct, but we also want it to reset the guess, so the user can try again.
The function looks like this:
const check = event => {
  Update(state => {
    const numble = state.guess.join("") === state.number
    return {
      feedback: numble ? "NUMBLE!" : "Wrong!",
      guess: Array(3).fill(null),
      count: 0
    }
  })
}
Like before, the Update uses a transformer function and takes state as a parameter, giving us direct access to all the app data held in the state. It then creates a Boolean constant called numble. It may not look like it but state.guess.join("") === state.number is actually a condition (checks if the user’s guess is equal to the number we generated) and if it meets this condition the value of numble will be true and if not, it will be false.
Then it returns three updated properties of the state:
feedbacktakes the Boolean value we’ve just created and if it istrueit sets the value to be the string “NUMBLE!” and if it isfalseit sets the value to be a string “Wrong!”guessis changed back to an array of length 3 filled withnull. This will effectively reset the user’s guess, allowing them to guess againcountis also reset to 0, meaning the program can work as if starting from the beginning.
Our final step is to put some HTML in View so that feedback can be displayed.
A good place to put it is below the guess and above the keyboard. So, your final View should look something like this:
const View = state => html`
<h1>Numble</h1>
${state.started ?
 html`<div id="guesses">
${state.guess.map(number => html`<div>${number}</div>`)}
</div>
<p id="feedback">${state.feedback}</p>
<div id="keyboard">
${state.digits.map((digit,index) => html`<button onclick=${state.appear(index)}>${index}</button>`)}
  <button onclick=${state.remove}>DELETE</button>
  <button onclick=${state.check}>ENTER</button>
</div>
 <button onclick=${state.finish}>END</button>`
:
 html`<button onclick=${state.start}>START</button>`
}`
And if you want you can use feedback to set a message at the start of the game, for example in the start event handler you can add the feedback property with a string value (“Guess 3 digits”):
const start = event => {
  Update({
    started: true,
    number: generateNumber(),
    feedback: "Guess 3 digits"
  })
}
And that’s it! You now have a fully functioning guess the number game!
Before you go on to the second article, there are just a couple of notes about CSS and bugs.
If you want to add your own CSS that’s perfectly fine, but if you just want to focus on the code, you can copy my CSS from the final CodePen demo.
If you’re a good programmer you’ll probably be able to pick up on some bugs here, for example, what if the user clicks ‘Enter’ before they’ve guessed three digits? And if you start playing with it, you’ll definitely be able to notice some more.
They aren’t hard to fix at all, you’ll just need a couple of conditions where appropriate. For example, to fix the problem of checking before there are three digits, in the check function you can write:
const check = event => {
  Update(state => {
    const numble = state.guess.join("") === state.number
    return state.count < 3 ? {
      feedback: "too short"
    }
    :
    {
      feedback: numble ? "NUMBLE!" : "Wrong!",
      guess: Array(3).fill(null),
      count: 0
    }
  })
}
This just checks if the number of guesses is less than 3 and returns different properties with different values accordingly.
We now have a fully functioning ‘Guess the Number’ game and next we will make it more like the full Numble.
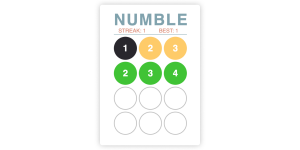
Four Guesses
Our first job is to allow the user 4 guesses. In Wordle, 6 guesses are allowed for a 5-letter word so for Numble we will allow 4 guesses for a three-digit number.
In order to do this we will have to remove the guess property and add two more properties to the State object:
const State = {
  started: false,
  digits: Array(10).fill("grey"),
  guesses: Array(4).fill(Array(3).fill(null)),
  guessCount: 0,
  count: 0,
  start, finish, check, appear, remove,
  View
}
As you can see, we now have a guesses property in place of the guess we had before. The value of guesses is a 2D-array, of 4 arrays, each of length three and filled with null. If you are unfamiliar with the Array.fill() function, it is a shortcut to creating an array meaning we do not have to write out the array in full.
Each of the 4 nested arrays represent one of the 4 guesses the user will make. For example, if the first guess was 123, the guesses array would look like this:
[[1,2,3], [null, null, null], [null, null, null], [null, null, null]]
Every time the user makes a guess, this array will be updated to match the their guess, effectively keeping a record of all the guesses they have made in the game.
Additionally, we have a guessCount property, set with a value of 0. Although similar to the count property, it will allow us to keep track of the number of guesses the user has made.
This diagram should help you visualise and fully understand the need for both the count and the guessCount properties:
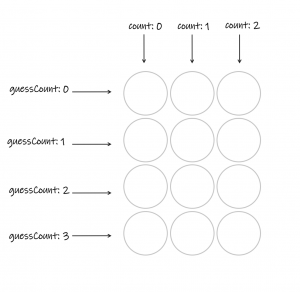
As you can see, guessCount is the index of which nested array the guess is stored in and count is the index of each individual digit of each guess.
Now we need to make some changes to the View function:
const View = state => html`
<h1>Numble</h1>
${state.started ?
 html`<div id="guesses">
${state.guesses.map((guess, i) => html`<div class="row">${guess.map((number,j)=> html`<div class="grey">${number}</div>`)}</div>`)}
</div>
<p id="feedback">${state.feedback}</p>
<div id="keyboard">
${state.digits.map((digit,index) => html`<button onclick=${state.appear(index)}>${index}</button>`)}
  <button onclick=${state.remove}>DELETE</button>
  <button onclick=${state.check}>ENTER</button>
</div>
 <button onclick=${state.finish}>END</button>`
:
 html`<button onclick=${state.start}>START</button>`
}`
This is almost identical to the View we created earlier, however the div with an id of ‘guesses’ has changed. The fact that we are now using a 2D-array to display the 4 guesses like a grid, we are going to need a nested map.
Coding tip: when using a nested map, for the index of each map we will use i for the first map and j for the second. You can use whatever you think is easiest for you, so long as they are not the same!
The first map loops over each guess as a row of the grid. The second map then loops over each individual digit of that guess and displays the relevent HTML to show the digit that has been guessed or an empty circle. With this, your screen should look like this:
This new layout means we also have to change the appear and remove functions. It is relatively simple but again requires a double map.
const appear = guess => event => {
  Update(state => ({
    guesses:  state.guesses.map((array,i) => i === state.guessCount ? array.map((digit,j) => j === state.count ? guess : digit) : array) ,
  count: state.count + 1
  }))
}
We are updating the guesses property here and this is where having the two different count properties is going to become really useful.
The first map checks which row to change: if the index of the array matches to the guess of the user, then the second map can occur, otherwise keep the value the same.
The second map performs the exact same logic as the appear we created in article two.
Just like before, the remove function works almost identically.
const remove = event => {
  Update(state => ({
    guesses: state.guesses.map((array,i) => i === state.guessCount ? array.map((digit,j)=> j === state.count - 1 ? null : digit) : array),
    count: state.count - 1
  }))
}
The first map here again just identifies which guess the user is making and the second follows the same logic as our original remove function.
The count property decrements, however, to ensure the user can re-make the guess.
Finally, we need to make some changes to the check function. This is the function that runs every time the user submits a guess.
const check = event => {
  Update(state => {
    const numble = state.guesses[state.guessCount].join("") === state.number
    return {
      feedback: numble ? "NUMBLE!" : state.guessCount < 3 ? "Keep going..." : `Nope! It was ${state.number}`,
      guessCount: state.guessCount + 1,
      count: 0
    }
  })
}
There are only two things that have changed here and both are in the object returned. The feedback property has some added logic to make the app a bit more dynamic. The feedback will now display a message to let the user know how they are getting on.
In this case we have: if numble is true in other words if the user’s guess is correct, the feedback becomes “NUMBLE”; if numble is false, check if the guess less than three (this essentially checks if the user has made their final guess). If it is, the feedback is “Keep going…”, otherwise it is “Nope! It was (the answer)”.
And that’s it for the first part! You can see the full code in the CodePen demo below.
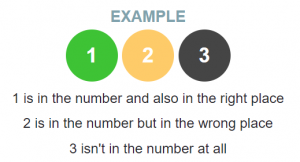
Color logic
As outlined at the very beginning of the article, colors are the main focus of Wordle and therefore Numble. If you haven’t already played Numble or Wordle would highly suggest that you do, in order to properly understand the way the colors work.
This is the example of the coloring system, used by Numble:
After the user makes a guess the colors are updated in two places: the actual guess and on the keyboard. The logic for the two is exactly the same, so we can create an arrow function called getColors that takes the guess and the actual number as parameters .
const getColors = (guess,number) => guess.map((digit,index) => number.includes(digit) ? digit.toString() === number[index] ? "green" : "yellow": "black")
We map over the ‘guess’ array and using the ‘String.includes(item)’ method, we check first if the answer includes the digit of the guess. If it does, then we check if the digit is in the correct place. If it is, the color is assigned “green”. If not, the color is “yellow”. Otherwise, the digit is not in the answer at all, and so the color is “black”.
This arrow function should then return an array with three items being either “green”, “yellow” or “black”, corresponding to each digit in the ‘guess’.
For example, if we called the function using getColors([1,2,3], "327") then the array we should be returned is ["black", "green", "yellow"]
You may notice we had to change the digit to a string. This is because we need to compare it to the answer that is stored as a string, and you cannot compare two elements if they are of different types. Well you can try, but be prepared to enter a whole world of JavaScript Type coercion pain.
Note: Wordle deals with duplicates differently, so if you wanted to make this a bit harder, you could try and mimic Wordle’s method.
For this next part, we don’t have to make any changes or add anything to State, but the View does get a bit more complex. As mentioned briefly in the first article, we are going to be using CSS classes to allow us to change the colors.
const View = state => html`
<h1>Numble</h1>
${state.started ?
 html`<div id="guesses">
${state.guesses.map((guess, i) => html`<div class="row">${guess.map((number,j)=> html`<div class=${state.guessCount > i ? getColors(guess,state.number)[j] : "grey"}">${number}</div>`)}</div>`)}
</div>
<p id="feedback">${state.feedback}</p>
<div id="keyboard">
${state.digits.map((digit,index) => html`<button class=${digit} onclick=${state.appear(index)}>${index}</button>`)}
  <button onclick=${state.remove}>DELETE</button>
  <button onclick=${state.check}>ENTER</button>
</div>
 <button onclick=${state.finish}>END</button>`
:
 html`<button onclick=${state.start}>START</button>`
}`
As you can see, the only two things that have changed are the CSS classes for both the keyboard buttons and the individual sections of each row.
Beginning with the “guesses” div, we have the following logic:
state.guessCount > i ? getColors(guess,state.number)[j] : "grey"
First of all this checks if guessCount is higher than the index, this is to ensure that every time the page is rerendered any previous guesses are recolored. If there needs to be a color, we call the getColors function with the guess the user has made and the answer as parameters and take the item at the index of each digit, j.
Here is what your screen should look like after the user has made one guess:
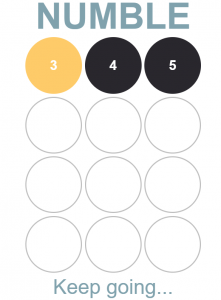
The array from the getColors function is:
["yellow", "black", "black"]
Therefore, the user will now know that 3 is in the number but in the wrong place, and 4 and 5 are not in the number at all.
The keyboard logic is much simpler, but it still uses the same getColor function that we wrote before. Remember before how we filled the digits array with “grey”? Well this is why we did it.
As the keyboard is drawn on the screen, the class is simply the value at the key’s index in the digits array. Later on we will run through how we can change the color, but using the example above after the first guess the digits array should look like this:
["grey", "grey", "grey", "yellow", "black", "black", "grey", "grey", "grey", "grey"]
We’re very nearly there! Our final job is to change the check function.
const check = event => {
  Update(state => {
    const guess = state.guesses[state.guessCount]
    const numble = guess.join`` === state.number
    const colors = getColors(guess,state.number)
    return {
      feedback: numble ? "NUMBLE!" : state.guessCount < 3 ? "Keep going..." : `Nope! It was ${state.number}`,
      digits: state.digits.map((colour,digit) => guess.includes(digit) ? colors[guess.indexOf(digit)] : colour),
      guessCount: state.guessCount + 1,
      count: 0
    }
  })
}
In the Update function, there are two more constants. This just makes it easy for the logic in the returned object.
We have guess which is the array of three digits the user has just guessed (hence the use of state.guessCount). We also have numble from before, but this time using the guess constant we just created. This just helps having cleaner code and avoiding repetition. Finally, we have colors which is the array returned when the getColors function is run with the users current guess and the answer.
This will update the digits array and ensure that the digits on the keyboard get colored correctly after each guess.
Now, the return object is identical to the one above but we’re also updating the digits property.
state.digits.map((color,digit) => guess.includes(digit) ? colors[guess.indexOf(digit)] : color)
This is our final mapping function! And it essentially checks if the number on the keyboard (which is the digit) is in the guess. If it is the current color should be replaced by the color generated from the getColors function, otherwise the color should remain the same.
Using the same guess as above, we can see what the keyboard should look like:
And that’s it! A fully functional version of Numble!
Again, here’s what the code should look like in its entirety:
In the actual version of Numble, I added a number of features just to make the game even more dynamic. If you want to challenge yourself and add some extra features here are some suggestions from the my final version of Numble:
- Play again – allow the user to play as many times as they want or make it so there’s only one challenge per day
- Streak – that keeps track of how many correct answers you have in a row
- Best streak – the longest streak the user has kept
- Dark mode – more of a CSS challenge but interesting nontheless
- Display Statistics – a breakdown of how many guesses it took the user for every game
- Share feature – lets users share their best streak
I really hope you had as much fun making Numble as I did!
Frequently Asked Questions (FAQs) about Numble
What is Numble and how does it work?
Numble is a fun and challenging game that combines numbers and puzzles. The game presents you with a 5×5 grid filled with numbers and your task is to find a sequence of adjacent numbers that add up to the target number. The numbers can be connected vertically, horizontally, or diagonally. The game continues until all the numbers on the grid have been used or no more valid sequences can be found. It’s a great way to exercise your brain and improve your number skills.
How is Numble different from Wordle?
While both Numble and Wordle are puzzle games, they are fundamentally different in their gameplay. Wordle is a word-based game where you guess a five-letter word within six attempts. On the other hand, Numble is a number-based game where you find sequences of numbers that add up to a target number. Both games require strategic thinking and problem-solving skills, but Numble also involves mathematical calculations.
Can I play Numble on my mobile device?
Yes, you can play Numble on any device with an internet connection. The game is designed to be responsive, meaning it adjusts to fit the screen size of your device, whether it’s a desktop, laptop, tablet, or smartphone. This makes it easy to enjoy Numble wherever you are, whenever you want.
Is there a time limit in Numble?
No, there is no time limit in Numble. You can take as much time as you need to find the number sequences. This allows you to fully engage with the game and develop your number skills at your own pace. However, if you’re looking for a challenge, you can try to complete the game as quickly as possible and beat your own record.
How can I improve my Numble skills?
The best way to improve your Numble skills is through practice. The more you play, the better you’ll become at spotting number sequences and developing strategies. It can also be helpful to familiarize yourself with common number combinations that add up to the target numbers. Additionally, try to stay patient and focused, as rushing can lead to mistakes.
Is Numble suitable for children?
Yes, Numble is suitable for children. It’s a fun and educational game that can help children improve their number skills and problem-solving abilities. However, as the game can be challenging, it may be more suitable for older children who have a good understanding of addition.
Can I play Numble offline?
Currently, Numble is a web-based game that requires an internet connection to play. However, you can play it anytime, anywhere as long as you have access to the internet.
Is there a multiplayer mode in Numble?
At the moment, Numble is a single-player game. You play against yourself, trying to use all the numbers on the grid or achieve the highest score possible. This allows you to focus on improving your own skills and beating your personal best.
How is the score calculated in Numble?
In Numble, your score is calculated based on the number of sequences you find and the length of these sequences. The longer the sequence, the higher your score. This encourages you to find longer sequences and adds an extra layer of strategy to the game.
Are there any tips for playing Numble?
When playing Numble, it’s important to plan your moves carefully. Try to find longer sequences as they give you a higher score. Also, consider the position of the numbers on the grid. Using numbers in the middle of the grid early on can limit your options later in the game. Lastly, practice regularly to improve your number skills and game strategy.
Olivia Gibson is a student of Maths and Computer Science. Over the past year, she has immersed herself in the world of web development and loves coding in JavaScript and Python. Some of her highlights include, Numble and German Flashcards.