Building an aircraft radar system in JavaScript
29/08/2022A few years ago, I came across this awesome talk by Thomas Watson in which he talks about how he built AirplaneJS, a web app that picks up ADS-B radio signals from airplanes and plots them in real time on a map in the browser. I had no idea this was possible in JavaScript so I started looking into it.
I played around with the project and started wondering if there was a way I could push it a little bit further. Considering AirplaneJS uses Node.js on the server, I decided to experiment to see if I could make it work using Web USB to turn it into a front-end only project. I finally got it to work a few weeks ago 🥳 so decided to write about it.
I'm still learning a lot about the USB protocol and how to decode ADS-B signals so this post won't dive too deep into the topic.
Before I start, here's a demo:
Here's the link to the demo site
The RTL-SDR dongle
The main components of this project include the Web USB API, a RTL-SDR dongle + antenna, and some JavaScript code.
Nowadays, most planes broadcast ADS-B data, that stands for Automatic Dependent Surveillance-Broadcast. It is a surveillance technology that allows aircrafts to broadcast their flight state without being interrogated to, meaning it needs no input from pilots. This data indicates the aircraft's location, latitude, longitude, speed, code, etc. They transmit this data periodically to air traffic controllers, however, using a Software Defined Radio dongle with an antenna, you can intercept these messages to make your own aircraft radar system 📡.
There are different types of antennas you can buy or build but I personally used a dipole antenna.
As the data is broadcasted at a frequency of 1090 MHz, the size of the dipole needs to be calculated with the following formula:
In feet:

Total length = 468 / Frequency in MHz // Gives the total lengh of the dipole

Length of each branch = Total length / 2

---

In cm:

Total length = 14264 / Frequency in MHz // Gives the total lengh of the dipole

Length of each branch = Total length / 2
There's an online calculator available if it's easier.
For this project, it gives me a total length of roughly 13cm so each part of the dipole should be about 6.5cm.
Connecting to the dongle via Web USB
The Web USB API is a browser API that allows you to connect and communicate with devices plugged into your computer via USB.
To use it, you need to start by checking if your browser supports it. You can do so with the following code:
if(navigator.usb){
    console.log("The Web USB API is supported!")
} else {
    console.log("I'm afraid this won't work")
}
Then, you need to indicate which device you’d like your app to connect to. You can list all currently connected devices, or you can specify a filter in which you pass the device’s vendor ID and product ID. On a Mac, you can find these IDs by plugging the device into your computer, clicking on the apple icon > About this Mac > System Report, and looking in the list under Hardware > USB.
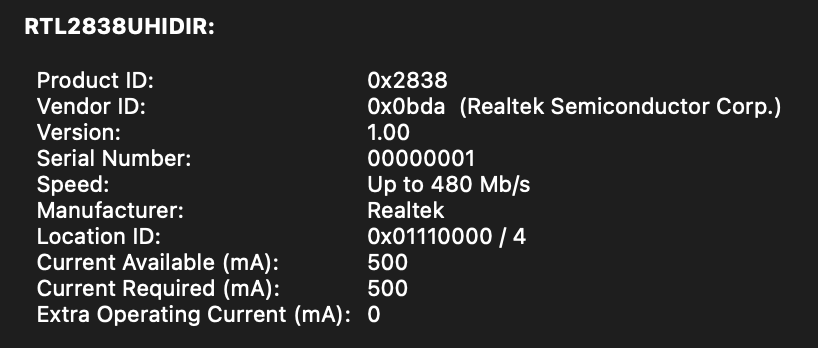
The image above indicates that the vendor ID is 0x0bda and the product ID is 0x2838 so I could use that in the code.
For security reasons, the Web USB API needs to be triggered by a user interaction, so I have a button on the screen to start the connection process.
The first method to call on navigator.usb is requestDevice:
button.onclick = () => {
  navigator.usb
    .requestDevice({
      filters: [
        {
          vendorId: 0x0bda,
          productId: 0x2838,
        }
      ],
    })
};
It returns a promise with the device selected in the list. The next steps are to open a session with this device, select a configuration and claiming an interface:
.then((device) => device.open());
.then(() => device.selectConfiguration(1))
.then(() => device.claimInterface(0))
The configuration and interface are device specific. I couldn't find information online about the particular device I'm using so I tried different values until it worked...
Once these steps execute successfully, the device should be connected. Now, the frequency and sample rate need to be set.
For this, I relied on the awesome rtlsdrjs library by Sandeep Mistry. If you decide to use it to create a similar project, I used 1090000000 as the frequency (for 1090MHz) and 2000000 as the sample rate.
Finally, the transferIn method executes when data is received from the device.
.transferIn(1, 256000)
.then((result) => {
    const data = new Uint8Array(result.data.buffer);
    console.log(data);
})
This code returns raw data that looks like this:
Once processed and formatted, it looks like this:
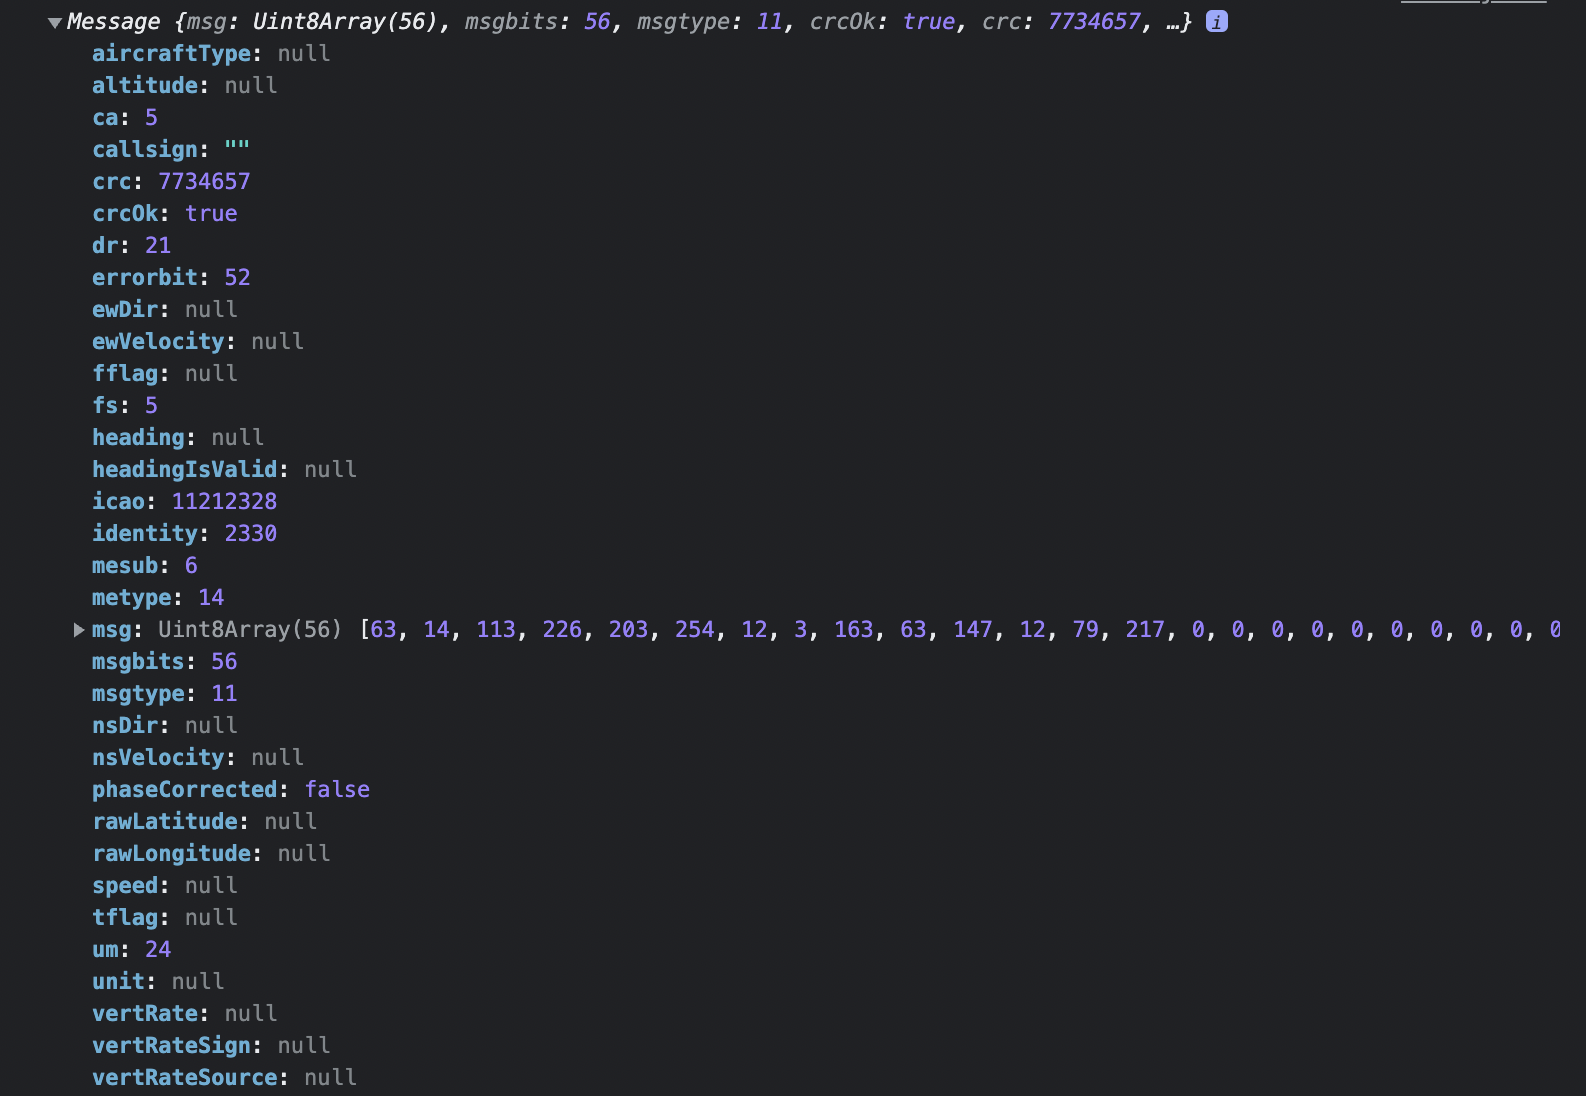
Processing raw ADS-B data
This part of the project relies a lot on existing work. I need to dive deeper into how the Mode S communication protocol works to decode the data but this guide to decoding Mode-S and ADS-B signals seems to be a very good start.
So far, from what I understand, ADS-B messages have 2 main parts, a preamble and a data block. The data block consists of 112 bits organised in 5 sections:
+----------+----------+-------------+------------------------+-----------+
|  DF (5)  |  CA (3)  |  ICAO (24)  |         ME (56)        |  PI (24)  |
+----------+----------+-------------+------------------------+-----------+- DF: Downlink Format
- CA: Transponder Capability
- ICAO Aircraft address
- ME: Message
- PI: Parity ID
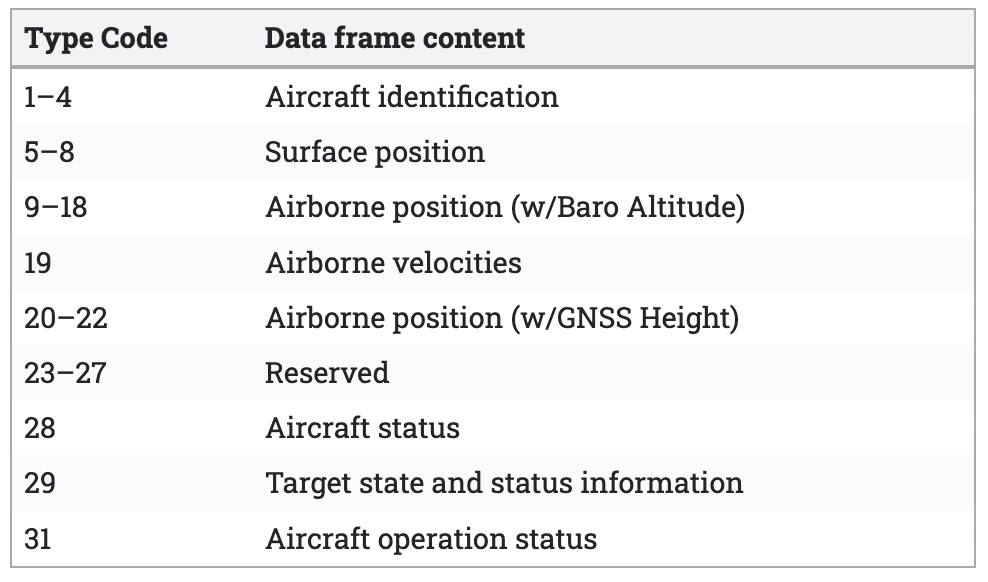
Bits 33-88 are dedicated to the message. Without going into too much detail, the first 5 bits of this section indicate the type code. If this type code is between 1 and 4, the ADS-B message is an Aircraft identification message, if the type code is between 5-8, the message is a surface position message, etc. This type code matters because it indicates what the rest of the message relates to.
An example of raw ADS-B message in hexadecimal format looks like this:
8D4840D6202CC371C32CE0576098In binary, it translates to:
1000110101001000010000001101011000100000001011001100001101110001110000110010110011100000010101110110000010011000If you're following, you can maybe guess how many bits this is...
...
...
...
112!
If we use the table shown previously, we can split this binary into the respective sections:
+--------+--------+--------------+-------------------------+-------------------+
| DF (5) | CA (3) |   ICAO (24)  |         ME (56)         |      PI (24)      |
+--------+--------+--------------+-------------------------+-------------------+
| 10001  | 101    | 010010000100 | 00100000001011001100001 | 01010111011000001 |
|        |        | 000011010110 | 10111000111000011001011 | 0011000           |
|        |        | 000011010110 | 0011100000              |                   |
|        |        |              |                         |                   |
+--------+--------+--------------+-------------------------+-------------------+
It makes it a little easier to read, but now we can also convert each of these into decimal:
+--------+--------+--------------+-------------------------+-------------------+
| DF (5) | CA (3) | ICAO (24) | ME (56) | PI (24) |
+--------+--------+--------------+-------------------------+-------------------+
| 17 | 5 | 4735190 | [4]... | ... |
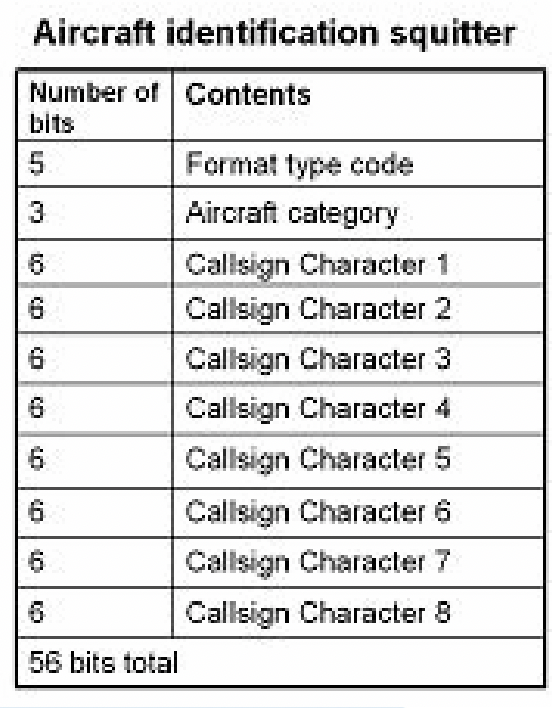
+--------+--------+--------------+-------------------------+-------------------+The first 5 bits of the message give the decimal value 4, which means this is an aircraft identification message. From there, if I understand well, the rest of the message should contain data about the aircraft category and its callsign, according to this table I found.
Using this data, you can use online tools like planespotters.net and search for the ICAO code to get more info about the airplanes you're tracking.
After processing all this data, the result is a JSON object containing information such as altitude, latitude, longitude, etc.
Check out the repo if you want.
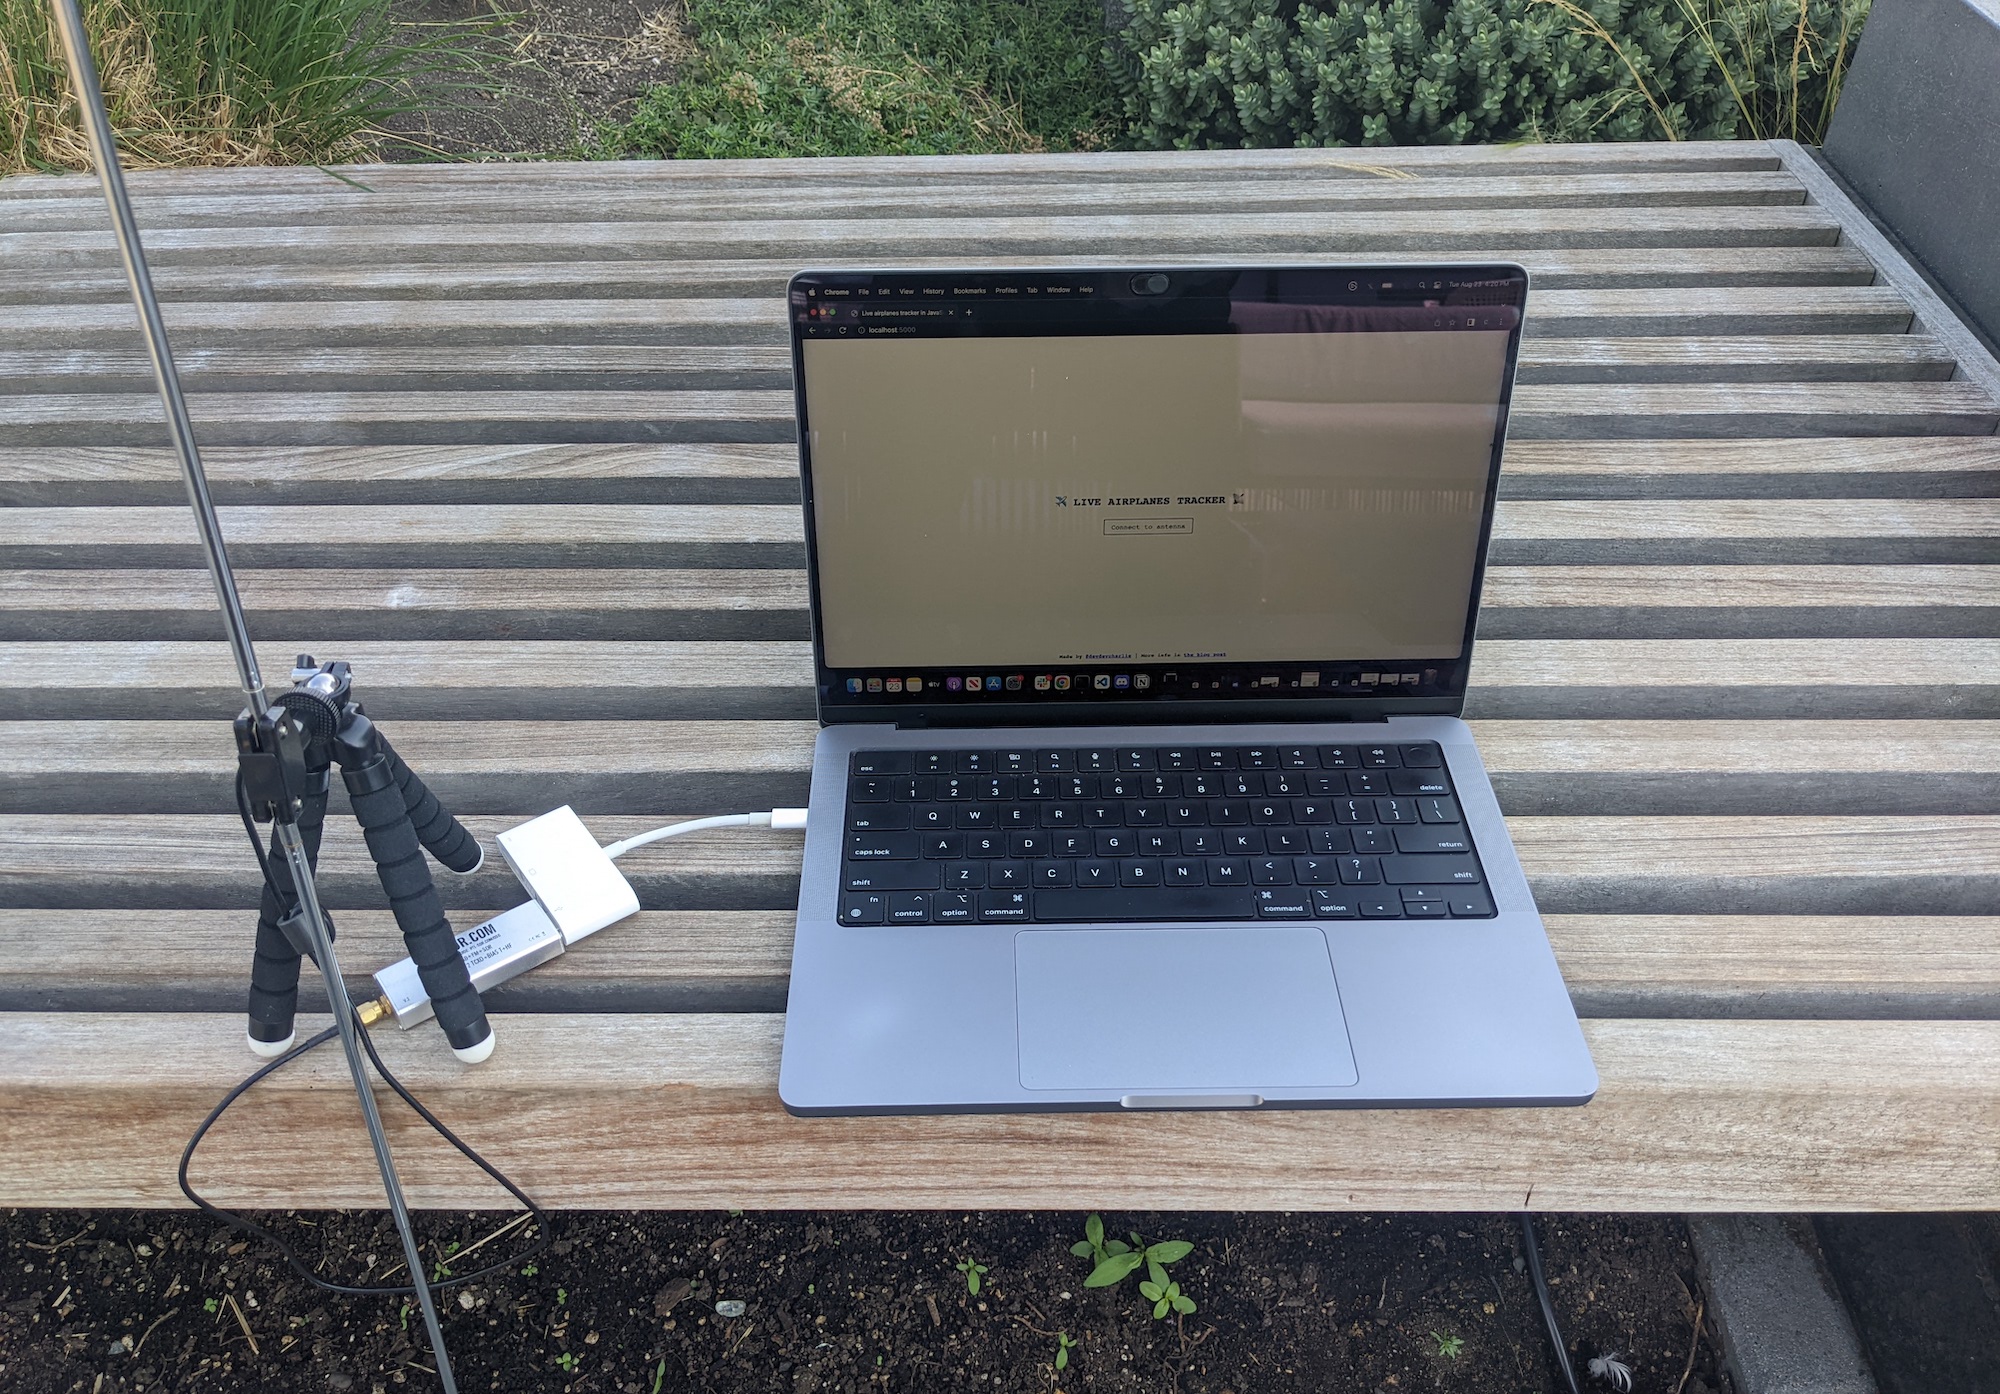
Final setup
In the end, this is what my setup looks like:
And here's another demo:
—-
This post wasn't a deep dive but hopefully it made sense!
I’m really super happy I was able to get this project to work using Web USB, it's something I've wanted to do for years!
I still gotta learn more about it but I have a few other ideas of projects I want to build around the same technology, I’m pretty excited! It just takes a lot of time to dive into something I know nothing about 😅...
Additional resources
-
The 1090 Megahertz Riddle (2nd edition) - Amazing online resource to learn how to decode Mode S data.