In this post we are going to build a desktop based chat application named vTak. We will use node-webkit to power the core desktop app and Firebase as our realtime data store. We will be using a slush generator named slush-wean to scaffold a basic node-webkit/Express/Angular app. The final product will look something like the following figure.

Prerequistes
If you are new to node-webkit, please refer to the following resources:
Node Webkit – Build Desktop Apps with Node and Web Technologies Node Webkit powered Dashboard application Node webkit and Angularjs – A MovieStub App
If you are new to Firebase, you should check out the following resources:
I would recommend using Sublime text while working with node-webkit apps. Refer here for more information.
The Application
As mentioned earlier, we are going to build a Chat application named vTak with node-webkit, Firebase, and Angular. vTak will allow the users to login by registering or by using social authentication providers like Twitter, Google, and Facebook. For this we will be leveraging Firebase’s Simple Login. Once the user is logged in, we will show a list of chat rooms to join. Once the user selects a room, we will connect the user to that room and fetch all the chat messages. Then then user can begin chatting.
Getting Started
To build the application base, we are going to leverage a slush generator named slush-wean. This will scaffold a basic node-webkit app for us with Express and Angular integration.
Create a new folder named vTak and open a new terminal/prompt here. First we will install gulp, slush and slush-wean globally using the following command:
$ npm i -g gulp slush slush-weanTo scaffold the wean app, run slush wean. Complete the scaffolding by entering the project name as vTak. Slush will take a moment to setup the project and download the required dependencies. To run the app, execute gulp run.
gulp run will trigger node-webkit-builder to fetch the required libraries to run the node-webkit app, so you need not worry about it. This is a one time process and will take up to 5 minutes. Once the download is completed, the dekstop app will launch.
When the app launches, you will see a splash screen for about 3 seconds and then the home page appears. If you checkout the scaffolded project, you should see the following structure:
.
├── app.js
├── gulpFile.js
├── index.html
├── package.json
├── public
│   ├── css
│   │   ├── app.css
│   │   └── bootstrap.css
│   ├── fonts
│   │   ├── ...
│   ├── js
│   │   └── app.js
│   ├── lib
│   │   ├── angular-resource.min.js
│   │   ├── angular-route.min.js
│   │   ├── angular.min.js
│   │   ├── bootstrap.min.js
│   │   └── jquery.min.js
│   └── partials
│       └── head.html
├── routes
│   └── index.js
└── views
    └── index.ejs
A quick overview:
- app.js : Express server configuration
- gulpFile.js : Task runner
- index.html : Application main page/splash screen
- public folder : static resources (client side – our app will be developed here)
- routes : Express routes
- view : Initial view for our Angularjs application, served by Express
Our first step is to set up the authentication. To keep this post simple, I have written another post named node-webkit and Firebase – Simple and Social Authentication. You can follow the post to integrate authentication with our node-webkit app.
I will be continuing from the output of the above post. You can either build the app from the above post or you can clone the ng-auth folder from this repo. Once you clone/download the repo, clear the contents of the vTak folder and copy the contents of ng-auth to vTak.
Note: We are going to use the Angular version from the above post.
Once you copy the contents, run npm i to install dependencies. Next, open gulpFile.js and comment/uncomment the tasks as per your OS. Finally open /public/js/controllers.js and update line 5 to read:
var ref = new Firebase('https://nwkchatapp.firebaseio.com/');If you wish, you can configure your own Firebase account. What ever approach you have followed, your final project structure should be:
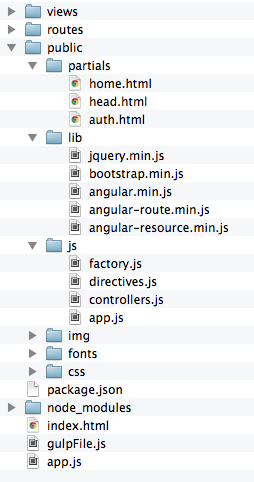
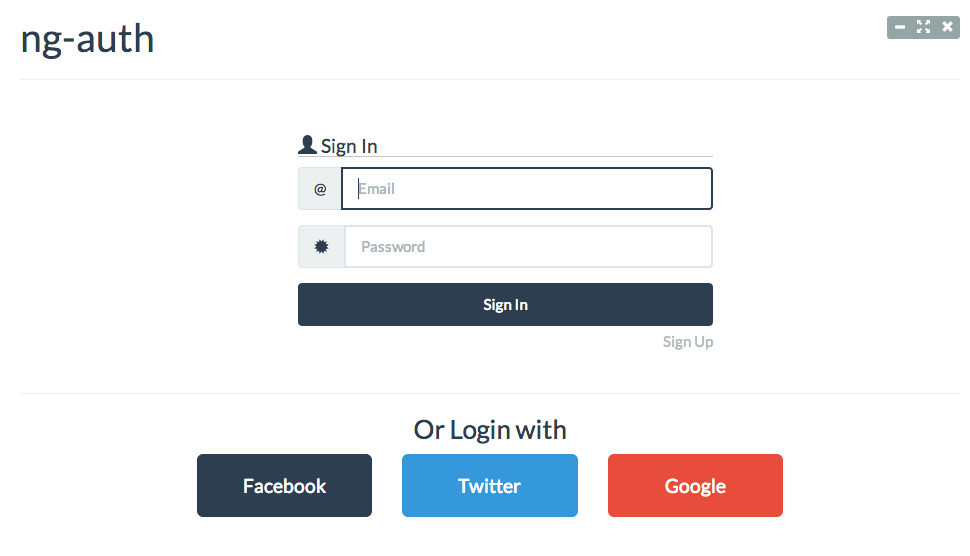
And, when you run the app (gulp run), you should see the following login screen.
Continue Development
You can update the application name to vTak in index.html and package.json.
Next, we will download the required Firebase files. Download firebase.js, angularfire.min.js and firebase-simple-login.js and dump them inside the public/lib folder.
Update views/index.ejs as shown below.
<!DOCTYPE html>
<html ng-app="ng-auth">

<head>
  <title>vTak</title>
  <link rel="stylesheet" href="css/bootstrap.css">
  <link rel="stylesheet" href="css/app.css">
  <script src="lib/angular.min.js"></script>
  <script src="lib/angular-route.min.js"></script>
  <script src="lib/angular-resource.min.js"></script>
  <script type="text/javascript" src="lib/firebase.js"></script>
  <script type="text/javascript" src="lib/firebase-simple-login.js"></script>
  <script type="text/javascript" src="lib/angularfire.min.js"></script>
  <script type="text/javascript" src="lib/jquery.min.js"></script>
  <script type="text/javascript" src="lib/bootstrap.min.js"></script>
  <script src="js/app.js"></script>
  <script src="js/factory.js"></script>
  <script src="js/controllers.js"></script>
  <script src="js/directives.js"></script>
</head>
</head>

<body>

  <div class="container" ng-controller="AppCtrl">
    <div ng-include src="'partials/head.html'"></div>
    <hr/>
    <ng-view></ng-view>
  </div>
</body>

</html>
Now, we will clean up the home page (the page the user is directed to following login) of the application a bit. Open public/partials/head.html and update it as shown below:
<div class="header" ng-controller="Toolbar">
  <div class="btn-group pull-right">
    <a href="#" class="btn btn-xs btn-default" ng-show="user" ng-click="logoutUser()">Logout</a>
    <button ng-click="minimize()" type="button" class="btn btn-default btn-xs">
      <span class="glyphicon glyphicon-minus"></span>
    </button>
    <button ng-click="toggleFullscreen()" type="button" class="btn btn-default btn-xs">
      <span class="glyphicon glyphicon-fullscreen"></span>
    </button>
    <button ng-click="close()" type="button" class="btn btn-default btn-xs">
      <span class="glyphicon glyphicon-remove"></span>
    </button>
  </div>
  <h1>vTak</h1>
</div>
We have moved the logout button from the body of the page to the header, next to the window action icons.
Next, open public/js/controllers.js and update the AppCtrl as shown below:
ngAuth.controller('AppCtrl',
  function($rootScope, $scope, $window, $firebaseSimpleLogin) {
    $rootScope.URL = 'https://nwkchatapp.firebaseio.com/';
    var ref = new Firebase($rootScope.URL);
    $rootScope.authClient = $firebaseSimpleLogin(ref);

    $rootScope.redirect = function(user) {
      if ($window.location.href.indexOf('home') < 0)
        $window.location.assign('http://localhost:3000/#home');

      if (user.provider == 'password') {
        user.name = user.email;
        user.img = '/img/user.png'
      } else if (user.provider == 'facebook') {
        user.name = user.displayName;
        user.img = user.thirdPartyUserData.picture.data.url;
      } else if (user.provider == 'twitter') {
        user.name = user.displayName;
        user.img = user.thirdPartyUserData.profile_image_url;
      } else if (user.provider == 'google') {
        user.name = user.displayName;
        user.img = user.thirdPartyUserData.picture;
      }

      $rootScope.user = user;
    };

    $rootScope.$on('$firebaseSimpleLogin:login', function(e, user) {
      if (user) {
        $rootScope.redirect(user);
      }
    });
  }
)
There are two changes in this code. First, we have moved the Firebase URL to a variable. Second, we have unified the user object’s user name and image across multiple service providers. You can download the user image here.
Next, we will move the logout functionality into the Toolbar controller. Update the Toolbar controller in public/js/controllers.js like this:
controller('Toolbar', ['$rootScope', '$scope', 'Window',
  function($rootScope, $scope, Window) {
    $scope.minimize = function() {
      Window.minimize();
    };

    $scope.toggleFullscreen = function() {
      Window.toggleKioskMode();
    };

    $scope.close = function() {
      Window.close();
    };

    $scope.logoutUser = function() {
      $rootScope.user = '';
      $rootScope.authClient.$logout();
    };
  }
])
If you re-run the app now, post login, you will see that the logout is moved to top. You will also see a logout in the center of the page, which we will deal with in a moment.
Now, we are going to work on the home page. When the user logs into vTak, we will show the user a list of chat rooms, and we will provide an option to create one of their own. We will update the markup of public/partials/home.html as shown below:
<div class="container" ng-controller="HomeCtrl">
  <label class="pull-right welcome-panel" ng-show="user">
    Welcome, <u>
        <span id="email">{{user.name}}</span></u>
    <img class="prof-img" ng-src="{{user.img}}" width="39" />
  </label>
  <br/>
  <h3 class="room-head">Chat Rooms
    <a href="javascript:" class="btn btn-xs btn-primary" ng-hide="isNew == true" ng-click="isNew = true; roomName = ''; ">New Room</a>
    <input ng-show="isNew == true" class="input-sm form-control cust-text" type="text" ng-model="roomName" placeholder="Room Name" />
    <a href="javascript:" ng-disabled="!roomName" ng-show="isNew == true" class="btn btn-xs btn-info" ng-click="newRoom()">Create</a>
  </h3>

  <input type="text" class="form-control" placeholder="Search Rooms" ng-model="search">
  <div class="rooms">
    <div ng-repeat="item in rooms | filter:search" class="room">
      <h3>{{item.roomname}}</h3>By : {{item.createdby}}
      <a class="btn btn-primary btn-xs pull-right join-room" href="javascript:" ng-click="joinChat($index)">Join</a>
      <a class="btn btn-danger btn-xs pull-right" ng-show="user.name == item.createdby" ng-click="deleteRoom($index)">Delete</a>

    </div>
    <div class="room" ng-show="rooms.length == 0">
      <h3>No Rooms Available. Create your own!</h3>
    </div>
  </div>

</div>- One line 2, we show the user’s display name and profile image. We have gathered this information in the
AppCtrlonce the user is logged in. - On line 8, we provide a button to create a new room. Once the user clicks on it, we hide the create button and show a text box and save button. Once the user saves the room, it will appear in the list populated on line 16.
- On line 14, we have a search bar, where a user can search the available rooms.
- Also do notice line 19. if the current logged in user is same as the user who has created the room, we show the delete button.
Do notice that all the related JavaScript code will be handled in HomeCtrl. Open public/js/controllers.js and navigate to the very bottom to find the HomeCtrl. Update it as shown below:
.controller('HomeCtrl', function($rootScope, $scope, $firebase, $location) {
  var ref = new Firebase($rootScope.URL + 'chatRooms');
  var sync = $firebase(ref);

  $scope.rooms = sync.$asArray();

  $scope.newRoom = function() {
    sync.$push({
      createdby: $rootScope.user.name,
      roomname: $scope.roomName,
      createddate: Date.now()
    });
    $scope.isNew = false;
  };
  $scope.deleteRoom = function(room) {
    sync.$remove($scope.rooms[room].$id);
  };

  $scope.joinChat = function(room) {
    $location.path('/chat/' + $scope.rooms[room].$id);
  };
})- Line 2 – We create a new reference to the
chatRoomsand sync it on line 3. - Line 4 – We query the Firebase datastore and populate all the rooms listed in
chatRoomsas an Array. - Line 8 – When a user creates a new room, we use the push method to save the required details.
- Line 15 – When a user deletes a room
- Line 19 – When the user wants to join a room, we redirect them to a new path. (which we will create soon)
Finally, add the required styles. Open public/css/app.css and add the following classes:
body {
  overflow-x: hidden;
}

.room-head {
  margin-top: -35px;
  border-bottom: 2px solid #CCC;
  padding: 20px 20px 8px;
}

.prof-img {
  vertical-align: bottom;
}

.welcome-panel {
  padding-right: 20px;
}

.cust-text {
  width: 22%;
  display: initial;
  vertical-align: middle;
  margin-left: 11px;
}

.rooms,.messages {
  border: 1px solid #e8e7e8;
  margin: 20px;
}

.room {
  border: 1px solid #c7c7c7;
  margin-bottom: -1px;
  background: #fff;
  -webkit-transition: background .5s;
  padding: 10px;
}

.room:hover {
  background: #e6e6e6;
}

.join-room {
  margin-left: 5px;
}

.messages {
  height: 377px;
  overflow: auto;
  border: 1px solid #e8e7e8;
}

.message {
  border-bottom: 1px solid #c7c7c7;
  background: #fff;
  height: 75px;
  -webkit-transition: background .5s;
  padding: 3px 3px 3px 10px;
}

.message img {
  vertical-align: baseline;
  margin-right: 9px;
}

.chat-input {
  position: absolute;
  bottom: 0;
  width: 93%;
  text-align: center;
  margin-bottom: 14px;
  padding-left: 8px;
}

.back-btn {
  vertical-align: bottom;
  margin-left: 20px;
}
Save all the files and re-run the app. If you have not logged out the last time, our authentication logic will take care of redirecting to the home page. You can click the ‘New Roombutton and create a new room. The newly created room will auto-magically appear in the list below.
If you wish to debug the application, you can set toolbar and frame to true in package.json.
Now that we have created a new room, let’s write the logic to join the room and begin chatting with all the users in it. For this, we will create a new route. Open public/js/app.js and add the following route:
$routeProvider.when('/chat/:roomid', {
  templateUrl: 'partials/chat.html',
  controller: 'ChatCtrl'
});
Next, create a new file named chat.html inside the public/partials folder. This file has the template for the chat view. Update it as shown below:
<div class="container" ng-controller="ChatCtrl">
  <label class="pull-right welcome-panel" ng-show="user">
    <a href="/#/home" class="btn btn-info btn-xs back-btn">Back</a>
    Welcome, <u>
        <span id="email">{{user.name}}</span></u>
    <img class="prof-img" ng-src="{{user.img}}" width="39" />
  </label>
  <br/>

  <h3 class="room-head">Welcome to {{roomInfo.roomname}}</h3>

  <div class="messages" scroll-glue>
    <div ng-repeat="msgs in chatMessages" class="message">
      <h4>
        <img ng-src="{{msgs.userimg}}" width="20" />{{msgs.message}}
      </h4>
      <span>{{msgs.postedby}}
        <small class="text-muted">{{msgs.posteddate | date:'yyyy-MM-dd HH:mm:ss'}}</small>
      </span>
    </div>
    <div class="message" ng-show="chatMessages && chatMessages.length == 0">
      <h4>No message yet!</h4>
    </div>
  </div>
  <div class="chat-input">
    <input type="text" class="form-control" placeholder="Send Message" ng-model="message" ng-keypress="sendMessage($event)" autofocus>
  </div>

</div>
Things to notice:
Line 12 – will hold all the messages. Do notice the scroll-glue directive, which will take care of automatically scrolling the chat pane to the last message. (We will add and include this reference in a moment)
Line 26 – Input box to enter the message.
Now, download scroll-glue from here and dump it into the public/lib folder. Next, update public/js/app.js module dependencies as shown below.
var ngAuth = angular.module('ng-auth', ['ngRoute', 'ngResource', 'firebase', 'luegg.directives']).config(['$routeProvider',
  function($routeProvider) {
    $routeProvider.when('/', {
      templateUrl: 'partials/auth.html',
      controller: 'AuthCtrl'
    });
    $routeProvider.when('/home', {
      templateUrl: 'partials/home.html',
      controller: 'HomeCtrl'
    });
    $routeProvider.when('/chat/:roomid', {
      templateUrl: 'partials/chat.html',
      controller: 'ChatCtrl'
    });
    $routeProvider.otherwise({
      redirectTo: '/'
    });
  }
]);
Update views/index.ejs to include scrollglue.js:
<script type="text/javascript" src="lib/scrollglue.js"></script>In public/js/controllers.js, we will add the logic to manage the chat. Add the following code to the end of all controllers:
.controller('ChatCtrl', function($rootScope, $scope, $firebase, $routeParams) {
  // get room details
  var chatRoom = new Firebase($rootScope.URL + 'chatRooms/' + $routeParams.roomid);
  var roomSync = $firebase(chatRoom);
  $scope.roomInfo = roomSync.$asObject();

  var msgsSync = $firebase(chatRoom.child('chatMessages'));
  $scope.chatMessages = msgsSync.$asArray();

  $scope.sendMessage = function($event) {
    if (!($event.which == 13)) return;
    if ($scope.message.length == 0) return;

    msgsSync.$push({
      postedby: $rootScope.user.name,
      message: $scope.message,
      posteddate: Date.now(),
      userimg: $rootScope.user.img
    });

    $scope.message = '';
  };
});
Things to notice:
Line 3 – We create a new Firebase reference to the Chat room
Lines 4 and 5 – We create an AngularFire reference and then sync it as an object
Line 7 – we create a reference to the chat messages object inside the chat room
Line 8 – We sync/fetch all the message
Line 14 – we push the chat message to the server, with some additional data.
Save all files and run the app. Now when you click on join, you should see the new view we have created. Add a new message and you can see the chat window update. If you want to test the chat out, (with the vTak app running) open a browser and navigate to http://localhost:3000. Login with a service provider, same or different from the one you have already logged in and you can chat with yourself.
Simple and easy!!
Distributing the app
You can create native installers and distribute the app. Execute the following command to build an OSX installer:
$ gulp build-osxOr, create a Windows installer using the following command:
$ gulp build-winOr, create a Linux installer using the following command:
$ gulp build-linuxConclusion
Hope you got a basic idea on how to build an end to end app using node-webkit and Firebase. You can find the complete code for this article on GitHub.
Thanks for reading. Comments are appreciated.
Frequently Asked Questions on Building a Chat App with Node-Webkit, Firebase, and AngularJS
How can I integrate a chat feature in my AngularJS application?
Integrating a chat feature in your AngularJS application involves several steps. First, you need to set up your AngularJS environment. This includes installing Node.js and npm, and then using npm to install AngularJS. Once your environment is set up, you can start building your chat application. You’ll need to create a new AngularJS module for your chat feature, and then create a controller for that module. The controller will handle all the logic for your chat feature, such as sending and receiving messages, and updating the chat interface. You’ll also need to create a view for your chat feature, which is the HTML template that will be used to display the chat interface to the user. Finally, you’ll need to integrate your chat feature with Firebase, which will handle the real-time data synchronization between different users of your chat application.
What is the role of Firebase in building a chat app?
Firebase plays a crucial role in building a chat app. It provides a real-time database and backend as a service. The service provides an API that allows developers to store and sync data across multiple clients. In the context of a chat app, Firebase can be used to store chat messages and sync them in real-time across all connected devices. This means that when a user sends a message, it is immediately available to all other users without any need for refreshing or polling. Firebase also handles user authentication, ensuring that only authorized users can send and receive messages.
How can I use Socket.IO in creating a real-time chat app with Angular?
Socket.IO is a JavaScript library that enables real-time, bidirectional, and event-based communication between the browser and the server. It consists of a Node.js server and a JavaScript client library for the browser. To use Socket.IO in creating a real-time chat app with Angular, you first need to install it via npm. Then, in your server-side code, you can require the Socket.IO module and use its functions to listen for and emit events. On the client side, you can include the Socket.IO client library in your Angular app and use it to listen for and emit events to the server. These events can represent various actions in your chat app, such as a user sending a message or joining a chat room.
How can I build an Angular chat app using SendBird SDK?
SendBird provides a chat SDK for Angular that you can use to build a chat app. The SDK provides a set of APIs that allow you to implement various chat features, such as one-on-one messaging, group messaging, and channels. To use the SendBird SDK, you first need to create a SendBird account and create a new application in the SendBird Dashboard. Then, you can install the SendBird SDK via npm and import it into your Angular app. You can then use the SDK’s APIs to implement your chat features. For example, you can use the SendBird.OpenChannel class to create a new open channel, and the SendBird.OpenChannel.createMessage method to send a message in that channel.
How can I use Stream’s Chat API to build an Angular chat app?
Stream provides a Chat API that you can use to build a chat app in Angular. The API provides a set of endpoints that allow you to implement various chat features, such as channels, messages, and users. To use the Stream Chat API, you first need to create a Stream account and create a new application in the Stream Dashboard. Then, you can install the Stream Chat JavaScript library via npm and import it into your Angular app. You can then use the library’s functions to interact with the Stream Chat API. For example, you can use the streamChatClient.channel function to create a new channel, and the channel.sendMessage function to send a message in that channel.
 Arvind Ravulavaru
Arvind Ravulavaru is a passionate web developer, likes experimenting with new and upcoming technologies. He also blogs at http://thejackalofjavascript.com.