The Backstory
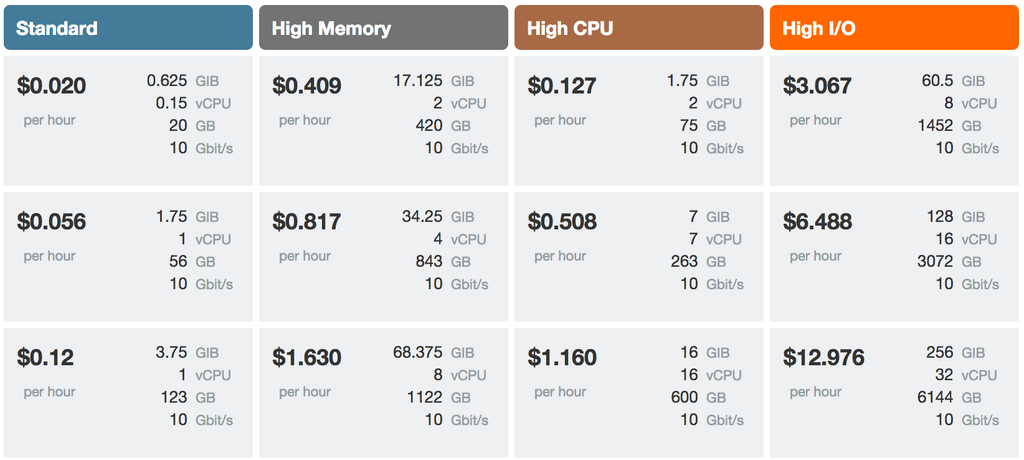
I will be the first person to admit that I love pretty things. A lot of what I do is cause and effect from seeing something really awesome and then being compelled to go build some version of it. The pricing menu at Joyent completely captured my attention the first time I saw it. The most outstanding feature is how the category that your mouse is on is given emphasis across all of the instances so it is easy to compare features.
In this blog post, we are going to build out a similar menu in AngularJS and learn about some of the crazy things you can do with AngularJS templates.
Demo CodeThe Data
Mocking out the data was easily the most time consuming part of the entire project. To set context, the two arrays that make up the model are larger than any other piece of what we will be building. It’s all downhill from here friends!
The only thing I want to point out in the InstanceService is that you have a categories array and an instances array with a category property on the instance objects that coincides with a category name. We are going to use this intersection in just a moment to control our layout.
angular.module('website', ['ngAnimate'])
.controller('MainCtrl', function ($scope, $window, InstanceService) {
$scope.categories = InstanceService.getCategories();
$scope.instances = InstanceService.getInstances();
})
.factory('InstanceService', function () {
var categories = [
{name: 'standard', display: 'Standard'},
{name: 'highmemory', display: 'High Memory'},
{name: 'highcpu', display: 'High CPU'},
{name: 'highio', display: 'High I/O'}
];
<pre><code>var instances = [
{ id: '1_1', category: 'standard', ram: '0.625', cpu: '0.15', disk: '20', network: '10', price: '0.020'},
{ id: '1_2', category: 'standard', ram: '1.75', cpu: '1', disk: '56', network: '10', price: '0.056'},
{ id: '1_3', category: 'standard', ram: '3.75', cpu: '1', disk: '123', network: '10', price: '0.12'},
{ id: '2_1', category: 'highmemory', ram: '17.125', cpu: '2', disk: '420', network: '10', price: '0.409'},
{ id: '2_2', category: 'highmemory', ram: '34.25', cpu: '4', disk: '843', network: '10', price: '0.817'},
{ id: '2_3', category: 'highmemory', ram: '68.375', cpu: '8', disk: '1122', network: '10', price: '1.630'},
{ id: '3_1', category: 'highcpu', ram: '1.75', cpu: '2', disk: '75', network: '10', price: '0.127'},
{ id: '3_2', category: 'highcpu', ram: '7', cpu: '7', disk: '263', network: '10', price: '0.508'},
{ id: '3_3', category: 'highcpu', ram: '16', cpu: '16', disk: '600', network: '10', price: '1.160'},
{ id: '4_1', category: 'highio', ram: '60.5', cpu: '8', disk: '1452', network: '10', price: '3.067'},
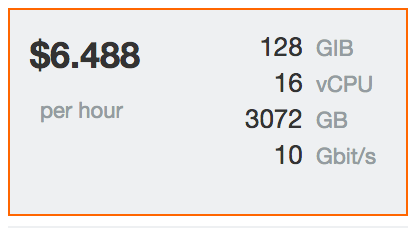
{ id: '4_2', category: 'highio', ram: '128', cpu: '16', disk: '3072', network: '10', price: '6.488'},
{ id: '4_3', category: 'highio', ram: '256', cpu: '32', disk: '6144', network: '10', price: '12.976'}
];
var getCategories = function () {
return categories;
};
var getInstances = function () {
return instances;
};
return {
getCategories: getCategories,
getInstances: getInstances
}
</code></pre>
});
The Layout Take One
Now that we have our data in place, we can lay out our menu by using an ng-repeat to iterate over the categories and within that iteration using another ng-repeat to iterate over the instances. A word of advice before we go any further: nesting two ng-repeat directives on highly dynamic data structures could have performance ramifications so be judicious about where you do this. Because our two collections are not going to change over the course of the application, it is a design choice I am comfortable with.
<div class="container">
<div class="row">
<div class="col-md-2 column">
<div class="header {{category.name}}">
<h2>{{category.display}}</h2>

</div>
<div class="instance clearfix">
<div class="left pph">${{instance.price}} per hour</div>
<div class="right">
<ul>
<li>{{instance.ram}} GIB</li>
<li>{{instance.cpu}} vCPU</li>
<li>{{instance.disk}} GB</li>
<li>{{instance.network}} Gbit/s</li>
</ul></div>

</div>

</div>

</div>
</div>
At this point, we will have a column for every category and a row for every instance regardless of the category the instance belongs to.

The Layout Take Two
For each category, we really only want a subset of the instances array that matches the category we are in. Returning a subset of an array is precisely what filters were designed for.
<div class="instance clearfix" ng-repeat="instance in instances | filter:{category:category.name}">
    <!-- OMMITTED -->
</div>
On our inner ng-repeat we are going to filter the instances collection by adding | filter:{category:category.name} to the end of it. This is essentially telling AngularJS to return only the instances where the category property matches the name of the current category i.e. category.name in the parent iteration.
Now we end up with something quite a bit more useful.
Dynamic Dynamic Classes
Because AngularJS not only binds to simple values but also expressions, we can do some really interesting things in our templates. We are going to diverge from the original Joyent menu and add in the ability to select an instance item and dynamically apply a dynamic class to indicate it is the active instance.
We need to be able to keep track of our current instance and also have the ability to know if an instance is the current instance. We will create a property on $scope called currentInstance to keep track of the current instance and a method called setCurrentInstance to update currentInstance.
angular.module('website', ['ngAnimate'])
    .controller('MainCtrl', function ($scope, $window, InstanceService) {
        $scope.categories = InstanceService.getCategories();
        $scope.instances = InstanceService.getInstances();

<pre><code>    $scope.currentInstance = null;

    $scope.setCurrentInstance = function (instance) {
        $scope.currentInstance = instance;
    };

    $scope.isCurrentInstance = function (instance) {
        return $scope.currentInstance === instance;
    };

})
</code></pre>
Then we have a method called isCurrentInstance that returns true or false depending on whether or not the instance parameter equals $scope.currentInstance.
I have also created a CSS class for each category that represents a border color that matches that category’s color theme.
.current-standard {
    border: 1px solid #457b97;
}

.current-highmemory {
    border: 1px solid #727372;
}

.current-highcpu {
    border: 1px solid #a66a48;
}

.current-highio {
    border: 1px solid #f60;
}
Notice that the classes follow the pattern of current-CATEGORY_NAME… could I be going somewhere with this? Yes I am!
First, we are going to set currentInstance by calling setCurrentInstance on ng-click and passing in the instance that was clicked. Then we will dynamically attach the current-{{category.name}} class if isCurrentInstance(instance) returns true. The current-{{category.name}} class? That’s right! That expression gets evaluated just like everything else and becomes current-standard, current-highmemory, etc.
<div class="instance clearfix" ng-repeat="instance in instances | filter:{category:category.name}"
     ng-click="setCurrentInstance(instance)"
     ng-class="{'current-{{category.name}}':isCurrentInstance(instance)}">
    <!-- OMMITTED -->
</div>
The end result is that a border that matches the category’s theme gets dynamically applied. Neat!
Comparing Features

And now for the grand finale – giving emphasis to the active feature across the different instances. We are going to start out very similar to how we tracked the current instance by creating a currentInstanceFeature on $scope. We are going to initialize it to null since there isn’t a current feature until the user interacts with the menu.
angular.module('website', ['ngAnimate'])
    .controller('MainCtrl', function ($scope, $window, InstanceService) {
        $scope.categories = InstanceService.getCategories();
        $scope.instances = InstanceService.getInstances();

<pre><code>    //... OMITTED
    $scope.currentInstanceFeature = null;

    $scope.setCurrentInstanceFeature = function (feature) {
        $scope.currentInstanceFeature = feature;
    };

    $scope.isMuted = function (feature) {
        return $scope.currentInstanceFeature !== null
            && $scope.currentInstanceFeature !== feature;
    };
})
</code></pre>
We will create a setter method called setCurrentInstanceFeature to set currentInstanceFeature depending on the user’s interaction. The isMuted method is designed to return true if there IS a currentInstanceFeature and feature is NOT it.
The point of this is realized when ng-class attaches the mute class to an element if it is not a member of the current feature. We set the current feature via ng-mouseenter and set it to null via ng-mouseleave.
<ul>
<li ng-mouseenter="setCurrentInstanceFeature('ram')"
        ng-mouseleave="setCurrentInstanceFeature(null)"
        ng-class="{mute:isMuted('ram')}">
        {{instance.ram}} <span>GIB</span></li>
<li ng-mouseenter="setCurrentInstanceFeature('cpu')"
        ng-mouseleave="setCurrentInstanceFeature(null)"
        ng-class="{mute:isMuted('cpu')}">
        {{instance.cpu}} <span>vCPU</span></li>
<li ng-mouseenter="setCurrentInstanceFeature('disk')"
        ng-mouseleave="setCurrentInstanceFeature(null)"
        ng-class="{mute:isMuted('disk')}">
        {{instance.disk}} <span>GB</span></li>
<li ng-mouseenter="setCurrentInstanceFeature('network')"
        ng-mouseleave="setCurrentInstanceFeature(null)"
        ng-class="{mute:isMuted('network')}">
        {{instance.network}} <span>Gbit/s</span></li>
</ul>
And in the CSS we are giving the muted features an opacity of 20% or 0.2.
.mute,
{
    opacity: 0.2;
}
And Just for Fun
We can also add a little something extra to the menu with our good friend ngAnimate. We will define our animation with the highlight-animation class and use the adding and removing of the mute class as our event trigger.
<ul>
<li ng-mouseenter="setCurrentInstanceFeature('ram')"
        ng-mouseleave="setCurrentInstanceFeature(null)"
        ng-class="{mute:isMuted('ram')}" class="highlight-animation">
        {{instance.ram}} <span>GIB</span></li>
<li ng-mouseenter="setCurrentInstanceFeature('cpu')"
        ng-mouseleave="setCurrentInstanceFeature(null)"
        ng-class="{mute:isMuted('cpu')}" class="highlight-animation">
        {{instance.cpu}} <span>vCPU</span></li>
<li ng-mouseenter="setCurrentInstanceFeature('disk')"
        ng-mouseleave="setCurrentInstanceFeature(null)"
        ng-class="{mute:isMuted('disk')}" class="highlight-animation">
        {{instance.disk}} <span>GB</span></li>
<li ng-mouseenter="setCurrentInstanceFeature('network')"
        ng-mouseleave="setCurrentInstanceFeature(null)"
        ng-class="{mute:isMuted('network')}" class="highlight-animation">
        {{instance.network}} <span>Gbit/s</span></li>
</ul>
And in our CSS, we define the base transition for .highlight-animation.mute-add and .highlight-animation.mute-remove classes to last .4 seconds and transition in a linear fashion over all properties.
.highlight-animation.mute-add,
.highlight-animation.mute-remove {
    transition: 0.4s linear all;
}

.highlight-animation.mute-add,
.highlight-animation.mute-remove.mute-remove-active {
    opacity: 1;
}

.highlight-animation.mute,
.highlight-animation.mute-remove,
.highlight-animation.mute-add.mute-add-active {
    opacity: 0.2;
}
From here, we are telling ngAnimate to start with an opacity of 100% when mute is added and end with a 20% opacity when it has been actively applied. We are also doing the same thing in reverse when mute is removed. We start at 20% opacity and end with 100% opacity when it has been actively removed.
Using ngAnimate comes down to understanding the convention that it uses. For a ton of great examples, check out Matias Niemela’s blog post on animations here. He knows stuff!
Review
Just a quick review before we give each other a high five call it a day.
- We can layout a grid of items using a nested ng-repeat
- We can limit the items shown in the inner ng-repeat by using a filter
- Be judicious about using the above technique and prefer static structures over highly dynamic structures
- Because AngularJS binds to expressions, we can dynamically set a dynamically defined class and it is awesome!
- Using simple, applicative functions such as isMuted it is really easy to control the state of the view.
- ngAnimate is super!
And here is the view in its entirety. Not bad for like forty lines of HTML!
<div class="container">
<div class="row">
<div class="col-md-2 column" ng-repeat="category in categories">
<div class="header {{category.name}}">
<h2>{{category.display}}</h2>

</div>
<div class="instance clearfix" ng-repeat="instance in instances | filter:{category:category.name}"
                 ng-click="setCurrentInstance(instance)"
                 ng-class="{'current-{{category.name}}':isCurrentInstance(instance)}">

<div class="left pph">
                    ${{instance.price}}<span>per hour</span>
                </div>
<div class="right">
<ul>
<li ng-mouseenter="setCurrentInstanceCategory('ram')"
                            ng-mouseleave="setCurrentInstanceCategory(null)"
                            ng-class="{mute:isMuted('ram')}" class="highlight-animation">
                            {{instance.ram}} <span>GIB</span></li>
<li ng-mouseenter="setCurrentInstanceCategory('cpu')"
                            ng-mouseleave="setCurrentInstanceCategory(null)"
                            ng-class="{mute:isMuted('cpu')}" class="highlight-animation">
                            {{instance.cpu}} <span>vCPU</span></li>
<li ng-mouseenter="setCurrentInstanceCategory('disk')"
                            ng-mouseleave="setCurrentInstanceCategory(null)"
                            ng-class="{mute:isMuted('disk')}" class="highlight-animation">
                            {{instance.disk}} <span>GB</span></li>
<li ng-mouseenter="setCurrentInstanceCategory('network')"
                            ng-mouseleave="setCurrentInstanceCategory(null)"
                            ng-class="{mute:isMuted('network')}" class="highlight-animation">
                            {{instance.network}} <span>Gbit/s</span></li>
</ul></div>

</div>

</div>

</div>
</div>
One more thing…
Is there something that you are struggling with in AngularJS? Something you would like to learn about? Comment below and let me know!
Resources
Remastered Animation in AngularJS 1.2
Demo Code


Thanks, nicely written. Out of interest, why are you injecting the $window service?
Ghosts in the code man! 😀 Thanks for pointing that out… updating the repo now. #highFive