
U Go Hue Go: Controlling Philips Hue Lights with Angular and Kendo UI

While on my Kendo Camper Tour I decided to work on a project using Angular and Kendo UI components to control my Philips Hue lights. I brought along my two Philips Hue Go lights to code out at the campsites where I was staying and two hue white lamp bulbs for inside the camper.
For this project I used: - Angular 4 - Kendo UI for Angular - Philips Hue API
To follow along with the code look for the 🐙 at the end of each coding section to see the git diff (aka code changes) that were made in that section. You can find all of the code in this Github repository. Now, let's get coding!
Creating the Angular Application
The first thing I did was create an Angular application using the Angular CLI making sure to add the --ng4 flag to take advantage of the new Angular HTTP client that was added with version 4 of Angular.
ng new u-go-hue-go-tutorial --ng4 --style="scss"ng new tells the CLI to create a new project named u-go-hue-go-tutorial
--ng4 tells the CLI to create the project using Angular v4
--style="scss" tells the CLI to create the project using sass for styling
🐙 Here is the commit for the initial project created by the CLI.
Connecting to the Hue Bridge
In order to talk to the Hue lights I needed to connect the Hue Bridge to the network, obtain its IP address and authorize the user to get the username. This is a bit out of scope for this post but you can find all the information on how to do that here on Philips Hue's Developer Program page.
For now, we'll add the Hue Bridge IP address and username where it is needed in our code to make API calls to the Hue Bridge API. If you want to try this out with your Philips Hue information you can clone the project repo, run npm install, then add your username here and your Hue Bridge's IP address here. Once you have that filled in you can just run ng serve from the main directory to see run the program locally 💁🏻
💡All the Lights💡
Using Angular's HTTPClientModule
The first thing I did was fetch all the lights connected to my Hue Bridge and all their information. To do that I needed to set up Angular's HTTPClient by importing the module inside our @NgModule directive.
// src/app/app.module.ts

import { BrowserModule } from '@angular/platform-browser';
import { NgModule } from '@angular/core';
import { HttpClientModule } from '@angular/common/http'; //  👈

import { AppComponent } from './app.component';

@NgModule({
  declarations: [
    AppComponent
  ],
  imports: [
    BrowserModule,
    HttpClientModule // 👈
  ],
  providers: [],
  bootstrap: [AppComponent]
})
export class AppModule { }
First I imported the HttpClientModule from Angular's common files. Then I added the HttpClientModule to the imports array of the @NgModule decorator so its classes could be used in the project.
🐙 Here is the commit for adding the HTTP module.
GET The Lights
Once I had that set up, I could use the HTTP library to grab
the information I needed from the Philips Hue API. First, I used the GET call to grab all the lights and their information using the /api/<username>/lights route.
For now, I am going to keep all these calls in the main component file to keep this post straightforward, but we can take the API calls out and create a service later. Here is what I added to the main component file to grab the lights:
// src/app/app.component.ts

import { Component, OnInit } from '@angular/core'; // 👈
import { HttpClient } from '@angular/common/http'; // 👈

@Component({
  selector: "app-root",
  templateUrl: "./app.component.html",
  styleUrls: ["./app.component.scss"]
})

export class AppComponent implements OnInit {
  // new code starts here
  username: string = "<username here>";
  // ex: 2DNWwpZpUyMZ3zzaGM53HWA70kwxCu-YFTzBojG2
  hueApiUrl: string = `http://<Bridge IP here>/api/${this.username}/lights`;
  // ex: 192.168.0.110
  lights: string[];

  constructor(private http: HttpClient) {}

  ngOnInit(): void {
    this.http.get(this.hueApiUrl)
    .subscribe(
      data => {
        this.lights = Object.values(data);
        // for early browser version and ie support
        // this.lights = Object.keys(data).map(key => data[key]);
      },
      err => { console.log('Something went wrong!'); }
    );
  }
  // new code ends here
}
Up top, I made sure to bring in the HttpClient into our component file by importing it, plus I brought in the OnInit function from Angular's core library. Then, in order to immediately have the application make the call to grab the lights once the component is set up, I made the AppComponent implement OnInit.
Inside the constructor I bound the HTTPClient to http so it is initialized when the new instance of AppComponent is created.
Inside of the AppComponent class I declared the variables I would be using for the Hue Bridge API:
usernamerandomly generated from the Hue Bridge API, which gets added on to thehueApiUrl, the url used to access the Bridge Hue API, that contains the Hue Bridge IP address (found when connecting the Hue Bridge to a network then visiting www.meethue.com/api/nupnp), and thelightsarray variable which will hold all of our lights' information.
Next, inside the ngOnInit function, the first API call is made as soon as the component is rendered instead of doing it on a user's prompt. The GET call is made to the API using hueApiUrl variable:
this.http.get(this.hueApiUrl)The HttpClient returns an observable that must be subscribed to. The observable returns either data or an error. I have just added a console.log for when an error is returned but there are more options for error handling, like retry(). Check out more error handling in the Angular HTTP docs.
.subscribe(
  data => {
    this.lights = Object.values(data);
    // for early browser version and ie support
    // this.lights = Object.keys(data).map(key => data[key]);
 },
 err => { console.log('Something went wrong!'); }
Object.values(data) is a method that returns an array by going through the data values, like how using a for...in loop would do, check out more info here. This let me turn the object received into an array we could iterate over in the template. This is a pretty new method so is not supported on ie so I added a more supported method in the comments.
Object.keys(data) is a method that iterates over an object's properties and makes it an array (more info here). I then mapped over that array to add the light's properties to the newly created array items.
Show The Lights
To see all the lights I received from the API call I edited the main template file making a list to display all of the lights received and just displayed their data to take a look.
<!-- src/app/app.component.html -->

<h1> U GO HUE GO </h1>
<div class="lights">
  <ul *ngFor="let light of lights; let i = index">
    <li class="light-box">
      <p> {{ light | json }} </p>
    </li>
  </ul>
</div>
*ngFor loops through each of the items in the lights array we sent from out main component files and an li element is made for each of them.
{{ light | json }} takes the light object and pipes the information to json formant.
After adding this code, run ng serve from the terminal and head over to localhost:4200 to see what shows up.
✨Eureka, we haz lights!
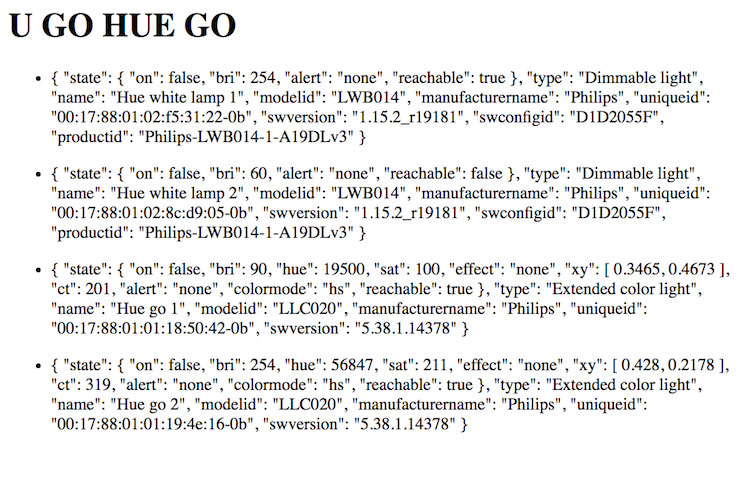
🐙 Here is the commit for fetching and displaying light data.
Updating Light Data
I realized that every time I wanted to change something with my lights - e.g. turning it on and off, changing the brightness, etc. - I was making the same API request and only changing a few values 🤔. This meant that I could have the same function for every change and just feed in the light id, property I was changing and the value to set that property to.
Here is where I added this function to the main component file:
// src/app/app.component.ts

...
export class AppComponent implements OnInit {
  private username: string = "<username here>";
  // ex: 2DNWwpZpUyMZ3zzaGM53HWA70kwxCu-YFTzBojG2
  private hueApiUrl: string = `http://<Bridge IP here>/api/${this.username}/lights`;
  // ex: 192.168.0.110
  private lights: string[];
  private lightChangeValues = {}; // 👈 new variable

  constructor(private http: HttpClient) {}

// new code starts here
  lightChange(lightNumber, property, propertyValue){
    this.lightChangeValues[property] =  propertyValue;
    this.http.put(
      `${this.hueApiUrl}/${lightNumber}/state`, this.lightChangeValues
    )
    .subscribe(
      data => { console.log(data); },
      err => { console.log('Something went wrong!'); }
    );
  }
  // new code ends here

  ngOnInit(): void {
    this.http.get(this.hueApiUrl)
...
Keep in mind that your API can also return an error inside of the data returned by the observable. To know what is being returned I've added a console log to output the data from the response. Below, I'll show what the console output looks like.
🐙 Here is the commit for adding the lightChange function.
Adding Kendo UI Switches
Since I have the function to send the changes made to the lights, the next step is to add the UI components that trigger that function. To turn the light on and off I used a switch (kind of a no-brainer 😛). First, I installed everything I needed for the switch. This happens to be everything I need for the slider components I'll be using later, so I only have to do this once.
npm install --save @progress/kendo-angular-inputs @progress/kendo-angular-intl @progress/kendo-angular-l10n @angular/animationsbonus tip: if you're using npm 5+ it adds the --save flag by default, so you do not need add it.
Once that is installed, I had to include it in the main module file. In order to use the Angular's NgModel to set the property on the switch component (and slider components later), I had to also import the Angular's FormsModule.
// src/app/app.module.ts

...
import { FormsModule } from '@angular/forms'; // 👈
import { SwitchModule } from '@progress/kendo-angular-inputs'; // 👈

import { AppComponent } from './app.component';

@NgModule({
  declarations: [
    AppComponent
  ],
  imports: [
    BrowserModule,
    HttpClientModule,
    FormsModule, // 👈
    SwitchModule // 👈
  ],
  providers: [],
...
I then added the switch to my template, use ngModel to bind the light's on state property and bind the click event to my new lightChange function.
<!-- src/app/app.component.html -->

...
    <li class="light-box">
      <h2> {{ light.name | uppercase }} </h2>
      <!-- new code starts here -->
      <div class="light-switch">
        <kendo-switch
          [(ngModel)]="light.state.on"
          (click)="lightChange(i+1, 'on', light.state.on)">
        </kendo-switch>
      </div>
      <!-- new code ends here -->
    </li>
...
Since I want to PUT the data to http://<Bridge IP here>/api/<username>/lights/<light #>/state/on, I added these parameters to lightChange:
- the iterator (
i) plus 1 because these light numbers start at 1 - the state property I want to change,
'on'in this case, as a string - the value the switch has bound to
light.state.on
You can check great documentation around the Philips Hue API to find what you want your route to look like. In order to see all the info you will have to register and sign in each time. This is a little bit of a pain, but I haven't received any spam and the docs have been really helpful!
Add Some Styling
In order for the Kendo components to take shape with the least amount of work I added the Kendo UI default theme. The first step is to install the theme
npm install --save @progress/kendo-theme-defaultthen add it to the Angular CLI config file:
.angular-cli.json
...
"prefix": "app",
"styles": [
"../node_modules/@progress/kendo-theme-default/dist/all.css",
"styles.scss"
],
"scripts": [],
...
I also added a little but of styling to the main components sass file to make things render the way I wanted it to look 🖼
// src/app/app.component.scss

@import url('https://fonts.googleapis.com/css?family=Fredoka+One');

h1, h2, p, .k-switch {
  font-family: 'Fredoka One', Helvetica, sans-serif;
}

h2 {
  margin: .5em 0;
}

h1, p {
  margin: 0 .25em;
}

h1 {
  background-color: white;
  color: #ff6358;
  padding: 0 .5em;
  width: 6.75em;
}

li {
  list-style: none;
}

.lights {
  margin: 0 auto;
  width: 95%;
}

.light-box {
  background-color: white;
  border: 3px solid black;
  float: left;
  margin: 1em;
  padding: 0 0 1em 1.5em;
  width: 20em;
}

.light-switch {
  margin-bottom: .75em;
}
Let's see what I've got at this point.

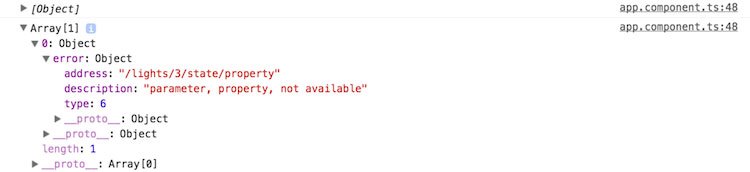
Here we can see the response that we're getting back from the API in the console since we used console.log in the lightChange function. This is what the success object looks like. Below is a screenshot of how an error shows up.
🐙 Here is the commit for adding the switches and styling. Ignore the app.component.ts changes as you see here, I figured out a way refactor the function more 🙌
Adjusting Brightness, Hue, and Saturation with Sliders
Next I added a three different sliders to control brightness, hue and saturation. The module was already installed when we installed the library for the Kendo UI Inputs but now we'll also add the SliderModule to the main module file.
// src/app/app.module.ts

...
import { SwitchModule } from '@progress/kendo-angular-inputs';
import { SliderModule } from '@progress/kendo-angular-inputs'; //  👈

import { AppComponent } from './app.component';

@NgModule({
  declarations: [
    AppComponent
  ],
  imports: [
    BrowserModule,
    HttpClientModule,
    FormsModule,
    SwitchModule,
    SliderModule  // 👈
  ],
  providers: [],
...
🐙 Here is the commit to add the slider module.
Brightness
Just like the on/off switch I bound the light's property light.state.bri with ngModel. Also like setting the state of on and off for the lamps, I had to pass the information for the number of the light I wanted to change, the property I wanted changed, 'bri', and the new value for the amount of brightness to lightChange(). Then I set some properties on the slider component for displaying this data.
<!-- src/app/app.component.html -->

...
        </kendo-switch>
      </div>
      <!-- new code starts here -->
      <div class="light-bright">
        <p> brightness </p>
        <kendo-slider
          [(ngModel)]="light.state.bri"
          (click)="lightBright(i+1, 'bri', light.state.bri)"
          [min]=0
          [max]=254
          [smallStep]=10
          tickPlacement="none">
        </kendo-slider>
      </div>
      <!-- new code ends here -->
    </li>
...[min]: pretty self-explanatory it's the minimal amount the slider can be[max]: the Hue brightness only goes up to 254 so that will be the max amount (again, this info can be found in the API documentation)[smallStep]: this is how far the value will move when a user clicks the slider arrows or uses the keyboard, since this goes all the way up to 254, I used 10tickPlacement: this slider would require a lot of ticks, so I just removed them
You can find more information on all the properties you can set for the slide here.
🐙 Here is the commit for adding the brightness slider.
Hue & Saturation
Next, I added sliders to control the hue, or color, and saturation of the Hue Go lights. Only the color bulbs and Hue Go lights have these properties. To avoid any errors of trying to display this property from objects that don't have it, I added an *ngIf to these component's divs to check the light.state.hue & light.stat.sat is greater or equal to 0. At first I just checked to see if this property existed but since both properties could be set to 0 it evaluated to false when the value was 0.
<!-- src/app/app.component.html -->

...
        </kendo-slider>
      </div>
      <!-- new code starts here -->
      <div class="light-hue" *ngIf="light.state.hue >= 0">
        <p> hue </p>
        <kendo-slider
          [(ngModel)]="light.state.hue"
          (click)="lightChange(i+1, 'hue', light.state.hue)"
          [min]=0
          [max]=65535
          [smallStep]=1500
          tickPlacement="none">
        </kendo-slider>
      </div>
      <div class="light-sat" *ngIf="light.state.sat >= 0">
        <p> saturation </p>
        <kendo-slider
          [(ngModel)]="light.state.sat"
          (click)="lightSat(i+1, 'sat', light.state.sat)"
          [min]=0
          [max]=254
          [smallStep]=10
          tickPlacement="none">
        </kendo-slider>
      </div>
      <!-- new code ends here -->
    </li>
...
All of the properties for these sliders are the same as the brightness slider. The saturation slider properties are identical. The hue property values are quite different, the values range from 0 to 65535 (both equal to red, 25500 is green and 46920 is blue 🌈). There are libraries to convert these values into rgb and hex values but for now I just kept it as a slider. I also bumped up the smallStep to 1500 so the user wouldn't have to step tens of thousands of steps to get across the slider.
🐙 Here is the commit to add the hue and saturation sliders.
Last Bit of Styling
The sliders need a little spacing so I added some styling to the component's sass file. I also wanted to add a background image for some 💃🏻flair🕺, to apply style to the html component I had to edit the main style.scss file.
// src/app/app.component.scss

...
.light-bright, .light-hue {
  margin-bottom: .25em;
}
...
// src/style.scss
/* You can add global styles to this file, and also import other style files */
html {
background-image: url(https://i.pinimg.com/originals/f5/b1/76/f5b176ba54ab9d1b81ceca8e11bf0c70.jpg);
}🐙 Here is the commit for the style changes & to fix a little typo 😯
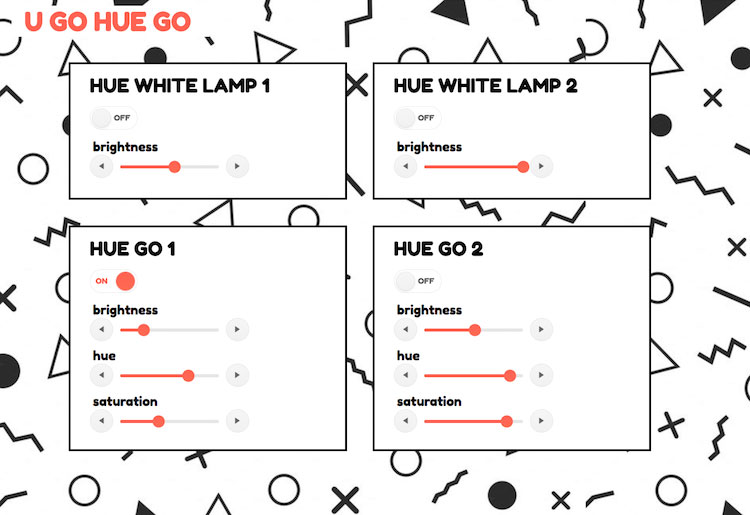
Now, let's see what was created:
That's a Wrap! 🎬
With that I have a fun web app to let me control the Hue lights around my camper and campground! The lightChange function allows me to plug in any other properties on the lights that I feel like changing in the future as well 👍
I hope you try out this application for yourself and let me know if you have any questions or any awesome upgrades. Ping me here or on the twittersphere (@tzmanics). Until then, happy coding and lighting! 👋👩🏻💻

Tara Z. Manicsic
Tara Z. Manicsic is a lifelong student, teacher, and maker. She has spent her career using JavaScript on both back-end and front-end to create applications. A Developer Advocate for Progress, Google Developer Expert, and international technical speaker, she focuses on conveying the codebase she has learned. She also works in her community launching & directing the Cincinnati Chapter of Women Who Code and the Cincinnati branch of NodeSchool.
Comments
All articles
Topics
Latest Stories
in Your Inbox
Subscribe to be the first to get our expert-written articles and tutorials for developers!
All fields are required