Azure Functions CI/CD pipeline for Node.js using VSTS
In this blog post, I'd like to share how to create CI/CD pipeline for Azure Functions (Node.js). I can find several posts for C#. However, we can't find it for Node.js. I'd like to share some knowledge as a tutorial style to build whole pipeline.
Sample Project
You can find a sample project on the GitHub. It includes source code, test code, package.json and exported file from my build / release definition. You can import the same CI/CD pipeline as me.
https://github.com/TsuyoshiUshio/AzureFunctionsCICDForNode
Prerequisite
Now you are ready to start this tutorial.
Configure Build definition
Project structure
If you don't need extra package for your Azure Functions, you don't need package.json. However, if you want to add extra packages, execute unit testing, and static analysis, I recommend to have a package.json on your FunctionApp directory. The sample package structure on the github is like this.
 .
├── Pipelines
│   ├── Node.CI.json
│   ├── Node.Release.json
│   └── build.yaml
├── README.md
├── Scheduler
│   ├── function.json
│   ├── index.js
│   └── sample.dat
├── Tests
│   └── scheduler.spec.js
├── Worker
│   ├── function.json
│   ├── index.js
│   ├── readme.md
│   └── sample.dat
├── build.yaml
├── host.json
├── local.settings.json
├── package-lock.json
└── package.json
The sample project have two functions. Scheduler and Worker. Scheduler get an request by HttpTrigger and pass the value to the QueueBindings. Worker receives Queue then emit a log message. Simple functions. Tests directory include unit test for the functions.
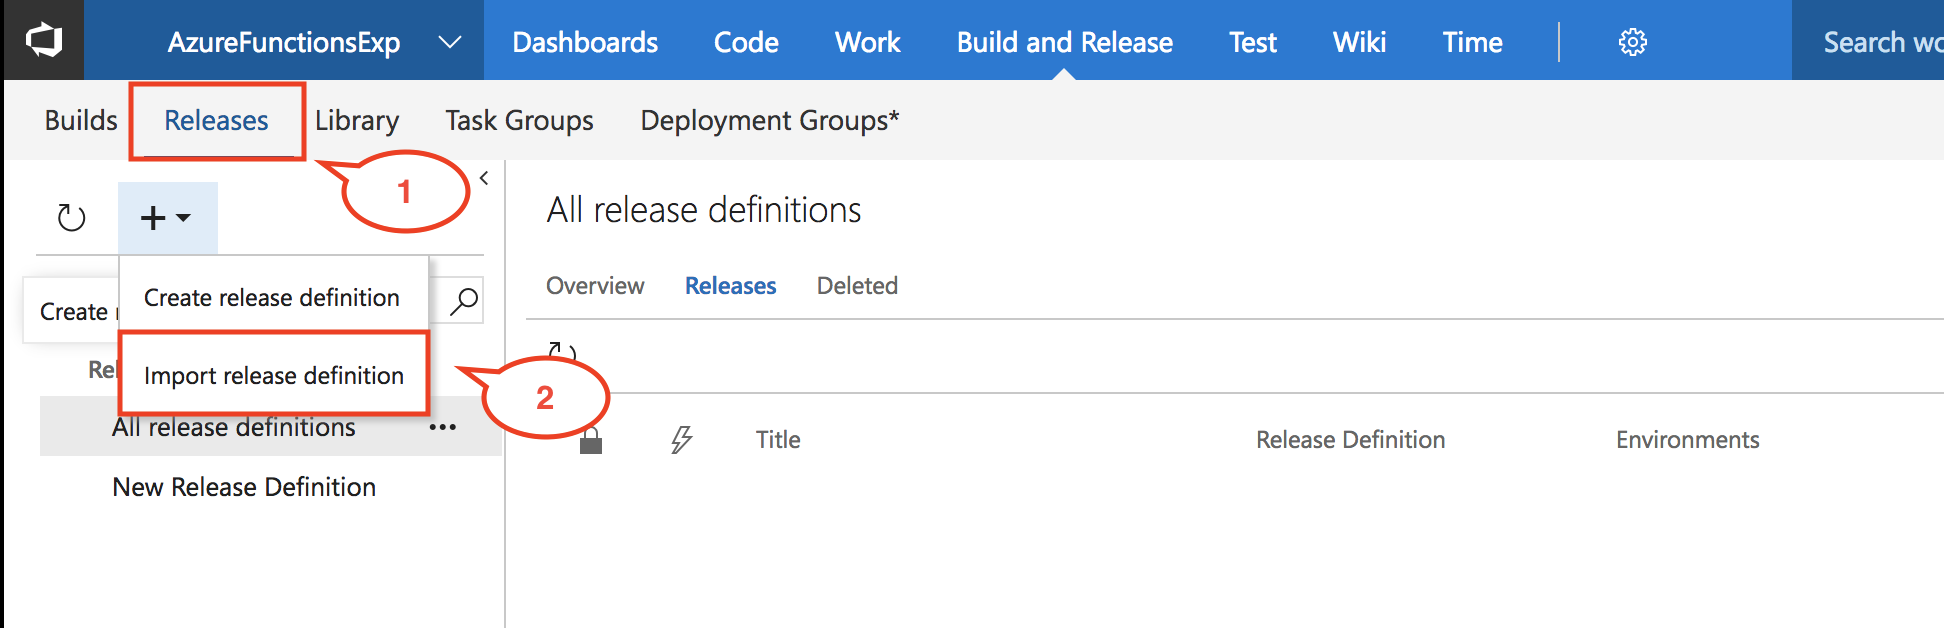
Import build definition
For your convenience, I export my Build/Release definition and put on my GitHub. You can import the definition on your VSTS account.
Clone my GitHub repo
You can find the sample GitHub repo in here. Clone this repo.
git clone git@github.com:TsuyoshiUshio/AzureFunctionsCICDForNode.git
Select Builds then push Import button
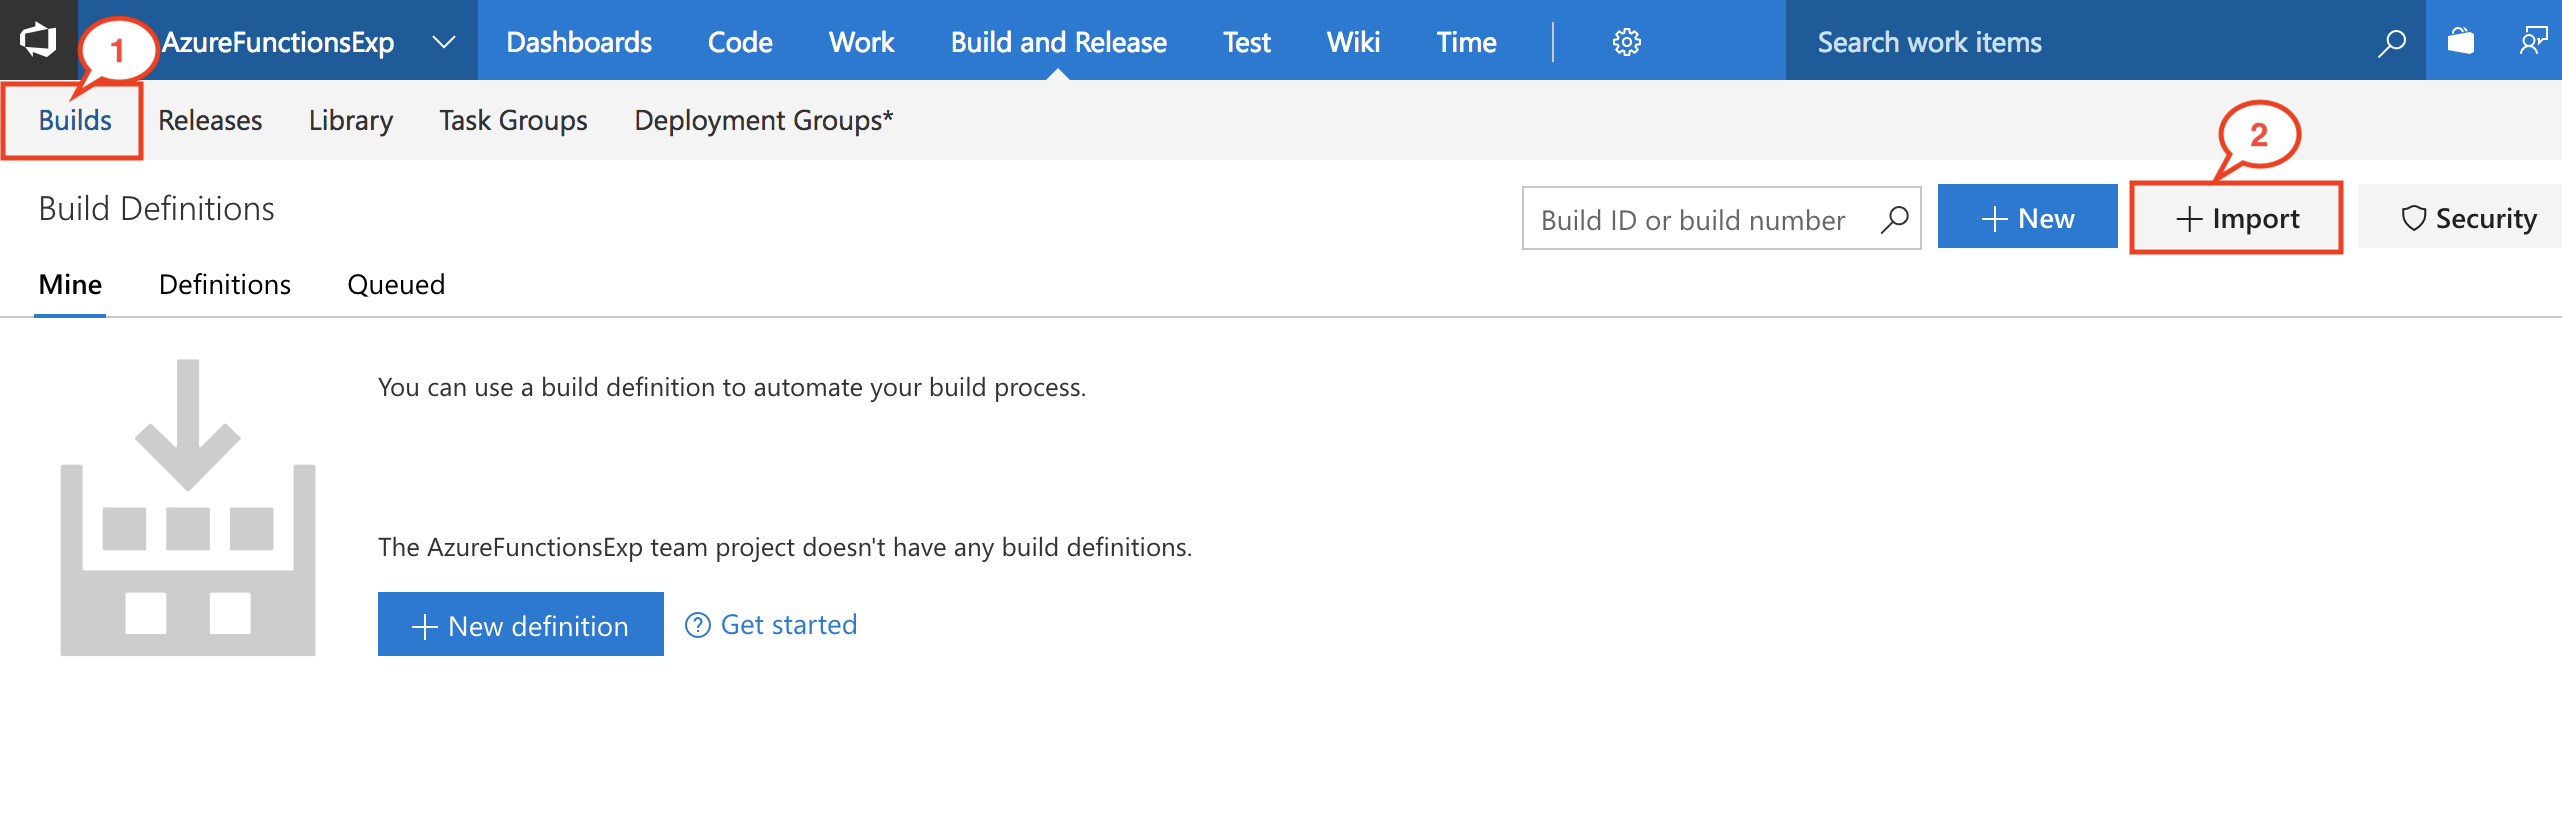
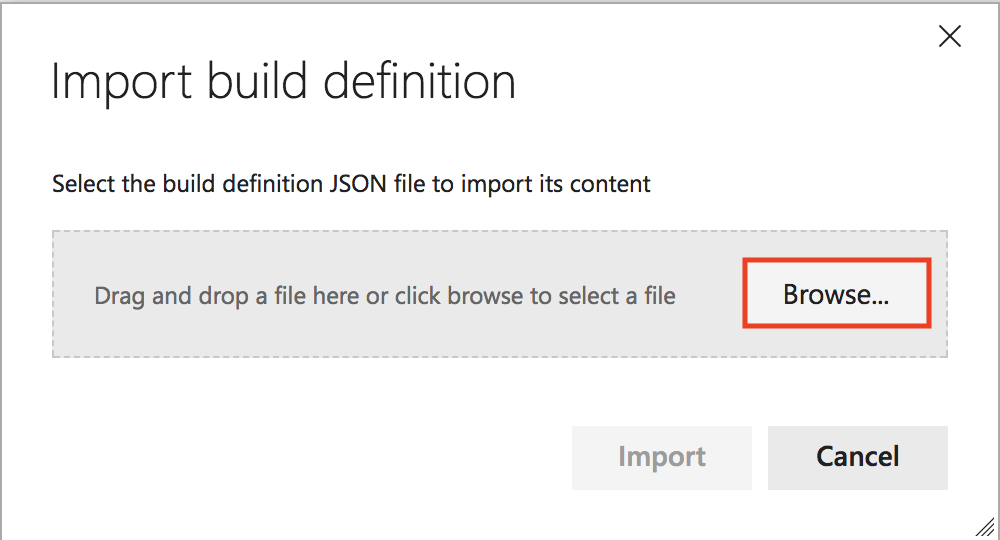
Import definition
Select Browse... button and select NodeCI.json file on my GitHub account.
You can find Pipelines/NodeCI.json on the repo which you cloned.
Configure source
You need to define repo which is the sample code is stored. e.g. You can folk my repository or push some other git repository then specify the repo.

Select Hosted VS2017 Agent
Finally, select Hosted > Hosted VS2017. Now done the configuration, you can save & queue the pipeline, also you can see the detail of the definition. Enjoy!

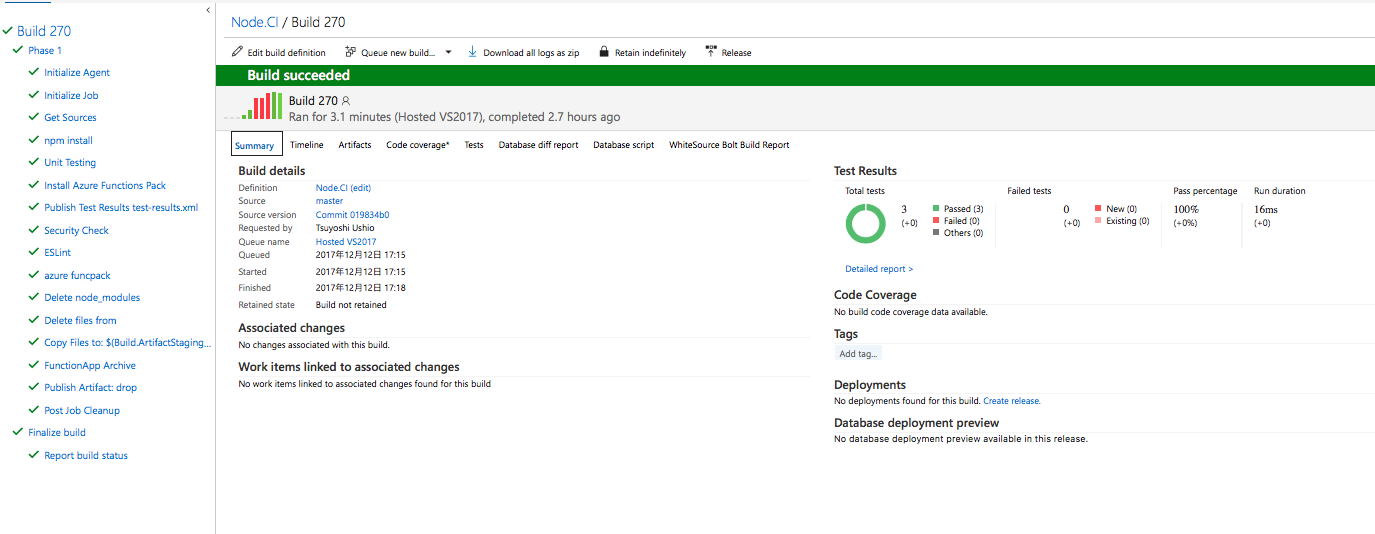
It works
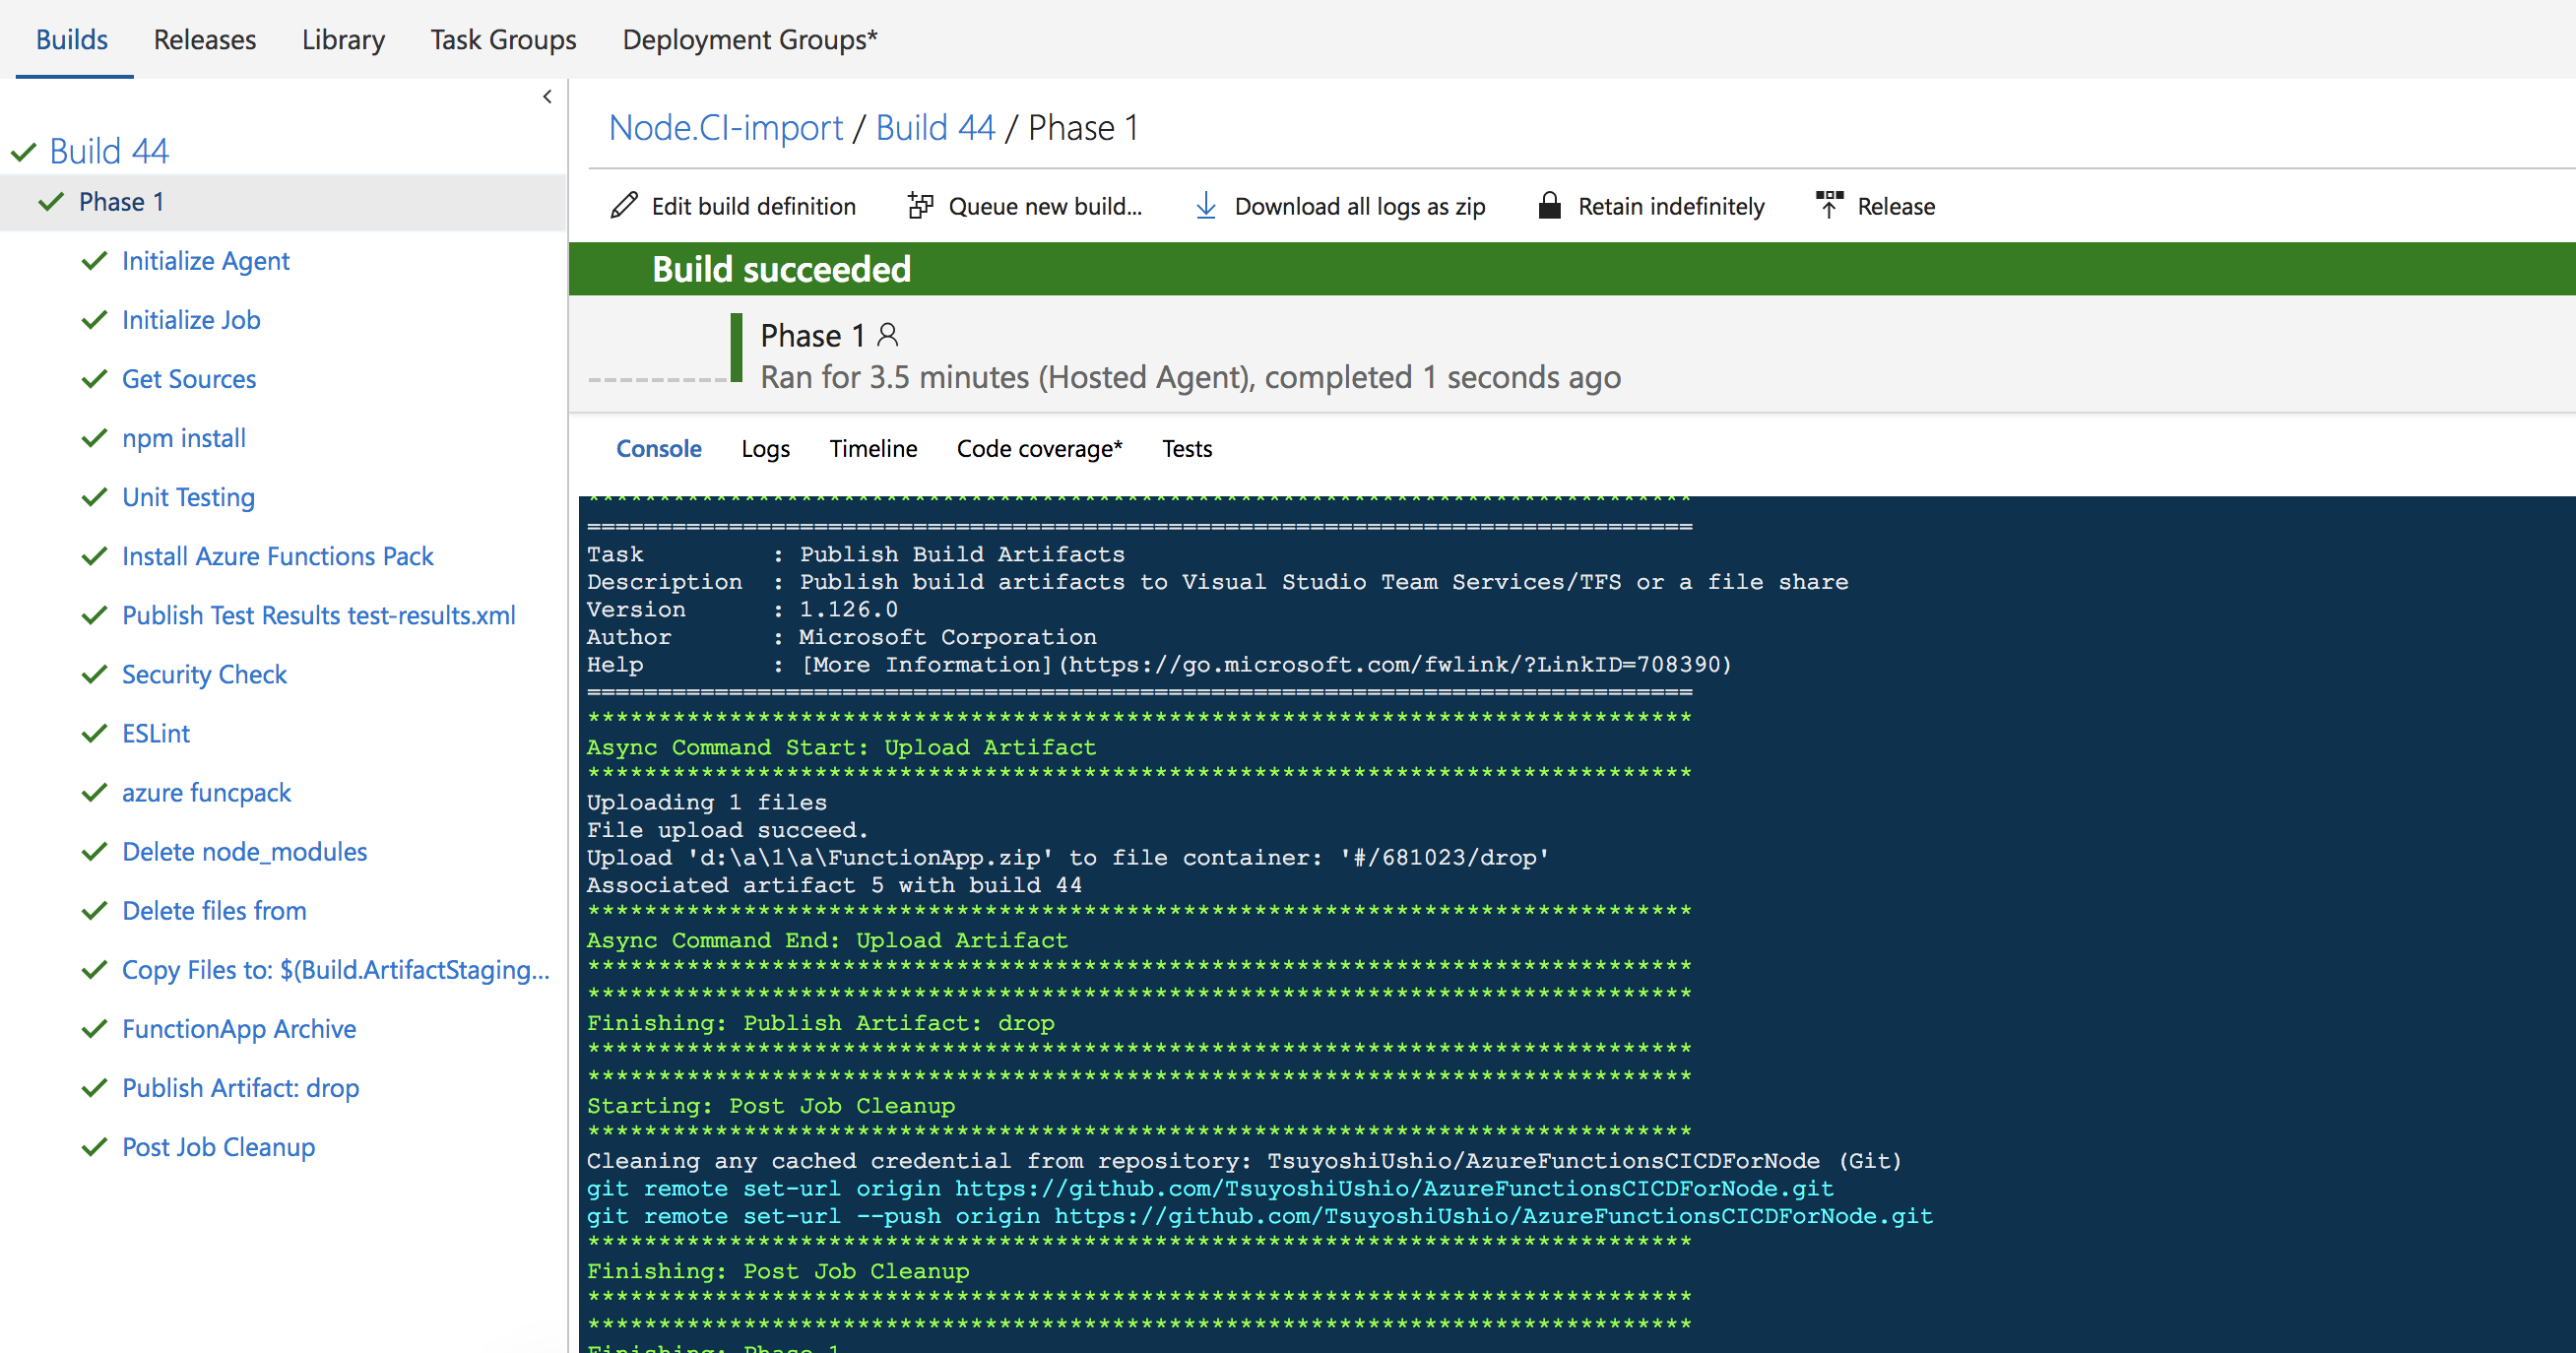
Build definition overview
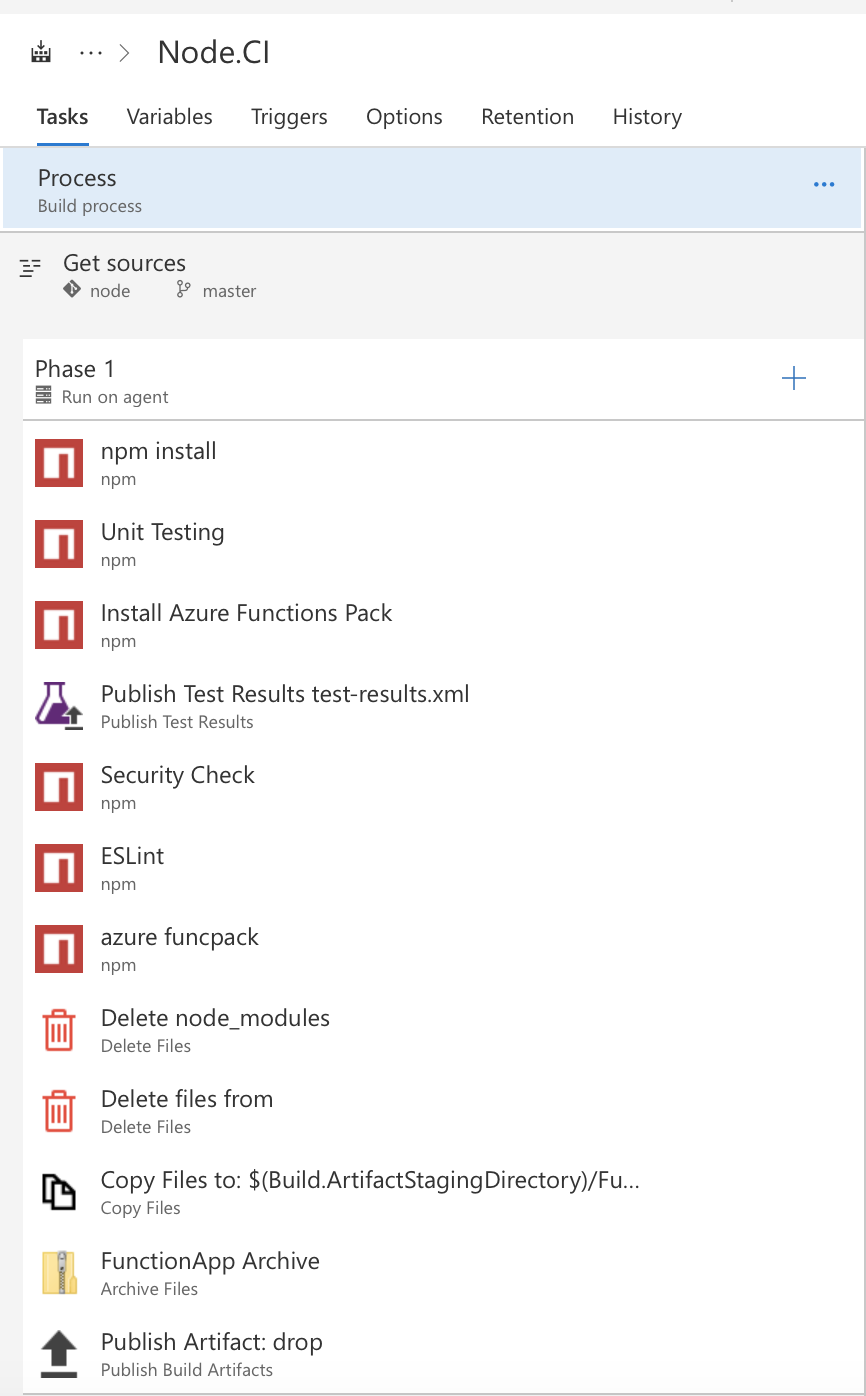
I'd like to expand the detail of the pipeline. It has these steps.
- Restore npm packages
- Unit testing
- Static Analysis
- Bundle functions
- Archive and publish
1.Restore npm packages
The sample package.json includes these packages. It includes some packages for testing, linting and security checking.
  "dependencies": {
 "express": "^4.16.2"
 },
 "devDependencies": {
 "azure-functions-pack": "^0.3.1",
 "chai": "^4.1.2",
 "eslint": "^4.13.1",
 "eslint-config-standard": "^11.0.0-beta.0",
 "eslint-plugin-import": "^2.8.0",
 "eslint-plugin-node": "^5.2.1",
 "eslint-plugin-promise": "^3.6.0",
 "eslint-plugin-standard": "^3.0.1",
 "mocha": "^4.0.1",
 "mocha-junit-reporter": "^1.15.0",
 "nsp": "^3.1.0",
 "sinon": "^4.1.3"
 }
On the VSTS, we have npm task with install Command. Then all npm packages are restored. It create node_modules package on the package root directory.
2. Unit Testing
Writing Unit Testing for Azure Fucntions (Node.js) is not so difficult. Azure Functions has two parameter, one is context and the other is req. You just mock it using json object and check the value of output bindings. You can use Sinon.JS for if the some functions has been called.
 'use strict'

const Scheduler = require('../Scheduler/index.js')
const expect = require('chai').expect
const sinon = require('sinon');

describe('Scheduler function', () => {
  var req = {};
  var context = {};

 beforeEach(function() {
   req = {
     query: {
       name: "Azure"
     },
     body: {
       name: "taro"
     }
   };

 context = {
   res: {
     status: 200
   },
   log: function (str) {
     console.log(str); // eslint-disable-line no-console
   },
   bindings: {
     outputQueueItem: "fake_queue_value"
   },
   done: function () {
   }
 };
 });

 it('should pass query name to queue bindings', (done) => {
   sinon.spy(context, "done");
   Scheduler(context, req);
   expect(context.bindings.outputQueueItem).to.equal("Azure", "Queue isn't set");
   expect(context.done.called).to.be.true
   context.done.restore();
   done();
 })

 it ('should be ok if the query name has been passed', (done) => {
   Scheduler(context, req);
   expect(context.res.body).to.equal("Hello Azure");
   done();
 })

 it ('should not be ok if the query name isnt supplied', (done) => {
   req = {
     query: {
     },
     body: {
     }
   };
   Scheduler(context, req);
   expect(context.res.status).to.equal(400);
   expect(context.res.body).to.equal("Please pass a name on the query string or in the request body");
   done();
   })
})
I'm using mocha-junit-reporter for export the test result. On the package.json you can see the definition
"report": "mocha Tests/*.spec.js --reporter mocha-junit-reporter",
On the pipeline, I simply call this script using npm task. It will create test-results.xml on the FunctionApp root directory. Then using Publish Test Results task, you can push the result to the VSTS. Then you can see the test result on the VSTS.
3. Static Analysis
This step is optional. I use nsp for security checking. If the npm packages has vulnerabilities, it stop the build. ESLint for liniting. I just call these script by npm tasks.
  "security-check": "nsp check",
 "lint": "eslint ."
4. Bundle functions
This section is very important for performance. If you use npm packages with node_modules directory, it might cause a performance issue. It leads a long cold start time of a function. You can avoid this problem using azure-functions-pack packages. This package make a lot of files of a function with a lot of dependencies into single file just this command.
"pack": "funcpack pack .",
It create a .funcpack directory. It includes a single fine which bundle all dependencies. It improve a performance a lot.
On the pipeline,
- Install Azure Functions Pack (npm task)
- Exec funcpack pack . (npm task)
- Delete node_modules ( Delete Files task)
- Delete Tests directory ( Delete Files task)
This pipeline remove node_modules and Tests directory. It is not needed for deploy to azure after you use funcpack. Remove these.
5. Archive and publish
If you want to publish your functions to azure, you need to archive it using zip. In this pipeline, I copy whole file to the $(Build.ArtifactStagingDirectory)/functionapp directory (Copy Files task), then Archive it (Archive files) into FunctionApp.zip file. If you want to deploy Function App, you need to uncheck the "Prefix root folder name to archive paths" check box. If selected, the root folder name will be prefixed to the file paths within the archive.
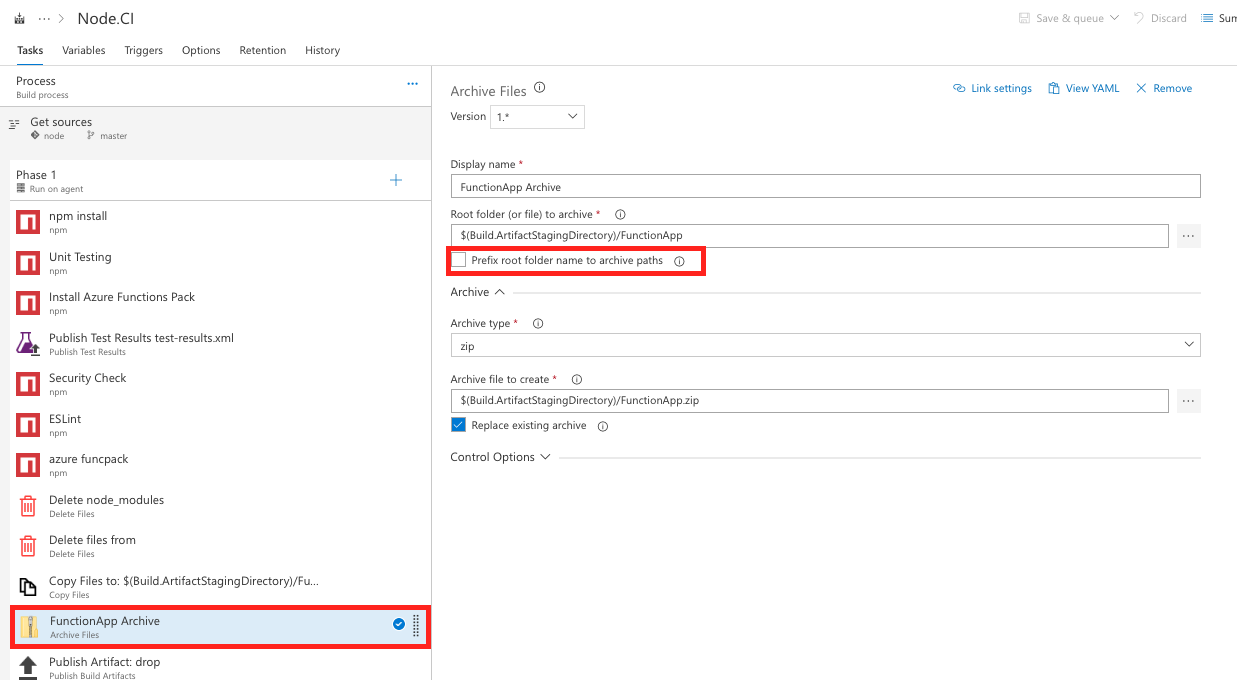
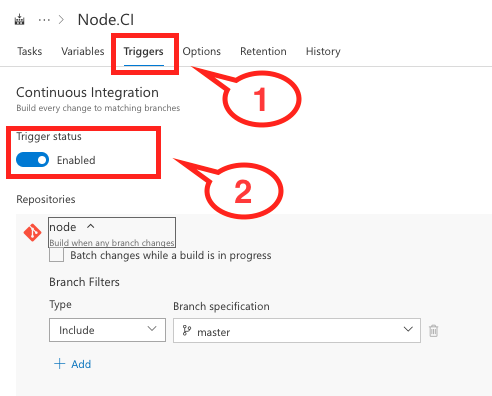
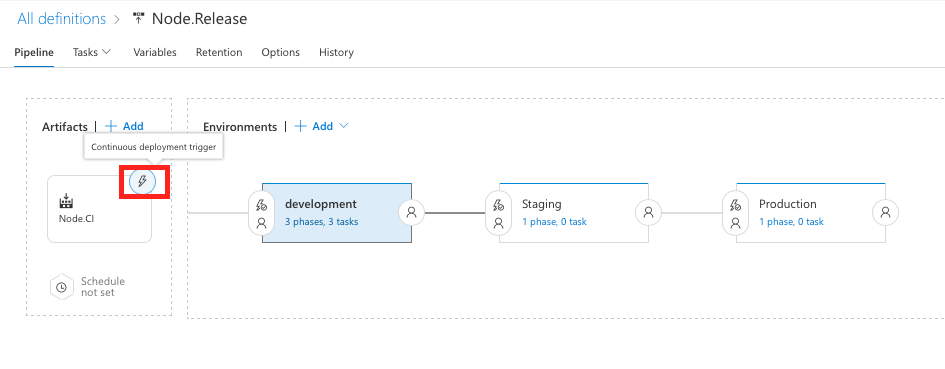
Then publish the zip file to the drop directory. using Publish Artifact task. Then you can refer it from the Release definition. If you enabled Continuous Integration on the Triggers tab, VSTS automatically start this pipeline when the new change introduced on your repo.
Configure Release definition
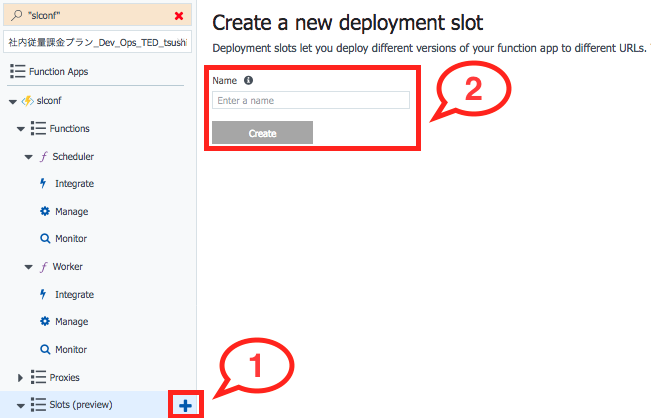
Create a slot on your FunctionApp
Before starting the configuration, Let's create deployment slot. If you don't need the deployment slot, you can skip this step. However, if you use it, it might be very good way to deploy functions. Once you deploy to the Deployment slot, you can test it without affect to the production, once it becomes OK then swap it. Then the slot application turn into production with zero-downtime. Go to the Function App on your azure, click Slots. Then create a slot.
Deploy to the slot
Using the Azure App Service Deploy task, 1. Select your Subscription, App Type (Function App), App Service Name(Your Function App name). Then 2. Select Resource Group and slot name. Finally 3. Select the zip file which you created on the Build definition.
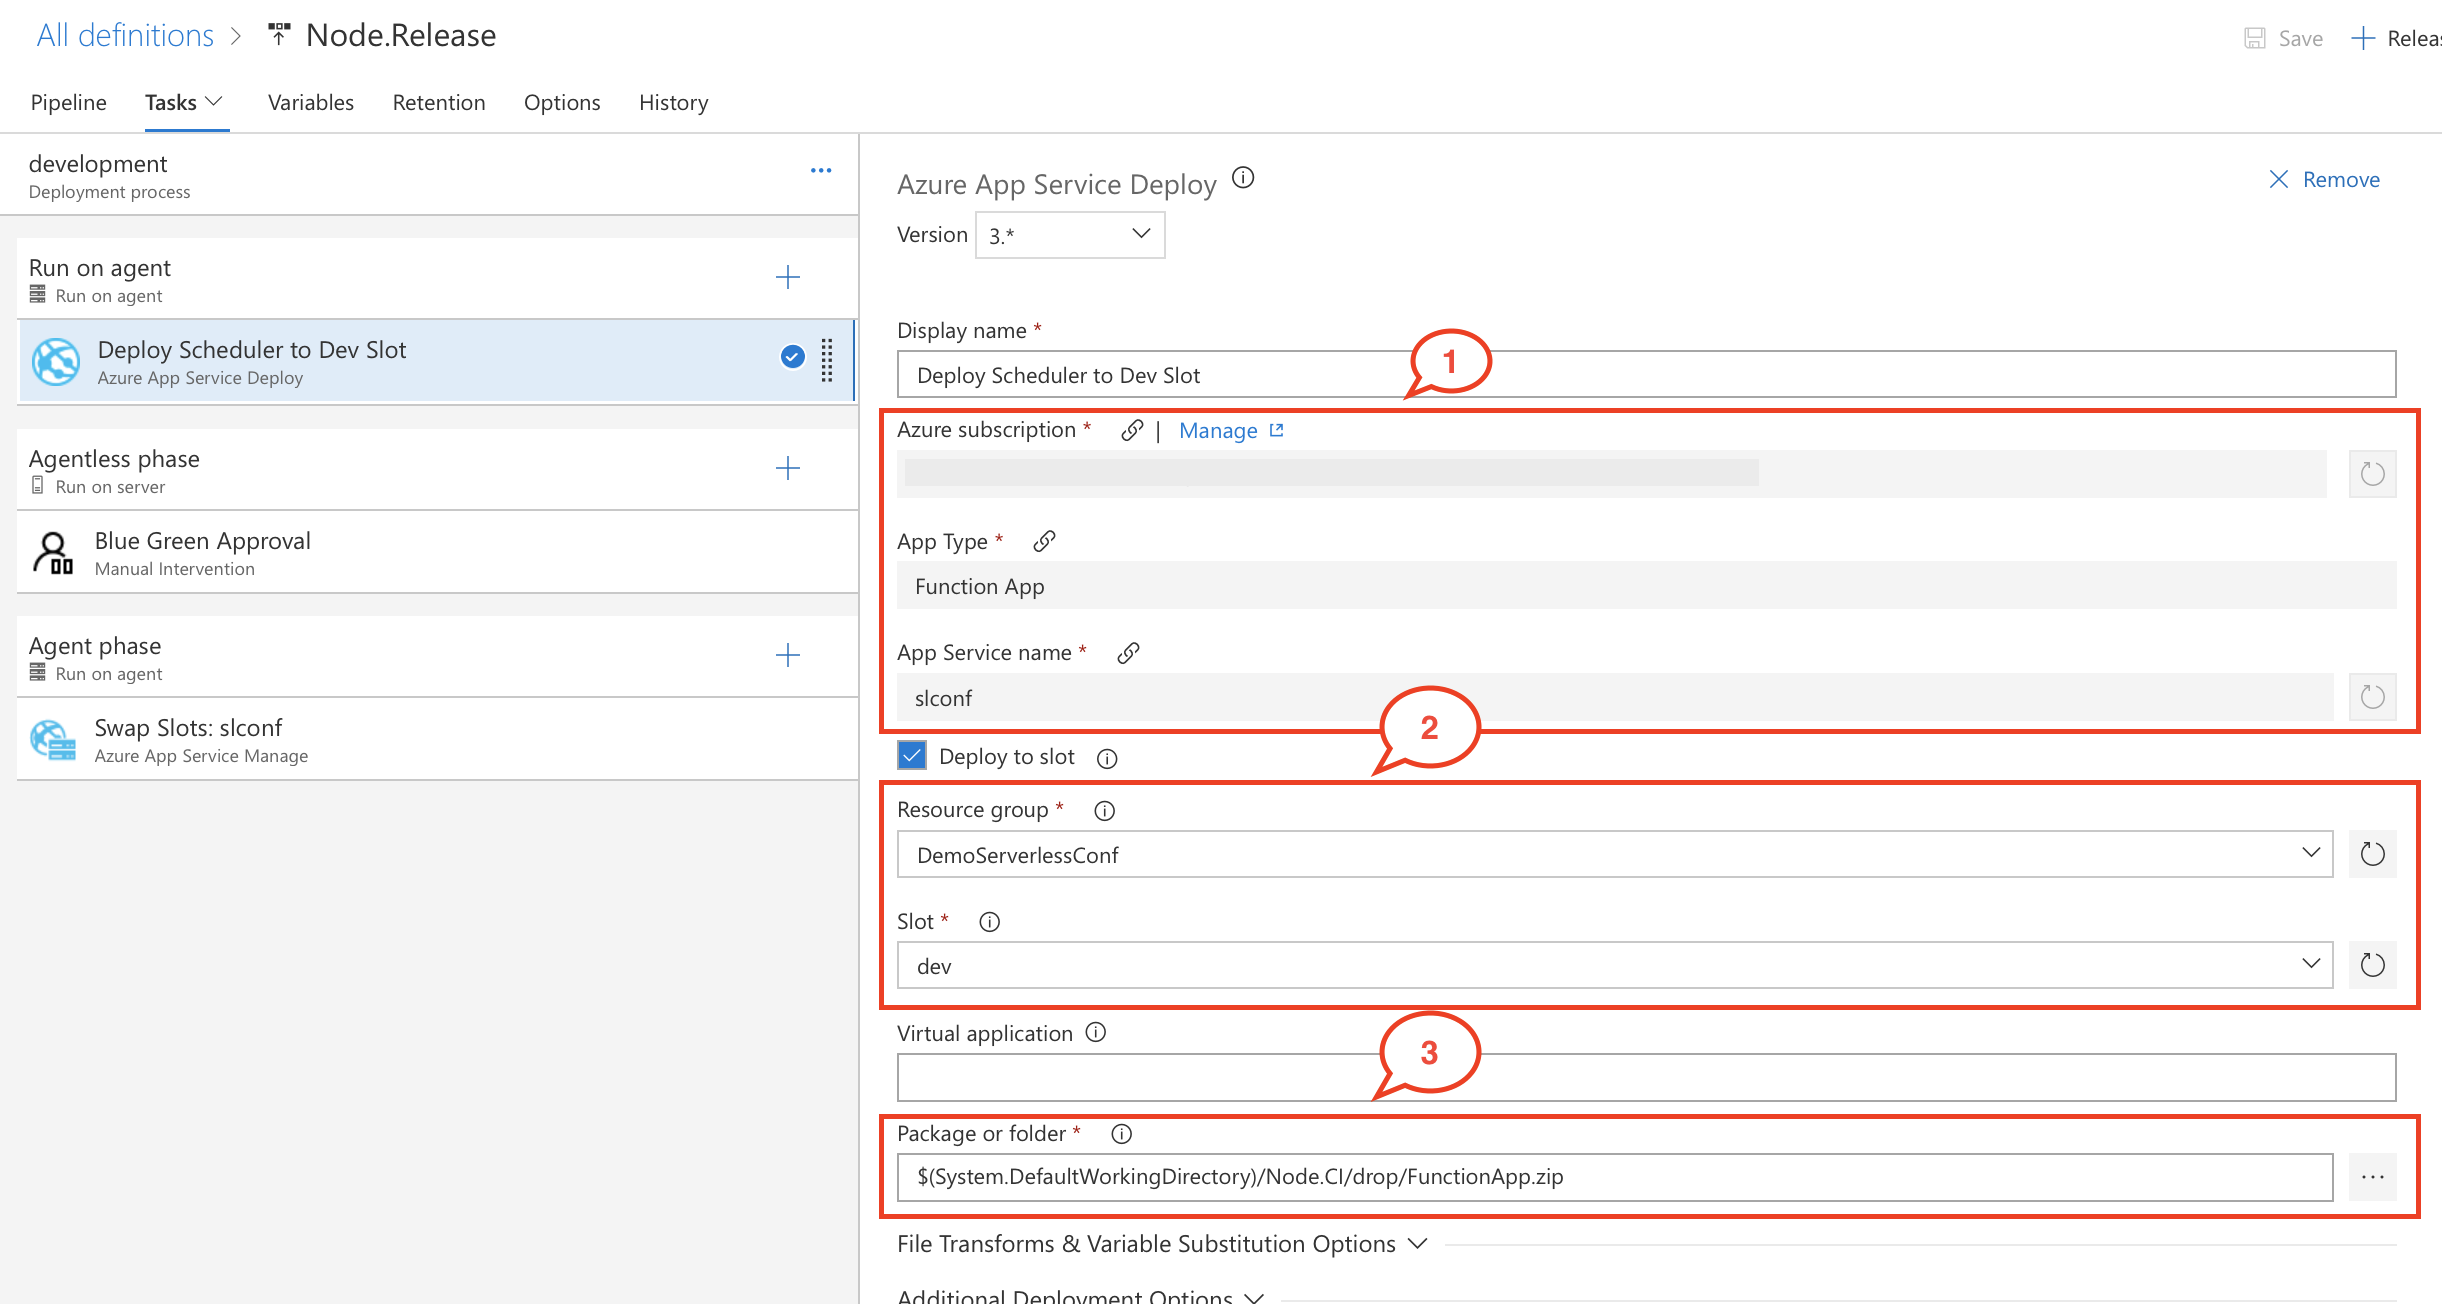
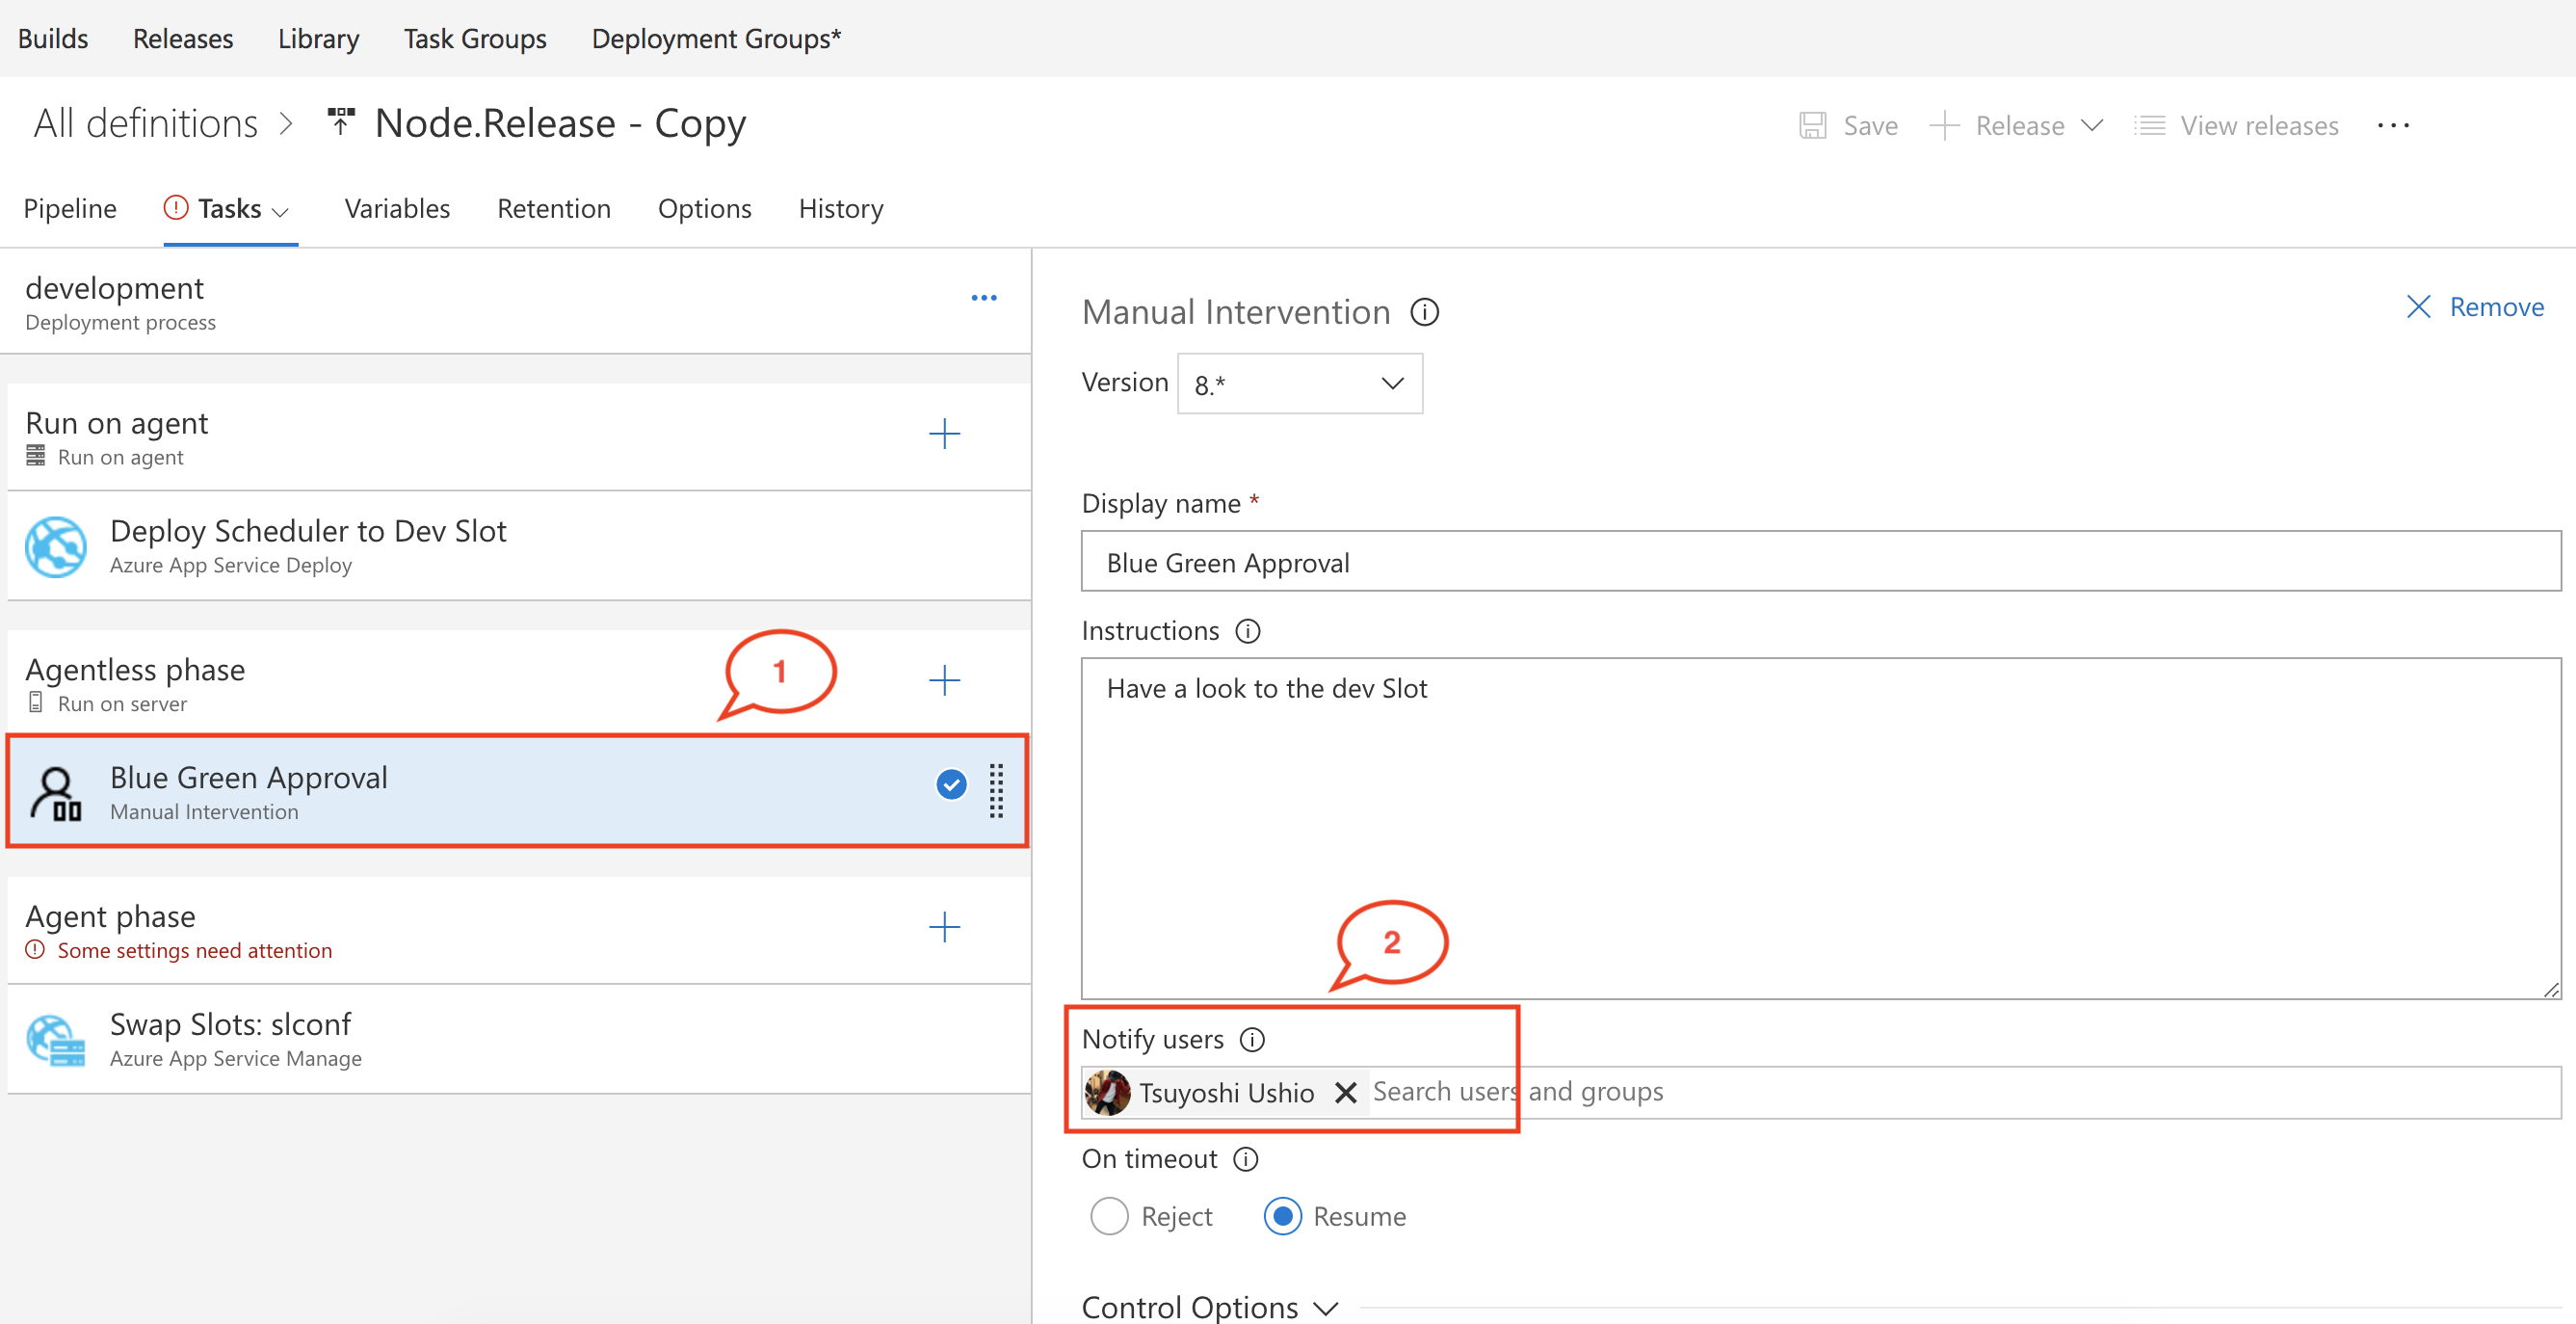
Then I add Manual Intervention to review the deployment. However it is optional.
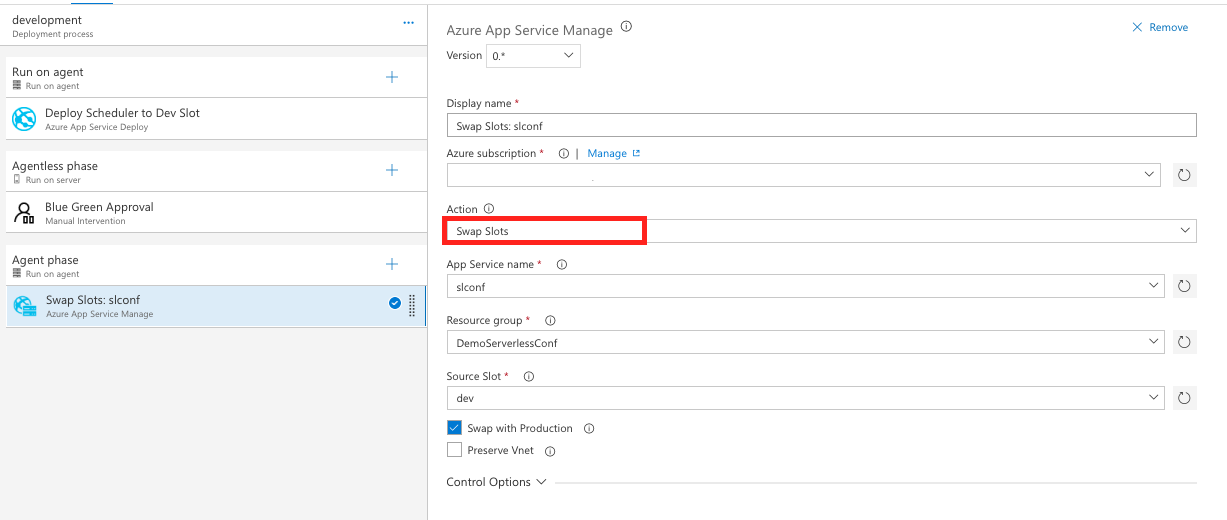
Swap Slot
Swap slot is almost the same as the Deploy task. It swaps the slot into production.
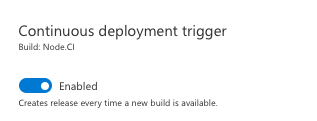
You can configure Continuous deployment if you like.
Import Release definition (Optional)
You can also import release definition from my GitHub
You can find the Release Definition file on the repo. Just import Pipelines/Node.Release.json
Then you can configure the pipeline according to your environment.
Select The Hosted VS2017 agent

Change configuration when you see the messages colored red.
You can select your own environment. like FunctionApp, Resource Group.

For the manual intervention task, please change the approver.
Conclusion
Now you have done advanced CI/CD pipeline with VSTS. You can do Continuous Deployment using Function App feature, however, if you use VSTS push deployment model, you can control the pipeline more.
Tips
- Use VSTS for complex pipeline
- Zip your FunctionApp to deploy it
- funckpack it to avoid performance issue
- Unit Testing with Mock object and frameworks
- Use Azure App Service Deploy task
- Use Swap Slot for Blue Green Deployment
I hope you enjoy this post.