I’m making a game titled “Charisma The Chameleon.” It’s built with Three.js, React and WebGL. This is an introduction to how these technologies work together using react-three-renderer (abbreviated R3R).
Check out A Beginner’s Guide to WebGL and Getting Started with React and JSX here on SitePoint for introductions to React and WebGL. This article and the accompanying code use ES6 Syntax.

How It All Began
Some time ago, Pete Hunt made a joke about building a game using React in the #reactjs IRC channel:
I bet we could make a first person shooter with React! Enemy has
<Head /><Body><Legs>etc.
I laughed. He laughed. Everyone had a great time. “Who on earth would do that?” I wondered.
Years later, that’s exactly what I’m doing.
Charisma The Chameleon is a game where you collect power-ups that make you shrink to solve an infinite fractal maze. I’ve been a React developer for a few years, and I was curious if there was a way to drive Three.js using React. That’s when R3R caught my eye.
Why React?
I know what you’re thinking: why? Humor me for a moment. Here’s some reasons to consider using React to drive your 3D scene:
- “Declarative” views let you cleanly separate your scene rendering from your game logic.
- Design easy to reason about components, like
<Player />,<Wall />,<Level />, etc. - “Hot” (live) reloading of game assets. Change textures and models and see them update live in your scene!
- Inspect and debug your 3D scene as markup with native browser tools, like the Chrome inspector.
- Manage game assets in a dependency graph using Webpack, eg
<Texture src={ require('../assets/image.png') } />
Let’s set up a scene to get an understanding of how this all works.
React and WebGL
I’ve created a sample GitHub repository to accompany this article. Clone the repository and follow the instructions in the README to run the code and follow along. It stars SitePointy the 3D Robot!

Warning: R3R is still in beta. Its API is volatile and may change in the future. It only handles a subset of Three.js at the moment. I’ve found it complete enough to build a full game, but your mileage may vary.
Organizing view code
The main benefit of using React to drive WebGL is our view code is decoupled from our game logic. That means our rendered entities are small components that are easy to reason about.
R3R exposes a declarative API that wraps Three.js. For example, we can write:
<scene>
  <perspectiveCamera
    position={ new THREE.Vector3( 1, 1, 1 )
  />
</scene>
Now we have an empty 3D scene with a camera. Adding a mesh to the scene is as simple as including a <mesh /> component, and giving it <geometry /> and a <material />.
<scene>
  …
  <mesh>
    <boxGeometry
      width={ 1 }
      height={ 1 }
      depth={ 1 }
    />
    <meshBasicMaterial
      color={ 0x00ff00 }
    />
</mesh>
Under the hood, this creates a THREE.Scene and automatically adds a mesh with THREE.BoxGeometry. R3R handles diffing the old scene with any changes. If you add a new mesh to the scene, the original mesh won’t be recreated. Just as with vanilla React and the DOM, the 3D scene is only updated with the differences.
Because we’re working in React, we can separate game entities into component files. The Robot.js file in the example repository demonstrates how to represent the main character with pure React view code. It’s a “stateless functional” component, meaning it doesn’t hold any local state:
const Robot = ({ position, rotation }) => <group
  position={ position }
  rotation={ rotation }
>
  <mesh rotation={ localRotation }>
    <geometryResource
      resourceId="robotGeometry"
    />
    <materialResource
      resourceId="robotTexture"
    />
  </mesh>
</group>;
And now we include the <Robot /> in our 3D scene!
<scene>
  …
  <mesh>…</mesh>
  <Robot
    position={…}
    rotation={…}
  />
</scene>
You can see more examples of the API on the R3R GitHub repository, or view the complete example setup in the accompanying project.
Organizing Game Logic
The second half of the equation is handling game logic. Let’s give SitePointy, our robot, some simple animation.
How do game loops traditionally work? They accept user input, analyze the old “state of the world,” and return the new state of the world for rendering. For convenience, let’s store our “game state” object in component state. In a more mature project, you could move the game state into a Redux or Flux store.
We’ll use the browser’s requestAnimationFrame API callback to drive our game loop, and run the loop in GameContainer.js. To animate the robot, let’s calculate a new position based on the timestamp passed to requestAnimationFrame, then store the new position in state.
// …
gameLoop( time ) {
  this.setState({
    robotPosition: new THREE.Vector3(
      Math.sin( time * 0.01 ), 0, 0
    )
  });
}
Calling setState() triggers a re-render of the child components, and the 3D scene updates. We pass the state down from the container component to the presentational <Game /> component:
render() {
  const { robotPosition } = this.state;
  return <Game
    robotPosition={ robotPosition }
  />;
}
There’s a useful pattern we can apply to help organize this code. Updating the robot position is a simple time-based calculation. In the future, it might also take into account the previous robot position from the previous game state. A function that takes in some data, processes it, and returns new data, is often referred to as a reducer. We can abstract out the movement code into a reducer function!
Now we can write a clean, simple game loop that only has function calls in it:
import robotMovementReducer from './game-reducers/robotMovementReducer.js';

// …

gameLoop() {
  const oldState = this.state;
  const newState = robotMovementReducer( oldState );
  this.setState( newState );
}
To add more logic to the game loop, such as processing physics, create another reducer function and pass it the result of the previous reducer:
const newState = physicsReducer( robotMovementReducer( oldState ) );
As your game engine grows, organizing game logic into separate functions becomes critical. This organization is straightforward with the reducer pattern.
Asset management
This is still an evolving area of R3R. For textures, you specify a url attribute on the JSX tag. Using Webpack, you can require the local path to the image:
<texture url={ require( '../local/image/path.png' ) } />
With this setup, if you change the image on disk, your 3D scene will live update! This is invaluable for rapidly iterating game design and content.
For other assets like 3D models, you still have to process them using the built-in loaders from Three.js, like the JSONLoader. I experimented with using a custom Webpack loader for loading 3D model files, but in the end it was too much work for no benefit. It’s easier to treat the model as binary data and load them with the file-loader. This still affords live reloading of model data. You can see this in action in the example code.
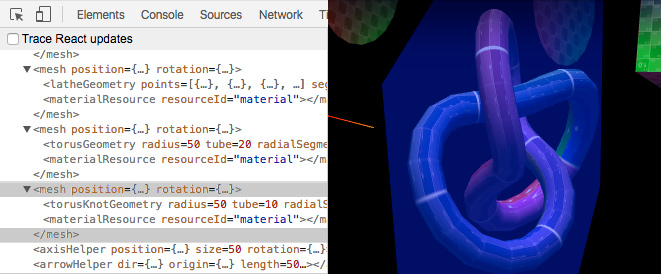
Debugging
R3R supports the React developer tools extension for both Chrome and Firefox. You can inspect your scene as if it were the vanilla DOM! Hovering over elements in the inspector shows their bounding box in the scene. You can also hover over texture definitions to see which objects in the scene use those textures.
You can also join us in the react-three-renderer Gitter chat room for help debugging your applications.
Performance Considerations
While building Charisma The Chameleon, I’ve run into several performance issues that are unique to this workflow.
- My hot reload time with Webpack was as long as thirty seconds! This is because large assets have to be re-written to the bundle on every reload. The solution was to implement Webpack’s DLLPlugin, which cut down reload times to below five seconds.
- Ideally your scene should only call one
setState()per frame render. After profiling my game, React itself is the main bottleneck. CallingsetState()more than once per frame can cause double renders and reduce performance. - Past a certain number of objects, R3R will perform worse than vanilla Three.js code. For me this was around 1,000 objects. You can compare R3R to Three.js under “Benchmarks” in the examples.
The Chrome DevTools Timeline feature is an amazing tool for debugging performance. It’s easy to visually inspect your game loop, and it’s more readable than the “Profile” feature of the DevTools.
That’s It!
Check out Charisma The Chameleon to see what’s possible using this setup. While this toolchain is still quite young, I’ve found React with R3R to be integral to organizing my WebGL game code cleanly. You can also check out the small but growing R3R examples page to see some well organized code samples.
This article was peer reviewed by Mark Brown and Kev Zettler. Thanks to all of SitePoint’s peer reviewers for making SitePoint content the best it can be!
Frequently Asked Questions (FAQs) about Building a Game with ReactJS and WebGL
What are the prerequisites for building a game with ReactJS and WebGL?
To start building a game with ReactJS and WebGL, you need to have a basic understanding of JavaScript, HTML, and CSS. Knowledge of ReactJS, a popular JavaScript library for building user interfaces, is also essential. Additionally, understanding WebGL (Web Graphics Library), a JavaScript API for rendering interactive 3D and 2D graphics, is crucial. Familiarity with ES6 syntax, npm (Node Package Manager), and the command line will also be beneficial.
How can I integrate Unity with ReactJS?
Unity can be integrated with ReactJS using the react-unity-webgl package. This package allows you to embed your Unity WebGL build in your ReactJS application. You can install it using npm and import it into your project. Then, you can use the Unity component provided by the package to embed your Unity game in your ReactJS application.
What are the different ways of creating 3D apps with React?
There are several ways to create 3D apps with React. One of the most popular methods is using Three.js, a cross-browser JavaScript library used to create and display animated 3D computer graphics. Another method is using WebGL directly, although this can be more complex. Other libraries like react-three-fiber and react-unity-webgl can also be used to create 3D apps with React.
How can I create interactive 3D graphics with WebGL?
WebGL allows you to create interactive 3D graphics directly in the browser without the need for plugins. You can use WebGL’s API to create complex 3D graphics, animations, and games. However, WebGL’s API is low-level and can be complex to use directly. Therefore, many developers prefer to use libraries like Three.js that provide a higher-level interface to WebGL.
What is the role of react-unity-webgl in game development?
The react-unity-webgl package allows you to embed your Unity WebGL build in your ReactJS application. This means you can create complex 3D games with Unity and then easily integrate them into your ReactJS application. This can be particularly useful if you want to create a web-based game or interactive 3D application.
How can I optimize my ReactJS and WebGL game for performance?
Optimizing a game built with ReactJS and WebGL can involve several strategies. These include minimizing the number of re-renders in React, using WebGL’s built-in performance features like requestAnimationFrame for smooth animations, and optimizing your 3D models and textures for the web.
Can I use ReactJS and WebGL to build mobile games?
Yes, you can use ReactJS and WebGL to build games that run in the web browser on mobile devices. However, for native mobile games, you might want to consider using a game development platform like Unity or Unreal Engine that can export directly to iOS and Android.
How can I handle user input in a ReactJS and WebGL game?
Handling user input in a ReactJS and WebGL game can be done using standard JavaScript event handlers. You can listen for keyboard, mouse, and touch events and then update your game state accordingly. ReactJS also provides synthetic events that can be used to handle user input in a consistent way across different browsers.
Can I use other JavaScript libraries with ReactJS and WebGL?
Yes, you can use other JavaScript libraries alongside ReactJS and WebGL. For example, you might use Three.js for 3D graphics, Howler.js for audio, or Matter.js for physics. The key is to ensure that these libraries can work together seamlessly in your game.
How can I debug my ReactJS and WebGL game?
Debugging a game built with ReactJS and WebGL can be done using the developer tools in your web browser. These tools allow you to inspect your HTML, CSS, and JavaScript code, view console logs, and debug your code step-by-step. Additionally, React Developer Tools is a browser extension that allows you to inspect your React component hierarchy, props, and state.
 Andrew Ray
Hello! I'm a software engineer from the Bay Area.