In this tutorial we’re going to build a chat application using Cordova and Socket.io. To make things easier we’re using the Ionic framework. I’m going to assume that you have already setup all the relevant SDK’s in your machine. And have installed Cordova and Ionic as we won’t be going through those steps in this tutorial.
Setting up the Project
First we need to create a new Ionic project, do this with the following command:
ionic start project_nameThis creates a blank Ionic template in the current directory.
Adding the Platform
Next add the platforms which you’re going to deploy to. If you’re on Windows or Ubuntu you can only use the android platform, if you’re on a Mac, you can also use the iOS platform.
ionic platform add android
ionic platform add ios
Installing Front-End Dependencies
Once the project is created, open the bower.json file in the root directory of the project and add the following:
{
  "name": "cordova-chatapp",
  "private": "true",
  "devDependencies": {
    "ionic": "driftyco/ionic-bower#1.1.1"
  },
  "dependencies": {
    "angular-local-storage": "~0.2.3",
    "angular-socket-io": "~0.7.0",
    "sio-client": "~1.3.6",
    "angular-moment": "~0.9.2",
    "moment": "2.9.0"
  }
}
devDependencies is automatically added to the default bower.json file so all we’ve added are the dependencies. In this project the following dependencies are used:
- angular-local-storage: Used for storing data in local storage. In this project it’s used to store the name of the current user, and the current room.
- sio-client: The socket.io JavaScript client.
- angular-socket-io: Allows us to use socket.io within Angular.
- angular-moment: Provides angular directives for the moment.js library, allowing us to use moment from within Angular.
- moment: This is a dependency of angular-moment so it automatically gets installed when you install angular-moment. If you’re not familiar with the moment.js library, it’s basically used for manipulating dates and times.
Install these dependencies with bower install.
Building the Project
Now we’re ready to start building the project. Start by opening the index.html file inside the www directory and linking the script files of the dependencies installed earlier. This includes angular-local-stroage, moment.js, angular-moment, and socket.io.
<!DOCTYPE html>
<html>
  <head>
    <meta charset="utf-8">
    <meta name="viewport" content="initial-scale=1, maximum-scale=1, user-scalable=no, width=device-width">
    <title></title>

    <link href="lib/ionic/css/ionic.css" rel="stylesheet">
    <link href="css/style.css" rel="stylesheet">

    <!-- IF using Sass (run gulp sass first), then uncomment below and remove the CSS includes above
    <link href="css/ionic.app.css" rel="stylesheet">
    -->

    <!-- ionic/angularjs js -->
    <script src="lib/ionic/js/ionic.bundle.js"></script>

    <script src="lib/angular-local-storage/dist/angular-local-storage.min.js"></script>

    <!-- cordova script (this will be a 404 during development) -->
    <script src="cordova.js"></script>

    <!-- your app's js -->
    <script src="js/app.js"></script>

    <script src="lib/moment/min/moment.min.js"></script>
    <script src="lib/angular-moment/angular-moment.min.js"></script>

    <script src="lib/sio-client/socket.io.js"></script>

    <script src="http://localhost:3000/socket.io/socket.io.js"></script>

    <script src="lib/angular-socket-io/socket.js"></script>

    <script src="js/services/SocketService.js"></script>

    <script src="js/controllers/HomeController.js"></script>
    <script src="js/controllers/RoomController.js"></script>
  </head>

  <body ng-app="starter">
    <ion-nav-view></ion-nav-view>
  </body>
</html>
There are other scripts which may not be familiar to you. This includes the socket.io script for the server.
<script src="http://localhost:3000/socket.io/socket.io.js"></script>The Socket service used for connecting to the socket.io server.
<script src="js/services/SocketService.js"></script>And the home controller which handles events that happen on the home pages. This includes the login page and the rooms page where the user selects which room to enter.
<script src="js/controllers/HomeController.js"></script>Finally there’s the room controller which handles events inside the chat room, such as when the user sends a message or leaves the room.
<script src="js/controllers/RoomController.js"></script>Later we’ll look at the code for each of these files. For now just remember what they’re for.
Adding the Dependencies
Open the js/app.js file and include the following services:
LocalStorageModule: Allows us to use local storage.btford.socket-io: Allows us to use socket.io.angularMoment: Allows us to use moment.js.
angular.module('starter', ['ionic', 'LocalStorageModule', 'btford.socket-io', 'angularMoment'])Adding Routes
Still in js/app.js, add configuration for the different states by using the config method. This allows us to specify the different pages, the url in which they can be accessed and the HTML template that will be displayed when these pages are accessed.
The login state returns the login page, the rooms state returns the list of rooms in which the user can join, and the room state returns the chat page. The login page is the default page that will be displayed if none of the other states are active.
.config(function($stateProvider, $urlRouterProvider) {
  $stateProvider

  .state('login', {
    url: '/login',
    templateUrl: 'templates/login.html'
  })

  .state('rooms', {
    url: '/rooms',
    templateUrl: 'templates/rooms.html'
  })

  .state('room', {
    url: '/room',
    templateUrl: 'templates/room.html'
  });
  // if none of the above states are matched, use this as the fallback
  $urlRouterProvider.otherwise('/login');
})
Home Controller
Next create the Home Controller in js/controllers/HomeController.js. It handles all UI interactions and data used in the login and rooms page.
Inside the controller we inject the following services:
$scope: Used for attaching data or functions to the current page.$state: Used for redirecting to a different state.localStorageService: Used for saving and getting data from local storage.SocketService: Used for sending data through websockets.
(function(){
    angular.module('starter')
    .controller('HomeController', ['$scope', '$state', 'localStorageService', 'SocketService', HomeController]);

    function HomeController($scope, $state, localStorageService, SocketService){

        var me = this;

        me.current_room = localStorageService.get('room');
        me.rooms = ['Coding', 'Art', 'Writing', 'Travel', 'Business', 'Photography'];

        $scope.login = function(username){
            localStorageService.set('username', username);
            $state.go('rooms');
        };

        $scope.enterRoom = function(room_name){

            me.current_room = room_name;
            localStorageService.set('room', room_name);

            var room = {
                'room_name': room_name
            };

            SocketService.emit('join:room', room);

            $state.go('room');
        };

    }

})();
Breaking this code down, first we get the name of the current room, if any.
me.current_room = localStorageService.get('room');Rooms are hard-coded in an array. This will be used in the rooms template later on.
me.rooms = ['Coding', 'Art', 'Writing', 'Travel', 'Business', 'Photography'];Attach a login function to the current scope. This function will be called when the user clicks on the login button. The username will be passed to this function and saved in local storage. Then we redirect to the room state.
$scope.login = function(username){
    localStorageService.set('username', username);
    $state.go('rooms');
};
Once the user is redirected to the rooms state, they will see a list of rooms, each with the enterRoom function attached to it. The function executes whenever the user clicks on a room, the name of the room passed as an argument used to set the current_room and saved to local storage. The join:room event is sent through the socket which contains the object representing the current room. Finally, we redirect to the room state.
$scope.enterRoom = function(room_name){

    me.current_room = room_name;
    localStorageService.set('room', room_name);

    var room = {
        'room_name': room_name
    };

    SocketService.emit('join:room', room);

    $state.go('room');
};
The SocketService.emit() calls allow us to send data through the socket. This means the data is sent to the socket.io server (created later) in real-time.
Login Template
Create the login template (templates/login.html), which is the default app page. This allows the user to enter their user name and click a login button to login. This uses the HomeController by adding it as the value for the ng-controller attribute and use home_ctrl as an alias for HomeController. When the login button is clicked, we call the login function attached to the scope earlier in the controller. This accepts the current value inputted in the username as its argument.
<ion-view title="Login" ng-controller="HomeController as home_ctrl">
    <header class="bar bar-header bar-positive">
        <h1 class="title">Login</h1>
    </header>

  <ion-content class="has-header padding">

    <div class="list">
        <label class="item item-input">
            <input type="text" ng-model="home_ctrl.username" placeholder="User name">
        </label>

        <div class="padding">
            <button class="button button-positive button-block" ng-click="login(home_ctrl.username)">Enter</button>
        </div>
    </div>

  </ion-content>

</ion-view>
Rooms Template
Next create the rooms template at templates/rooms.html. This is the page where the user gets redirected after logging in. This lists all the rooms supplied from the HomeController earlier. The ng-repeat directive allows us to loop through all the rooms and the ng-click directive allows us to execute the enterRoom function upon user click.
<ion-view title="Rooms" ng-controller="HomeController as home_ctrl">
    <header class="bar bar-header bar-positive">
        <h1 class="title">Rooms</h1>
    </header>

  <ion-content class="has-header padding">
    <div class="card" ng-repeat="room in home_ctrl.rooms">
      <div class="item item-text-wrap text-center" ng-click="enterRoom(room)">
        <strong>{{room}}</strong>
      </div>
    </div>
  </ion-content>

</ion-view>
SocketService
Next create js/services/SocketService.js, which we use to connect to the socket.io server using the SocketService(). This service uses the socketFactory provided by angular-socket-io. Here you can see that we are connecting to port 3000 of localhost. If you’re planning to deploy a chat app later, you should change http://localhost:3000 to an internet-accessible URL. For development purposes, you can use ngrok to expose a localhost URL to the internet.
(function(){

    angular.module('starter')
    .service('SocketService', ['socketFactory', SocketService]);

    function SocketService(socketFactory){
        return socketFactory({

            ioSocket: io.connect('http://localhost:3000')

        });
    }
})();
Room Controller
Create the room controller in js/services/RoomController.js which handles all the events that happen in the chat room. In this controller we’re injecting two new services, moment and $ionicScrollDelegate. moment allows us to use the moment.js library to get the current timestamp when a message is sent. It allows us to format a timestamp into a human friendly format (e.g. 4 seconds ago). $ionicScrollDelegate automatically scrolls the app every time a new message is pushed into the array. This way the user always sees the most recent message.
(function(){
    angular.module('starter')
    .controller('RoomController', ['$scope', '$state', 'localStorageService', 'SocketService', 'moment', '$ionicScrollDelegate', RoomController]);

    function RoomController($scope, $state, localStorageService, SocketService, moment, $ionicScrollDelegate){

        var me = this;

        me.messages = [];

        $scope.humanize = function(timestamp){
            return moment(timestamp).fromNow();
        };

        me.current_room = localStorageService.get('room');

        var current_user = localStorageService.get('username');

        $scope.isNotCurrentUser = function(user){

            if(current_user != user){
                return 'not-current-user';
            }
            return 'current-user';
        };


        $scope.sendTextMessage = function(){

            var msg = {
                'room': me.current_room,
                'user': current_user,
                'text': me.message,
                'time': moment()
            };

            me.messages.push(msg);
            $ionicScrollDelegate.scrollBottom();

            me.message = '';

            SocketService.emit('send:message', msg);
        };


        $scope.leaveRoom = function(){
            var msg = {
                'user': current_user,
                'room': me.current_room,
                'time': moment()
            };

            SocketService.emit('leave:room', msg);
            $state.go('rooms');

        };


        SocketService.on('message', function(msg){
            me.messages.push(msg);
            $ionicScrollDelegate.scrollBottom();
        });


    }

})();
Breaking this code down. First we have the array which stores the messages sent in the current room. Whenever a message is sent through the socket, we simply push it to this array and then we can use it from the view to output all the messages.
me.messages = [];Attach the humanize function into the scope. This uses the moment.js library to format the timestamp in a standard way.
$scope.humanize = function(timestamp){
    return moment(timestamp).fromNow();
};
Get the name of the current room from local storage and assign it to the controller. We will use this data later when sending messages and leaving the room.
me.current_room = localStorageService.get('room');Get the name of the current user from the local storage.
var current_user = localStorageService.get('username');Attach the isNotCurrentUser function to the current scope that checks if the user supplied as the argument is the same as the current user. It returns a different string based on the result used in the view so that the message container for the current user is styled differently.
$scope.isNotCurrentUser = function(user){

    if(current_user != user){
        return 'not-current-user';
    }
    return 'current-user';
};
The sendTextMessage function executes when the user clicks on the button for sending the message. This constructs an object containing the name of the current room, current user and the actual message. We then push it to the messages array so that it can be immediately seen by the user. And then call the scrollBottom function in the $ionicScrollDelegate to scroll down the page. Next, we assign an empty string to the message so that the contents of the text field gets deleted. Finally, we send the object.
$scope.sendTextMessage = function(){

    var msg = {
        'room': me.current_room,
        'user': current_user,
        'text': me.message
    };

    me.messages.push(msg);
    $ionicScrollDelegate.scrollBottom();

    me.message = '';

    SocketService.emit('send:message', msg);
};
The leaveRoom function leaves the room, sending a leave:room message to the server so that the current user is removed from the current room, sending the name of the user leaving the room. This is used by the server to send a message to all the other users in the room that a specific user has left the room.
$scope.leaveRoom = function(){

    var msg = {
        user: current_user,
        room: me.current_room
    };

    SocketService.emit('leave:room', msg);
};
This listens for messages sent by other users in the room. When a message is received, we push it to the messages array so that it’s displayed in the view.
SocketService.on('message', function(msg){
    me.messages.push(msg);
    $ionicScrollDelegate.scrollBottom();
});
Room Template
Create the room template in templates/room.html, which is the chat room itself. It’s where messages are sent by people in the room. This relies on the RoomController for its data and functions to be executed (sending messages and leaving the room).
<ion-view title="{{ room_ctrl.current_room }}" ng-controller="RoomController as room_ctrl">
    <header class="bar bar-header bar-positive">
        <h1 class="title">{{ room_ctrl.current_room }}</h1>
        <button class="button button-assertive" ng-click="leaveRoom()">Leave</button>
    </header>

  <ion-content class="has-header padding">

    <div class="list" ng-if="room_ctrl.messages.length > 0">
        <li class="item item-text-wrap no-border {{ isNotCurrentUser(msg.user) }}" ng-repeat="msg in room_ctrl.messages">
            <div class="msg">
                <div class="details padding">
                    <p>
                        <div class="user">{{ msg.user }}</div>
                        <div class="message">{{ msg.text }}</div>
                    </p>
                    <small>{{ humanize(msg.time) }}</small>
                </div>
            </div>
        </li>
    </div>

    <div class="card" ng-if="!room_ctrl.messages.length">
      <div class="item item-text-wrap">
        No messages yet.
      </div>
    </div>

  </ion-content>


<footer class="bar bar-footer bar-positive item-input-inset">
    <label class="item-input-wrapper">
      <input type="text" id="message" name="message" ng-model="room_ctrl.message" placeholder="Type message">
    </label>
    <a class="button button-icon icon ion-android-send" ng-click="sendTextMessage()"></a>
</footer>

</ion-view>
Breaking this code down. Inside the main content we check if there are any messages by checking the element length. If there are, we use ng-repeat to loop through all the messages. Note that this uses the live data stored in the messages array. This means that every time a new message is pushed into that array, it automatically gets displayed. For every iteration, we use the isNotCurrentUser function to output an additional class for the current item. Then we show the username, the message and the time sent.
<div class="list" ng-if="room_ctrl.messages.length > 0">
    <li class="item item-text-wrap no-border {{ isNotCurrentUser(msg.user) }}" ng-repeat="msg in room_ctrl.messages">
        <div class="msg">
            <div class="details padding">
                <p>
                    <div class="user">{{ msg.user }}</div>
                    <div class="message">{{ msg.text }}</div>
                </p>
                <small>{{ humanize(msg.time) }}</small>
            </div>
        </div>
    </li>
</div>
If there are no messages, we output a card saying there are no messages yet.
<div class="card" ng-if="!room_ctrl.messages.length">
  <div class="item item-text-wrap">
    No messages yet.
  </div>
</div>
The footer is where we have the form which allows the user to send messages.
<footer class="bar bar-footer bar-positive item-input-inset">
    <label class="item-input-wrapper">
      <input type="text" id="message" name="message" ng-model="room_ctrl.message" placeholder="Type message">
    </label>
    <a class="button button-icon icon ion-android-send" ng-click="sendTextMessage()"></a>
</footer>
Styling
Add the following to css/style.css, mostly for the chat room.
ion-content {
    margin-bottom: 50px !important;
}

.no-border {
    border: none;
}

.user {
    font-weight: bold;
}

.current-user {
    float: left;
    clear: both;
}

.not-current-user {
    float: right;
    clear: both;
}

.current-user .details {
    background-color: #72CBFF;
}

.not-current-user .details {
    background-color: #DCDCDC;
}
Socket.io Server
Now we’re ready to work on the server side. Create a server folder inside the root directory of the app and inside the folder, create a package.json file, adding the following:
{
  "name": "cordova-chatapp",
  "version": "0.0.1",
  "dependencies": {
    "socket.io": "^1.3.7"
  }
}
Save the file and execute npm install. This installs the server version of socket.io, earlier we installed the client version.
Create a chat-server.js file and add the following:
var io = require('socket.io')(3000);

io.on('connection', function(socket){

    socket.on('join:room', function(data){
        var room_name = data.room_name;
        socket.join(room_name);
    });


    socket.on('leave:room', function(msg){
        msg.text = msg.user + " has left the room";
        socket.in(msg.room).emit('exit', msg);
        socket.leave(msg.room);
    });


    socket.on('send:message', function(msg){
        socket.in(msg.room).emit('message', msg);
    });

});
Calling require('socket.io') returns a function. This function accepts the port in which the server will run. In this case we’re using port 3000, which is why in the SocketService earlier we connected to http://localhost:3000. In the index.html file, the socket.io script serves on port 3000. If you change the value for the port you must also change it in those two other places.
var io = require('socket.io')(3000);Every time a client connects to socket.io, the code below is executed. So we wrap all the socket.io function calls inside this. The socket.io client passes an object containing the socket information. This is basically an ID assigned by socket.io to every user.
io.on('connection', function(socket){
    ...
});
Earlier in the app were calls to SocketService.emit('join:room', msg). This is the event triggered in the server every time that’s executed. As you have seen earlier we have added the room_name to the object that we were sending. We just get it from here and use it to add the user to the room.
socket.on('join:room', function(data){

    var room_name = data.room_name;

    socket.join(room_name);

    console.log('someone joined room ' + room_name + ' ' + socket.id);
});
This code executes whenever a user leaves a room. First a message is sent to all other users that the user has left the room. Then the user is removed from the room.
socket.on('leave:room', function(msg){
    msg.text = msg.user + " has left the room";
    socket.in(msg.room).emit('exit', msg);
    socket.leave(msg.room);
});
We need to listen for messages sent from the client. All that is needed is to send the message to all the users in the room.
socket.on('send:message', function(msg){
    socket.in(msg.room).emit('message', msg);
});
Testing the App
To test the app, first you need to run the socket.io server:
node chat-server.jsThen in the root directory of the project, use ionic serve to test in your browser.
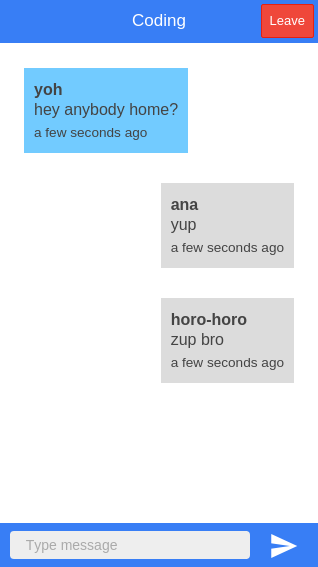
ionic serveHere’s how the final output should look:
Conclusion
That’s it! In this tutorial we learned how to create a chat application with Cordova. The chat application is simple and here are a few ideas to improve the app:
- Add a database to store messages. This allows users who entered a room late in the discussion to have an idea what the others are talking about.
- Add photo sharing functionality.
- Add voice-mail functionality.
- Add emoticons.
The list is endless. The basic idea is that you can always improve on things. If you want to see the code used in this tutorial take a look at Github.
Frequently Asked Questions (FAQs) about Real-Time Chat App Development
What are the key differences between Socket.IO and other real-time communication technologies?
Socket.IO is a JavaScript library that enables real-time, bidirectional, and event-based communication between the browser and the server. It consists of two parts: a client-side library that runs in the browser and a server-side library for Node.js. Unlike other real-time communication technologies, Socket.IO provides a unified method of communication, regardless of the support of the underlying server. It automatically upgrades the connection from long-polling to WebSocket if possible. It also provides additional features like broadcasting to multiple sockets, storing data associated with each client, and asynchronous I/O.
How can I integrate Socket.IO with Cordova for Android app development?
Integrating Socket.IO with Cordova for Android app development involves a few steps. First, you need to install the Socket.IO client and server. Then, you need to set up the server to listen for incoming connections from the client. After that, you can use the Socket.IO client in your Cordova app to connect to the server and send/receive messages. You can also use Cordova plugins to access native device features.
What are the benefits of using real-time chat in my application?
Real-time chat can significantly enhance the user experience of your application. It allows users to communicate instantly, without any noticeable delay. This can be particularly useful for applications that require immediate interaction, such as social networking apps, online gaming, live customer support, collaborative work tools, and more. Real-time chat can also increase user engagement and retention, as users are more likely to return to an app where they can interact with others in real time.
How does real-time chat work with Socket.IO?
Real-time chat with Socket.IO works by establishing a persistent connection between the client and the server. This connection allows the server to push updates to the client as soon as they happen, without the client having to request updates. When a user sends a message, the client emits an event to the server with the message data. The server then broadcasts the message to all other connected clients, who update their chat interfaces in real time.
Can I use Socket.IO for real-time chat in a cross-platform app?
Yes, you can use Socket.IO for real-time chat in a cross-platform app. Socket.IO is a JavaScript library, so it can be used in any app that supports JavaScript. This includes web apps, mobile apps built with hybrid frameworks like Cordova, and desktop apps built with Electron. Socket.IO also has client libraries for other languages like Swift and Java, so you can use it in native iOS and Android apps as well.
How secure is real-time chat with Socket.IO?
Socket.IO uses WebSocket protocol which is as secure as HTTP. It supports both WS (WebSocket) and WSS (WebSocket Secure) protocols. WSS provides a secure connection, similar to HTTPS. However, the security of your real-time chat also depends on other factors, such as how you handle user authentication and how you secure your server.
How can I scale my real-time chat app built with Socket.IO?
Scaling a real-time chat app built with Socket.IO can be achieved in several ways. One common method is to use multiple Node.js processes or servers, with a load balancer to distribute incoming connections. Socket.IO also supports horizontal scaling with the use of Redis to store and share session data across multiple nodes.
Can I use Socket.IO with other JavaScript frameworks?
Yes, Socket.IO can be used with any JavaScript framework. It is not tied to any specific framework, and it can be integrated into any JavaScript project. This includes popular front-end frameworks like React, Angular, and Vue.js, as well as back-end frameworks like Express.js.
What is the role of Cordova in developing a real-time chat app?
Cordova is a mobile development framework that allows you to build mobile apps using HTML, CSS, and JavaScript. In a real-time chat app, Cordova can be used to create the user interface and handle user interactions. It can also integrate with Socket.IO to enable real-time communication. Additionally, Cordova provides a set of APIs that allow you to access native device features, such as the camera or accelerometer.
How can I handle disconnections and reconnections in a real-time chat app with Socket.IO?
Socket.IO provides built-in mechanisms to handle disconnections and reconnections. When a client disconnects, either intentionally or due to network issues, Socket.IO will automatically try to reconnect. You can also listen for ‘disconnect’ and ‘reconnect’ events to update your app’s UI or perform other actions when the connection status changes.
 Wern Ancheta
Wern is a web developer from the Philippines. He loves building things for the web and sharing the things he has learned by writing in his blog. When he's not coding or learning something new, he enjoys watching anime and playing video games.