In this tutorial I will demonstrate how two-way data binding works in AngularJS by building a dynamic business card generator. This generator will allow you to create your own virtual visiting cards, which you can personalize with your name, occupation, email, company logo, as well as links to both homepage and social media sites. You will be able to adjust both the background and text color of the card, using HTML5 color inputs and see any changes you make appear on the screen in real-time.
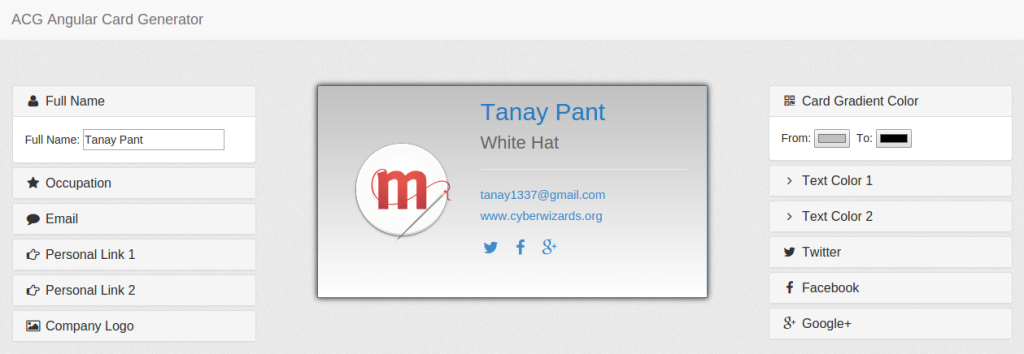
This is what we’ll end up with:
Getting Started
We’re going to use Bower to manage our project’s dependencies. Bower is a package manager for the web and can be installed using npm (which means you’ll need to have Node.js installed). If you need help installing Node.js (or npm) then check out this recent SitePoint article on that very subject. If you need help installing Bower, then you can check out the instructions on their homepage. Our dependencies for this project will be the Bootstrap Framework (for styling and an accordion component), Font Awesome (for icons), as well as jQuery (on which Bootstrap depends) and AngularJS. Assuming you have Bower installed and configured, create a new directory,cd into that directory and use Bower to initialize the project:
mkdir ACG && cd ACG
bower initbower.json file in the root directory of your project. It will also ask you a few questions, such as the name of the project, name of the author, description and so on. Under name enter “ACG” ( for Angular Card Generator) and fill the rest out as you see fit (or just accept the default values). The resultant JSON file should look like this:
{
name: 'ACG',
version: '0.0.0',
authors: [
'Tanay Pant <tanay1337@gmail.com>'
],
description: 'Card Generator',
keywords: [
'AngularJS'
],
license: 'MIT',
ignore: [
'**/.*',
'node_modules',
'bower_components',
'test',
'tests'
]
}bower install bootstrap --save
bower install font-awesome --save
bower install angular --savebower_components and save the dependencies to the JSON file. It is a good idea to add bower_components to .gitignore because you do not want to upload this folder to your GitHub repository, since any contributor can install the same dependencies by running bower install in the root of the project.
The Anatomy of an AngularJS App
In the ACG folder create a fileindex.html and another called style.css. Add the following code to index.html:
<!DOCTYPE HTML>
<html lang="en" ng-app="myApp" ng-controller="BusinessCardController">
<head>
<title>{{ user.name }} | Business Card</title>
<meta charset="utf-8">
<link href="path/to/bootstrap.min.css" rel="stylesheet">
<link href="path/to/font-awesome.min.css" rel="stylesheet">
<link href="style.css" rel="stylesheet">
</head>

<body>
<script src="path/to/jquery.min.js"></script>
<script src="path/to/js/bootstrap.min.js"></script>
<script src="path/to/angular.min.js"></script>
<script>
'use strict';

angular.module('myApp', [])
.controller('BusinessCardController', function($scope){
$scope.user = {
name: 'Tanay Pant'
}
});
</script>
</body>
</html>ng-app="myApp" and ng-controller="BusinessCardController" to the <html> tag. The ng-app directive is required to tell Angular that the whole page is an AngularJS application, while the ng-controller directive attaches a controller class to our view.
We then use the ng-bind directive in the title, so as to keep the title of the page in sync with our model, before including the relevant CSS files (in the <head>) and JS files (before the closing </body> tag). These files (apart from style.css) are all located in the bower_components folder.
Finally, we define myApp (our main module that’s loaded when the app bootstraps), as well as a BusinessCardController in which we will set up the initial state of the $scope object (the method by which our controller and view share data).
Accordions, Please!
Now we need a way to present the configuration options to the user. As we are using Bootstrap, we can make use of the collapse component—a basic accordion. The structure of an accordion panel is as follows:<div class="panel panel-default">
<div class="panel-heading">
<h4 class="panel-title">
<a data-toggle="collapse" data-parent="#accordion" href="#collapseOne">
Panel Title
</a>
</h4>
</div>
<div id="collapseOne" class="panel-collapse collapse in">
<div class="panel-body">
Panel content
</div>
</div>
</div><i class="fa fa-user fa-fw"></i>Full NameFull Name: <input type="text" ng-model="user.name" placeholder="Full Name" />ng-model directive. This binds the value of HTML control to the application data (in this case the name attribute of the user object we declared in the controller).
We can also give the panels a class of in to have them default to open.
This is what we’ve got so far. If you are following along at home, copy the HTML from the CodePen into index.html and the CSS from the CodePen into style.css.
See the Pen ZYqrKW by SitePoint (@SitePoint) on CodePen.
Wiring Things up
In the controller we can set some sensible defaults for ouruser object:
$scope.user = {
name: 'Tanay Pant',
designation: 'White Hat',
email: 'tanay1337@gmail.com',
link1: 'www.cyberwizards.org',
tusername:'tanay1337',
companylogo: 'https://s3-us-west-2.amazonaws.com/s.cdpn.io/123941/logo.png',
color1: '#c0c0c0',
color2: 'white',
textcolor1: '#287cc2',
textcolor2: '#666',
fusername:'...',
gusername:'+TanayPant1337'
}ng-model, previously) can now be referenced inside of expressions—JavaScript-like code snippets that are usually placed inside curly braces. This means that if we write {{ user.name }} anywhere within our ng-controller, it will evaluate to whatever user.name is currently set to.
We can make use of this when creating our card. Creating a title that automatically updates according to whatever was entered into the “Full Name” input element, is as simple as:
<h1>{{ user.name }}</h1>index.html and style.css with the HTML and CSS from the CodePen. The JavaScript goes inside our controller.
See the Pen Working Demo of Card Generator by SitePoint (@SitePoint) on CodePen.
<img ng-src="{{ user.companylogo }}" class="logo">
<a ng-href="mailto:{{ user.email }}">{{ user.email }}</a>ng-src. This is because if we just use src, the browser will start fetching the URL in raw format before AngularJS replaces the expression. We are also using ng-href for the same reason.
Social Links
An important part of the code is the social links button. We have used theng-if directive (which removes or recreates a portion of the DOM tree based on an {expression}) in both the Facebook and Google+ username columns, but not in the Twitter profile, as it is required. This means that the Facebook and Google+ icons will only be displayed if a user has entered their respective profile URLs.
<span class="facebook"
style="color:{{ user.textcolor1 }};"
ng-if="user.fusername">
<a ng-href="https://www.facebook.com/{{ user.fusername }}"
title="{{ user.name }} on Facebook" >
<i class="fa fa-facebook fa-fw"></i>
</a>
</span>ng-show directive on the span tag. This displays the user’s full Twitter handle only if the Facebook and Google+ URLs are not set. Pretty easy, huh?
<span class="twitter" style="color:{{ user.textcolor1 }};">
<a ng-href="https://www.twitter.com/{{ user.tusername }}"
title="@{{ user.tusername }}">
<i class="fa fa-twitter fa-fw"></i>
</a>
<span class="twitter-handle"
ng-show="!user.fusername && !user.gusername">
@{{user.tusername}}
</span>
</span>
Conclusion
I hope that the Card Generator helped you in learning the basic concepts of data binding in AngularJS. You can find a complete demo of the code on CodePen, or you can clone the code for this article from GitHub. I encourage you to fork the repository, play around with the code and see what cool things you can come up with.Frequently Asked Questions about Two-Way Data Binding in AngularJS
What is the difference between one-way and two-way data binding in AngularJS?
One-way data binding in AngularJS is a process where the view (UI) part of the application does not update automatically when data in the model changes. It’s a unidirectional flow of data. On the other hand, two-way data binding means that any changes in the model will update the view and vice versa. This is achieved using AngularJS’s built-in directives such as ng-model and ng-bind.
How does AngularJS implement two-way data binding?
AngularJS implements two-way data binding using a combination of event and property binding. It uses the ng-model directive to bind the view into the model, which will reflect changes in both sides. AngularJS also uses a digest cycle mechanism to monitor and update the view whenever a data change occurs.
What is the role of the $scope object in two-way data binding?
The $scope object plays a crucial role in two-way data binding in AngularJS. It acts as a bridge between the controller and the view. The $scope object stores the model data and functions, which can be accessed and manipulated from both the controller and the view.
Can you explain the digest cycle in AngularJS?
The digest cycle in AngularJS is a loop mechanism that AngularJS enters when it detects a data change that could potentially affect the view. During this cycle, AngularJS checks all the watch expressions and updates the view if it finds any changes. The cycle continues until no more changes are detected.
What is the role of ng-model in two-way data binding?
The ng-model directive in AngularJS is used to bind the value of HTML controls (like input, select, textarea) to application data. It provides two-way data binding by synchronizing the model to the view, as well as the view to the model.
How does two-way data binding affect performance in AngularJS?
While two-way data binding can make development easier by automatically synchronizing the view and the model, it can also negatively impact performance if not used carefully. This is because AngularJS adds a watcher for each binding, and having too many watchers can slow down the digest cycle.
How can I optimize two-way data binding in AngularJS?
You can optimize two-way data binding in AngularJS by limiting the number of watchers and avoiding unnecessary two-way data bindings. Use one-way data binding where possible, and consider using the :: (one-time binding) syntax for static data that does not change.
Can I use two-way data binding in AngularJS with arrays or objects?
Yes, you can use two-way data binding with arrays or objects in AngularJS. However, keep in mind that AngularJS will create a watcher for each item in the array or each property of the object, which can impact performance.
What is the difference between ng-bind and ng-model?
The ng-bind directive in AngularJS is used to bind the model value to the innerHTML of the HTML element. It provides one-way data binding from the model to the view. On the other hand, ng-model provides two-way data binding, synchronizing the view to the model and the model to the view.
Can I use two-way data binding in AngularJS with custom directives?
Yes, you can use two-way data binding in AngularJS with custom directives. You can use the scope option in the directive definition object to bind directive attributes to the parent scope. However, be aware that this can create a new scope and may lead to unexpected behavior if not used carefully.
 Tanay Pant
Tanay Pant is an Indian author, hacker, developer and tech enthusiast. He is known for his work on Learning Firefox OS Application Development, which was published by Packt. He is also an official representative of Mozilla, and has been listed in the about:credits of the Firefox web browser. His personal website is tanaypant.com.