![]()
This article has been updated to cover the installation of both Rasperry Pi OS Bullseye and the latest version of Node at the time of this writing which is Node 20.x.
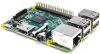
In this installment of my LTM (Learning through Making) series of Node.js tutorials, I will show you how to get Node.js up and running on a Raspberry Pi 4 (or Pi 3, or Pi 2). I’m focusing on the Raspberry Pi 4/ Pi 3 / Pi 2 rather than older versions such as the Raspberry Pi Model B+ since these are the latest models at the time of this writing. The Raspberry Pi 4, for example, sports a 1.5 GHz quad-core ARMv8 chip with RAM options of 8 GB, 4 GB, 2 GB, or 1 GB versus the Raspberry Pi 1 Model B+’s 700 MHz single-core ARMv6 chip with 512 MB RAM.
A majority of this installation guide should still prove useful for other Raspberry Pi systems besides the Pi 4/ Pi 3/ Pi 2; however, the final steps focused on the installation of Node.js will not work for these systems based on the older ARMv6 architecture.
If you are interested in creating a slimmed down Raspberry Pi system without a graphical user interface, see my article on creating a lightweight Raspberry Pi with Raspbian Lite.
This tutorial is useful for anyone wishing to successfully install a Raspberry Pi 4/Pi 3/Pi 2 system, even if they are not interested in Node.js since the Node.js installation happens in the final steps of the tutorial. But why would you not want to install Node.js? 😃 Let’s get started!
Table of Contents
 Hardware Needed
If you don’t currently own a Raspberry Pi, the easiest way to get started is to buy a starter kit such as this one on Amazon:
- Vilros Raspberry Pi 4 4GB Complete Desktop Kit (or purchase Vilros Raspberry Pi 4 8GB Basic Starter Kit or CanaKit Raspberry Pi 4 Extreme Kit – 1GB RAM)
Note: my affiliate info is included on Amazon links so you can, if you desire, support these tutorials while paying nothing extra.
Other note: due to supply chain issues, it is hard to find Raspberry Pi systems at reasonably low prices. The Raspberry Pi Amazon links may have a higher price than before due to these issues.
You will need the following items to get started:
- Raspberry Pi 4 Model B, Pi 3 Model B+, Pi 3 Model B, or P i 2 Model B (these are the official names for the Raspberry Pi 4, Pi 3, and Pi 2. Don’t let the “B” confuse you since there is also an older Raspberry Pi Model B which is now effectively the “Raspberry Pi 1 Model B”.)
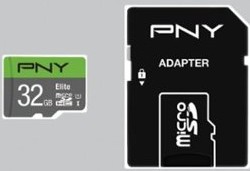
- MicroSD card (I recommend a class 10 card that is 16 GB or higher. I like this PNY 32GB Elite Class 10 Card).
- MicroSD to SD memory card adapter (so you can use the SD card reader on your laptop/desktop to write to the microSD card. Many microSD card vendors include an SD adapter with the purchase as shown below. You do not need to use an adapter if your computer has a microSD card slot built in. )
- (Pi 4 only) USB C power supply (3A or greater recommended) to power the Pi. For example, this CanaKit 3.5A Raspberry Pi 4 Power Supply.
- (Pi 2 and 3 only) Micro USB power supply (2.5A or greater recommended) to power the Pi. For example, this CanaKit 5V 2.5A Raspberry a Pi 3 B+ Power Supply.
- (Pi 4 only) Micro HDMI to HDMI adapter since the Raspberry Pi 4 doesn’t have a full-sized HDMI port. I like this Cable Matters Micro HDMI to HDMI Adapter. This is not needed for the Pi 2 and Pi 3 since these models have full-sized HDMI Ports.
- (Pi 2 only) USB WiFi adapter (or Ethernet cable if preferred. I have tested this Edimax USB WiFi adapter on Raspberry Pi 2 and it works great out of the box.) This is not needed for the Pi 4/Pi 3 since these systems include built-in WiFi.
- Windows laptop/desktop (Linux or Mac works great too, but this tutorial is geared more toward Windows machines so some readers will need to adapt.)
- Monitor with HDMI cable/USB keyboard/mouse (You can borrow these from another system temporarily and then run your Pi in a headless mode as I will explain later.)
Once you have gathered the needed hardware, we are ready to bring our Pi machine to life!
Write Raspberry Pi OS Image to SD Card
We will be running Raspberry Pi OS which is a free operating system based on Debian Linux and optimized for the Pi. Here we go:
- Download the latest Raspberry Pi OS image from https://www.raspberrypi.com/software/operating-systems. Download the 64-bit option if you are using a Pi 4 or Pi 3. Otherwise, if you are using a Pi 2, download the 32-bit option. Be sure to download one of the desktop versions (“Raspberry Pi OS Bullseye with desktop” or “Raspberry Pi OS Bullseye with desktop and recommended software”) rather than the “lite” version. I recommend downloading the smaller version (“Raspberry Pi OS Bullseye with desktop”) since you can always add other software packages later if needed. The download for the smaller desktop version is a zip file that is approximately 760 MB for the 64-bit version, and 840 MB for the 32-bit version. If you have a slow connection, it may take some time to download.
- Insert the microSD card into the SD adapter as shown in the Samsung sample picture above.
- Insert the SD adapter in the SD card reader on your laptop/desktop. Make sure it is seated well in the connection.
- Launch Windows Explorer and verify that the SD card registers as a drive on your system. Make a note of the drive letter as you will need it soon.
- Download and install Balena Etcher. Balena Etcher is a cross-platform (Windows, OS X, Linux) tool for flashing images to SD cards. It has many nice features including a simple user interface, the ability to flash an image without unzipping the zip file, and a validation step to verify the SD card image was written correctly to the SD card.
- (As an alternative for Windows users, you can use Win32 Disk Imager since it also provides the ability to read an SD card and create an image file which is handy for creating snapshots of Raspberry Pi systems that can flashed back to an SD card later if needed. For Win32 Disk Imager, you will need to first unzip the downloaded zip file before burning the .img file to the appropriate drive letter containing your SD card.)
- Launch Etcher. Be patient as Etcher may take a few seconds to launch. When launched, the interface will look something like this:

- Click the Flash from file button and navigate to the Raspberry Pi OS zip file that you downloaded. (It does NOT need to be unzipped before flashing.)
- Click the Select drive button to specify the target device location of the SD card.
WARNING: Be sure you choose the right target device, or you will write the image to another drive on your system, and this will not be good. - Click the Flash! button to write the image to your SD card.
- If you are running Windows, you may be presented with a security prompt regarding making changes to your device. If so, click Yes to proceed.
- After the image is written to the SD card and verified, Etcher will automatically dismount your SD card so it can be safely removed.
- Remove the SD card and or adapter from your laptop/desktop and remove the microSD card from the SD adapter.
Prep the Hardware
See the Raspberry Pi 4 Tech Specs page for a diagram showing the various parts of the Pi 4. Also, you will find a diagram of the Pi 2 here (the Pi 3 looks very similar). These diagrams may help you in this section. Let’s get this little SBC (single board computer) ready to boot! Here are the steps:
- Insert the microSD card into the Pi. (Turn the Pi upside down. The microSD card slot is located on the side opposite of the USB ports. This short video explains the process well.)
- Connect the USB keyboard and mouse
- Connect the HDMI cable
- Connect the USB Wi-Fi adapter (or Ethernet connection if you are not using Wi-Fi) This step is not necessary if you are using a Raspberry Pi 4/Pi 3 model which has on-board Wi-Fi.
- Connect the power supply (You will see the Pi lights come on and power up.)
- You should now see Raspberry Pi OS booting on the screen. Hooray!
Configure the Pi
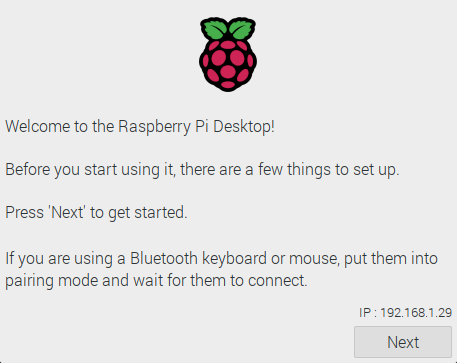
Raspberry Pi OS includes a setup wizard that launches on the first boot, making it easier than ever to set up our Pi. After booting Raspberry Pi OS for the first time, you will be greeted with the following dialog box:
Note: If you need to run the setup wizard at a future time (since it only launches on first boot), issue the following command from the terminal (I will show you how to launch the terminal later in the Apply Raspberry Pi OS Updates section of this tutorial):
$ sudo -E piwiz
Press the Next button. I won’t keep telling you to press the Next button, but it is implied as I show each screen in the setup wizard.
Enter your country, language, and timezone to ensure your keyboard and other localization settings work as expected for you:

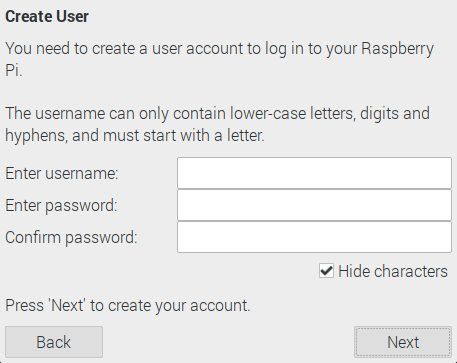
Select a user name to use such as your first name. I do not recommend the user name of “pi” since this was the default user name for many years and it is considered a security risk to use this common name. Also, enter a password. Just make sure you don’t forget it. 😉
In this tutorial, I’m showing you how to build a “headless” Pi system that you can remote into without a dedicated monitor so just press the Next button unless you will be connecting it to a monitor and you have a need to check the box based on observations:

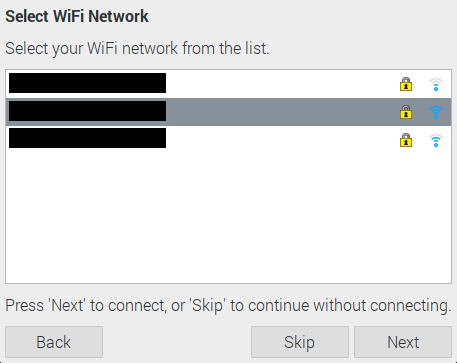
Select your WiFi network from the list. When you press Next, you will be prompted to enter your WiFi network password:
Press the Next button to update your software (or see the alternative step immediately below). It is a good idea to ensure you have the latest versions of software including security updates.
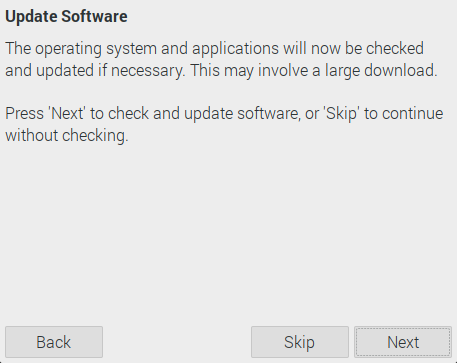
Alternative step for updating software
The “Update Software” dialog box is handy, but it does not provide detailed feedback (i.e. bytes remaining to download) for one to ascertain how long the update process will take. This is especially problematic for those who have slow Internet connections. As an alternative step for updating software, press the Skip button and follow the directions in the Apply Raspberry Pi OS Updates section further down in the tutorial.
Back to our regularly scheduled program…
The initial setup is complete. Press the Restart button as prompted:

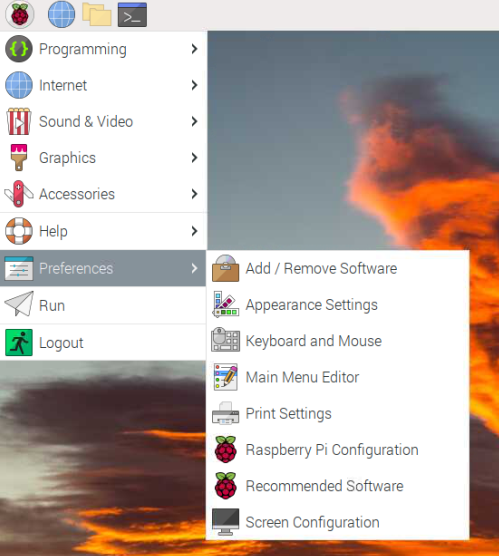
After the system is restarted, we need to make a couple more changes to the Pi for the purpose of personalizing it for our use. To get started, launch Raspberry Pi Configuration which is located in the Menu under Preferences.
This will launch the Raspberry Pi Configuration utility, a handy graphical version of the console-based raspi-config program that was used for many years to configure the Pi (and is actually still used behind the scenes by this graphical version). The following window will appear:
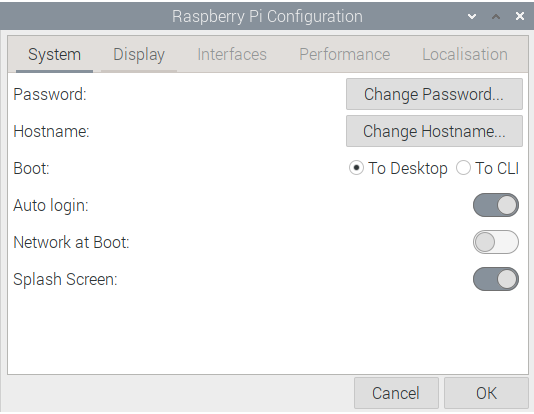
Change the host name from the default of “raspberrypi” to something shorter such as “raspi” or something fun and personal to you by.
Next, select the Interfaces tab.
Click the VNC toggle button on the right to enable VNC. A little further down in this tutorial, we will configure the Pi so we can remote into it with VNC. While you are in the Raspberry Pi Configuration tool, you can also enable SSH as another avenue to connect to your Pi:
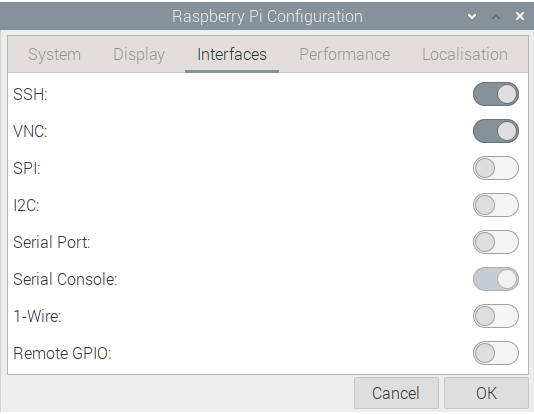
Press the OK button and select Yes to reboot your Pi when prompted.
Apply Raspberry Pi OS Updates
If you did not already apply the Raspberry Pi OS updates using the setup wizard above (or you are visiting this tutorial later and want to know how to keep your Pi up to date), follow the instructions in this section.
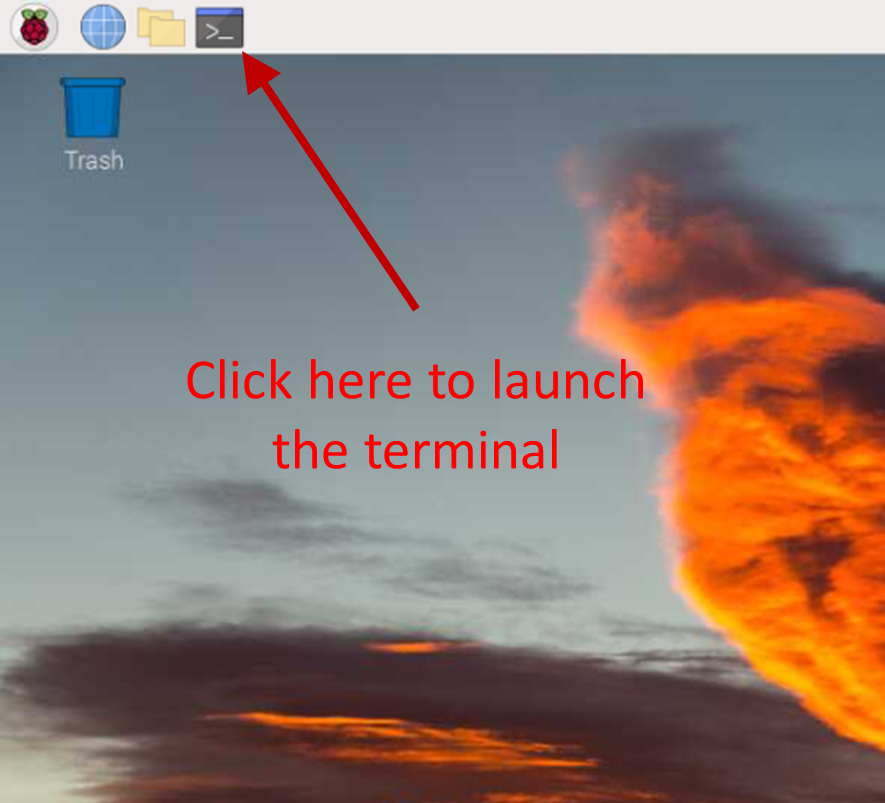
First, launch the terminal:
From the terminal, issue a ping command to verify your network connection is working:
$ ping -c 5 google.comWe’re now ready to ensure our system is up to date with security patches.
We will first run the apt “update” command. This command will not actually update any software on the system but will download the latest package lists from the software repositories so that Raspberry Pi OS will be aware of all new software available along with dependencies. Issue the following command at the “$” prompt:
$ sudo apt updateNext, run the following command to upgrade any packages installed on your system that need upgrades:
$ sudo apt upgrade -yThis is important to keep your Pi system synchronized with security updates, etc. These two commands should be issued together and run periodically.
Prepare for Remote VNC Connections
We want to run our Pi remotely without requiring a dedicated HDMI monitor and USB keyboard/mouse. This is known as headless mode. We will be using the RealVNC server that Raspberry Pi OS ships with to accomplish this goal. To prepare for this, we need to install the samba package so we will be able to access the Pi by its host name from Windows machines on the network rather than by its IP address which can change since the Pi receives its IP address via DHCP. (For OS X users, you can install Bonjour and then access your Raspberry Pi by host name. For example, if your host name is “raspi”, you can access it on OS X as “raspi.local”.) OK, let’s install Samba:
$ sudo apt install samba -y- After this installation completes, you should be able to ping the Pi Hostname (configured in the Raspberry Pi Configuration program above) from a Windows machine:
C:\> ping raspi - Next, install VNC Viewer on your Windows machine from here and accept all defaults in the installation process.
- You are now ready to launch a remote connection!
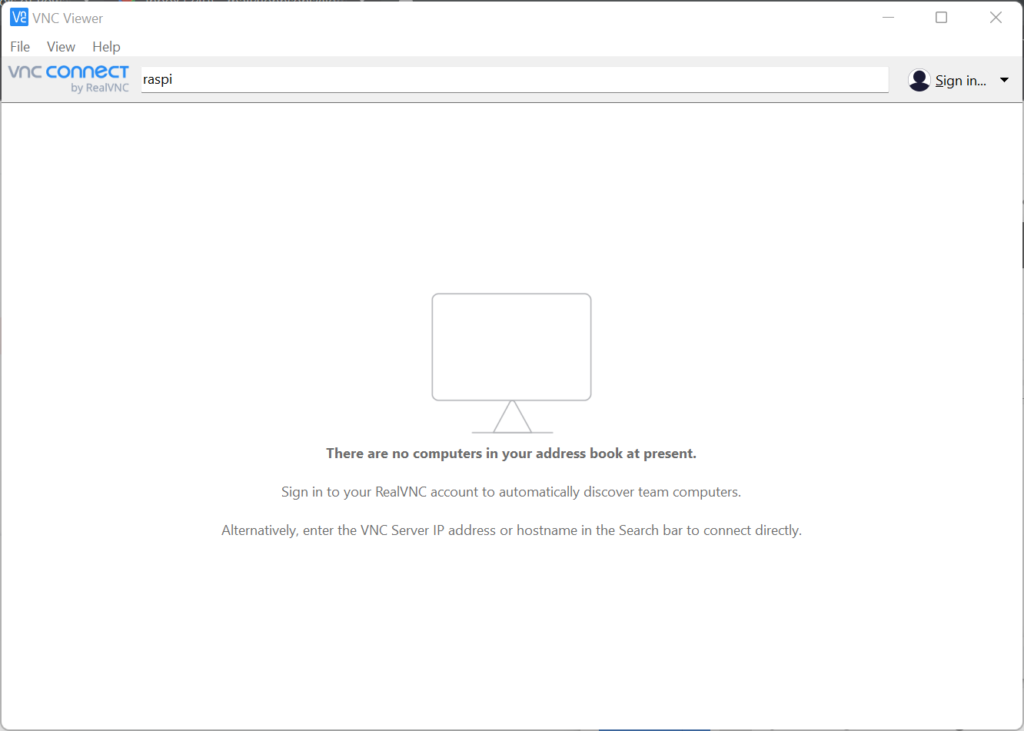
- From your Windows machine, hit the Windows key, type “VNC Viewer” and select to invoke it. (VNC Viewer is also available for macOS and Linux.)
- When VNC Viewer starts up for the first time, it may ask you if you want to create an account. An account is not mandatory, so you can decline and continue this tutorial.
- Type the host name of your Pi (“raspi” in my case) in the textbox and press the Enter key on your keyboard to launch the remote connection.
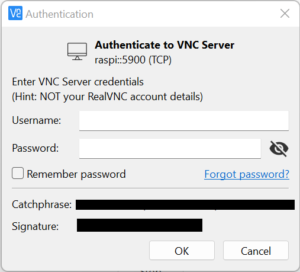
- You may be presented with a warning dialog box if you have never connected to this Raspberry Pi before. Accept this warning and continue.
- When prompted for credentials, enter the username and password you configured during the installation and press OK.
Amazing! We are connected remotely to the Pi and no longer need the dedicated HDMI monitor and USB keyboard/mouse. Let’s go ahead and shut down the Pi for a minute so we can free up our monitor and keyboard/mouse:
- Launch a terminal session and enter the following command to cleanly shut down your system:
$ sudo poweroff - Wait a minute for the Pi to fully power down.
- Unplug the power cable, HDMI cable, and the USB keyboard and mouse.
- Plug the power cable back in and the Pi should be on its way back up without all of those extra cables!
- After giving the Pi a minute or so to boot, connect to it once again using VNC Viewer.
Create Windows File Share on the Pi (Optional)
We can create a Windows file share on the Pi so that we can copy files from our Windows machine directly onto the Pi. This can come in handy in many contexts. This is also useful for OS X users since you will be able to connect to your Raspberry Pi file share from Finder under “Shared”. Here’s how we do it:
- Launch a terminal session.
- Issue the following command to launch the Mousepad editor.
$ sudo -E mousepad /etc/samba/smb.conf & - We could have also used the console-based “nano” editor, but Mousepad provides a GUI which is more suitable for beginners. The ampersand on the end of the command launches Mousepad as a background process so we are returned to a shell prompt in the terminal. Also, the smb.conf is part of the Samba package we installed earlier and this is why it exists on our system.
- Scroll down to the very bottom of the smb.conf configuration file and add the following (or copy and paste from this tutorial), replacing USERNAME with the user name you chose in the setup process:
[PiShare] comment=Pi Share path=/home/USERNAME browseable=yes writeable=yes only guest=no create mask=0740 directory mask=0750 public=no - Save the changes to the smb.conf configuration file and exit the Mousepad editor. (Raspberry Pi OS will automagically restart the SMB (Samba) services based on the changes you made to the configuration file.)
- Back in a terminal session, we need to create an SMB (Samba) user so we can connect securely from Windows. We will create a user with the same name as the username you chose, but this will be an SMB (Windows user) rather than the one you assigned in the setup wizard. Use the following command, but replace USERNAME with your user name in lower case:
$ sudo smbpasswd -a USERNAMEYou will be prompted to enter and re-enter a password. Document this password somewhere for future reference.
We are ready to connect to our newly created Pi file share from Windows!
- Back on your Windows machine, type the Windows key and “R” (Win-R) to launch a run box for typing in commands.
- Enter two backslashes followed by the name of your Pi machine (i.e. your Hostname) and hit enter. For example:
\\RASPI - (Please note that when connecting to the file shares through Windows 10, the host name here can be entered in lower case or upper case.)
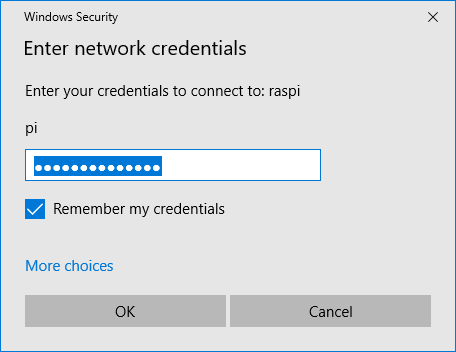
- When prompted for credentials, enter the following:
- Username: The format to enter here in Windows parlance is the domain\username. For us, our domain will be our Pi hostname and our user name will be “pi”. Therefore, we will enter the following with USERNAME replaced with your user name in lower case: raspi\USERNAME
If your Hostname is not raspi, you will obviously enter that instead. - Password: (enter the password you created with the smbpasswd command above)
- Username: The format to enter here in Windows parlance is the domain\username. For us, our domain will be our Pi hostname and our user name will be “pi”. Therefore, we will enter the following with USERNAME replaced with your user name in lower case: raspi\USERNAME
- Voilà! We should now be connected. Double click the PiShare folder to launch the file share you just created. You will also see a folder called pi that provides read-only access to your entire home directory.
- You can test your newly created file share by creating a text file on the Windows side and verifying that it shows up in the /home/USERNAME directory on the Pi side. USERNAME should be replaced with your user name in lower case.
- In Windows, you can also map a drive to the file share you just created as follows:
- Launch Windows Explorer.
- Click on the Map network drive button in the ribbon menu at the top and select Map network drive.
- Enter the drive letter (for example “P” for “pi” drive), the share folder path, and select Reconnect at sign-in:
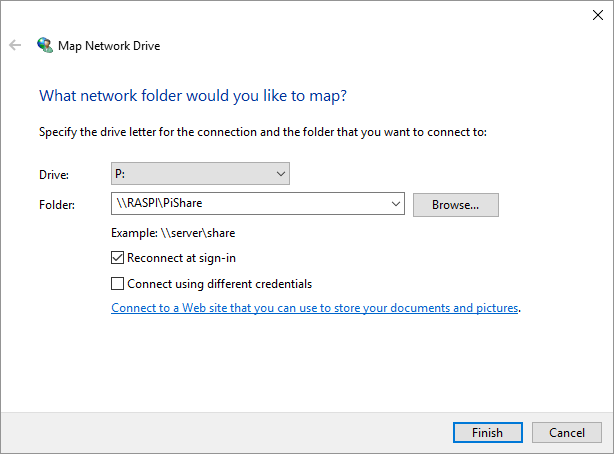
- Enter the password you created with the smbpasswd command above (if prompted) and select Remember my credentials:
- You should now see a “P” drive (or other drive letter you selected) when viewing through Windows Explorer!
Install Node.js
You now have an amazing general purpose Raspberry Pi system that can be used for a variety of tasks and inter-operates well in the Windows world (it even looks like a Windows machine to the other Windows machines!) – and can play nicely in the Mac and Linux world too. Let’s go ahead and install Node.js so we will be ready to do some fun projects in the future. Here are the steps:
Our friends at NodeSource host and maintain some excellent Node.js binary distributions. We will leverage a command they have written to add another package repository to our Pi so that we will be able to “apt install” a modern version of Node.js from their repository. This is beneficial since the Debian/Raspberry Pi OS versions may not always be up to date. By adding the NodeSource repository, we will also be able to receive updates rather than just installing a standalone (.deb) file version of Node. that cannot be updated easily.
Note: As described at the beginning of this article, this final section of the tutorial related to the installation of Node.js requires a Pi system based on the newer ARMv7 or ARMv8 chip such as the Pi 4/Pi 3/Pi 2. NodeSource provides Node.js binaries for these newer ARMv7+ architectures, but not for Raspberry Pi systems based on the older ARMv6 architecture such as the Raspberry Pi Model B/B+ or the older Raspberry Pi Zero. The Raspberry Pi Zero 2, however, is based on ARMv7 and thus works with the NodeSource Node.js binaries
Read the writing carefully on your Raspberry Pi circuit board to confirm it indicates something like “Raspberry Pi 4 Model B” or “Raspberry Pi 2 Model B”. If in doubt, run the following command in the terminal:
$ uname -mIf the result returned starts with “armv6”, you are running a Raspberry Pi based on the older ARMv6 chipset and the next Node.js installation step will not work; otherwise, you are ready for the next step.
Here we go in the final stretch! Let’s proceed with an installation of the latest version of Node at the moment which is Node 20.5.1.
$ curl -sL https://deb.nodesource.com/setup_20.x | sudo -E bash - The previous command updates our Debian apt package repository to include the NodeSource packages.
Note: It’s generally a good idea from a security perspective to know what commands you are invoking on your system, especially since the command above invokes the script as the root user. If you want the technical details behind this script, you can launch the URL (https://deb.nodesource.com/setup_20.x) in your browser and review the code. The script carries out some ceremony to determine the Linux distribution you are running and instructs the Debian apt package system to add the NodeSource package repository as a trusted source for obtaining Debian packages. This enables us to install Node.js now and upgrade to more recent versions of Node.js when they become available.
Now that we have added the NodeSource package repository, we can move on and install Node.js!
$ sudo apt install nodejs -y
We can then test and see what version of Node.js we are running and launch the Node REPL as we discussed in one of my previous articles as a quick test to confirm the installation was successful.
$ node -v
v20.5.1
$ node
> 1 + 3
4
<
> # We can hit Ctrl-C twice to exit the REPL and get back to the bash (shell) prompt.
Continue your Node.js Journey
To continue your learning-through making journey with Node.js, follow my tutorial to leverage Node.js for creating a functional webserver without any code. This can be accomplished using the Raspberry Pi system you just created here or on a Windows/Linux/Mac machine as I outlined in one of my previous articles. I hope you have enjoyed this article!
Follow @thisDaveJ (Dave Johnson) on Twitter and subscribe to my RSS feed to stay up to date on the latest tutorials and tech articles.
Related Articles
Create a Lightweight Raspberry Pi with Raspbian Lite
Learning through Making – Getting Started with Node.js
Upgrading to more recent versions of Node.js on the Raspberry Pi
Create a Web Server in Node without any Code
Make Your Raspberry Pi Web Server Available on the Internet with Node.js
Controlling a Raspberry Pi from a Mobile Device with Bonus Menu Too

Please clarify what the large script from NodeSource exactly does or remove the reference. Until then I advice against this method as it involves executing a script from an unknown source that until proven otherwise must be assumed to be damaging.
Hi Philip, thanks for taking the time to provide feedback regarding security! I agree with your assessment and added a paragraph to address your concerns.
excellent tutorial on node.js on pi .
correct
Great article and well written.
Just wanted to add after I followed your instructions and installed node, the version returned is : 0.10.29!!
I had to do another “apt-get update” and “apt-get dist-upgrade” to fix the issue.
Hi John, thanks for your positive feedback and for letting me know about the issue you experienced. I ran through my entire tutorial from square one with the current version of Raspbian and could not reproduce your issue. The Node version returned was 6.x. I’m not sure what happened in your case since running the NodeSource “setup_6.x” script via curl will run “apt-get update” near the end of the script. This would ensure that when you subsequently ran “sudo apt-get install -y nodejs”, it should have installed Node 6.x instead of 0.10.29. Perhaps the “apt-get update” command in the script failed for some reason in your case due to Internet connectivity or some other reason. In any case, I’m glad you ultimately were able to get Node 6.x up and running on your RPi!
Dave,
You are probably right. It was also odd to me. but anyway it was fixed by re-updating!
Just one simple question, accept my apology if it seems silly. what is the different between apt-get install node and wget https://nodejs.org/dist/… ?
I am trying to make node as a service by following this website “http://yannickloriot.com/2016/04/install-mongodb-and-node-js-on-a-raspberry-pi/”, and of course without installing nodejs again and it fails!
Hi John, not a silly question. The Node installation method I recommend in my article above (using the NodeSource script and apt-get install) sets you up for longer term success since you can easily update Node as new versions are released. See my article on Upgrading to more recent versions of Node.js on the Raspberry Pi for how this works. In the article you referenced, the “wget” method installs Node, but you must carry out extra steps to symlink the binary and, most importantly, Node cannot be as easily upgraded.
I recommend this article for installing Node as a service since it uses the newer systemd init system and the task can be accomplished with a much simpler script. It also automatically restarts if there is a failure with your Node script. You will need to change one line of code in the nodeserver.service file to make it work with the steps you have completed with my tutorial since the path to the Node binary is different:
ExecStart=/usr/bin/node /home/pi/share/node/app.js
The path to your “app.js” file may be different too. If so, adjust this path accordingly. Finally, in that tutorial, there are places you will need to prefix the commands with “sudo” such as “sudo systemctl enable nodeserver.service”
Dave,
You saved me tons of time and effort. Thank you very much for your great article and your responses.
John, glad to hear it. Thanks for letting me know!
Awesome guide Dave! Especially the remote connectivity from Windows m/c
I have recently starting playing with the Razz and am loving it. I have 2 and may buy another. A coworker stumbled onto your site and shared the link with me, and it is my good fortune. Thank you for this article, and for the others I haven’t read yet.
Thanks for your positive feedback, Jahan. I’m glad my article has been useful to you and that you are having fun with the Raspberry Pi!
Great article. It saved me a lot of time when all I want is a quick web server. One thing, the remote desktop failed Dutton connecting but after digging I found that I needed tightvnc installed on my pi b+ before installing xrdp. Thanks again. So useful!
*during
Hi Ryan, that’s great to hear that my guide was useful to you. Thanks for the heads up and the solution to this problem! The latest version of Raspbian with the PIXEL desktop ships with RealVNC which conflicts with xrdp. By installing tightvncserver first, it removes RealVNC and paves the way for a successful xrdp installation. Your problem was not limited to the B+, but all pi models. Thanks for letting me know!
My understanding is that node version 0.10.29 installed with Raspbian Jessie is tailored to run on the pi and should not be ‘upgraded’. independently of the Rasbian installation package.
Hi George, thanks for joining the conversation. The Node ecosystem is moving very fast. For example, Node 0.10 reaches end of life status at the end of this month (October 2016). I am running Node v6.x on the Raspberry Pi with no issues. When I installed it, the only side effect was that it uninstalled Node-RED which depends on Node 0.10.x. For those using Node-RED, a more modern version can be installed using a manual install following the directions here. Most of the Node packages in the Raspbian repository can be installed with npm which is, in my opinion, a much better approach than using Node packages that are frozen in time.
I recommend installing and running more recent versions of Node.js on the RasPi (following the steps in my guide above) rather than using the Node.js 0.10.x version that ships with Raspbian—in order to stay up to date with security updates and in order to be positioned to build (and use) awesome software based on Node.js.
Should we (could we) remove the Node.js 0.10.x version that ships with Raspian, both to recover space and to avoid issues?
Should we delete the version of Node installed with Jessie so space is recovered?
Hi Wilson, thanks for your question! AFAIK, the Raspbian Jessie base image ships with nodejs-legacy (and possibly nodejs). Both of these packages, if present, are removed when the NodeSource nodejs package is installed (following the instructions above). Let me know if your experience is different.
Hi, very helpfull. Concerning the optional samba share, which I find very usefull, wouldn’t it be better (safer) to change value 0777 in create mask and directory mask to 755, (or even 770 or 700)?
Thank you for bringing this to my attention. I agree with your assessment. The create mask and directory mask impact the default permissions assigned when creating files and directories from the Samba share. I changed as follows:
create mask – 0777 to 0740 (user all, group read, other none)
directory mask – 0777 to 0750 (user all, group read and execute (so can cd into directories), other none)
Perfect!
And as this guide can also be used as generic installation guide for the RPI you can consider also adding a section for creating a static IP such as this on: https://www.modmypi.com/blog/how-to-give-your-raspberry-pi-a-static-ip-address-update
(although installing Samba/Bonjour already solve most IP change issues)
When I attempt to run the suggested curl command, I get output that ARMv6 hardware is not currently supported. Checking the nodesource github, I found a repo that looks like it backs these scripts, but the setup_7.x script within it includes the architecture check, so I’m confused as to how this would have worked, or what I may have missed.
Hi Eric, what model of the Raspberry Pi are you running? (For example, Pi 2 Model B.) Also, if you issue
uname -mfrom the terminal, what does it return? The setup_7.x appears to present this error ifuname -myields a value that starts with “armv6”.Sorry for the lateness of my reply, it was a pi0; which I see you’ve clarified in the article. Thank you!
Thanks for the great article. I was following along, but whenever I attempt to run the install script I get the following error
“## You appear to be running on ARMv6 hardware. Unfortunately this is not currently supported by the NodeSource Linux distributions. Please use the ‘linux-armv6l’ binary tarballs available directly from nodejs.org for Node.js v4 and later.”
Any recommendations? I’d like to be able to upgrade in the future, and know that the wget method won’t allow for that.
Thanks!
Hi Chris, thanks very much for your feedback! The NodeSource Node.js script requires a Raspberry Pi based on the ARMv7+ architecture such as the Pi 3 or Pi 2 and will not work with the Raspberry Pi 1 Model B/B+ or the Pi Zero. I updated my article above to include these clarifications.
when i ran node -v it was still showing as v0.10.28
when i ran nodejs -v it was showing as v7.2.0
so i ran nvm install stable and then ran node -v again and it was v7.2.0
Hi Jake, thanks for the feedback. I ran through all the steps in my guide using the latest Raspbian image and Node.js installed fine. I was not able to reproduce the issue you experienced. I’m not sure what happened in your context. In any case, I’m glad you arrived at a workaround to get the latest version of Node up and running!
Hello Dave,
I found your article very interesting and inspiring as lately I was thinking about building my little server for personal projects, also as a learning experience playing on server technology.
What holds me back a little is I don’t know what kind of performances I can expect from a little RasPi. Can it be considered comparable to any other “standard” web server you can find at godaddy, hostgator or similar hosting companies for example?
Would it be possible to install on the same RasPi something like LAMP to run also a PHP/MySql web server? Would they (the two servers) be able to run at the same time providing a fair service, at least as a development environment for my projects or maybe to host my personal website?
Thank you in advance!
Hi Stefano, I have done LAMP development in the past, but not on the RasPi. LAMP is awesome, but my focus with the Pi has been on Node.js. Based on what I have read, I don’t see any reason why you couldn’t run both the Apache (PHP) server, and the server for MySQL on the same Raspberry Pi machine, assuming you are using a Pi 3 or Pi 2. I think performance would be sluggish on the Pi Model B+ or lower.
I recommend, however, that you run your code editor/IDE on a separate machine with more horsepower and map a drive to your Pi as explained in my article on Using Visual Studio Code with a Raspberry Pi (whether you use VS Code or another editor) since there are more code editor options available outside the Pi.
Finally, I would not recommend using the Pi to host your personal website since it could become overwhelmed with traffic. The RasPi would make a great test server for learning and then you could port your code to an ISP such as HostGator for your production personal website. For testing and for sharing with a small group of your friends, you could also install Node.js and follow my guide to Make Your Raspberry Pi Web Server Available on the Internet—and serve up your Apache/LAMP server instead. Hope this helps!
deve. I had a raspberry pi b +. and I tried to install nodejs. What version nodejs support with raspberry pi b +?. which support the package OnOff and RPI-GPIO.
Hi Dewi, check out this article if you want to run Node.js on a Raspberry Pi Model B+ or older. The article describes installing Node using a “gzipped tarball”. This installation method is not as elegant as installing from a Debian repository (as described in my article above), especially since upgrades are not quite as easy, but it is definitely a workable solution for your context.
hi dave. thanks for replying to my question. I’ve tried the link you gave, install package (RPI-GPIO) and then running the program control led I created before. program was running well, no errors but the led is not lit position. before my raspberry pi using os whezzy and nodejs v0.12.7. I install package RPI-GPIO and I am running my program, program running properly, no error, position led is on. but now i install os jessie. try using nodejs v4 and v0.12 and then run the same program but led is not lit position . What should I do dave?. plz help me. Btw, Merry Christmas to you and to all your family. sorry if my English is bad. God Bless
Hi Dewi, I have not done GPIO with Node on ARMv6 systems such as the Raspberry Pi Model B+. I have used the https://www.npmjs.com/package/wiring-pi npm package with good success on a Pi 2/3 so you might try that package with your B+. Also, Johnny Five, the “jQuery for Robotics”, might be an option you could try. See this article for how to make an LED blink with a Raspberry Pi.
Very Useful!! Thank you!!!
Kudos! Clear, simple and easy to follow, thank you!
I’m very new to GitHub after purchasing my first raspberry pi 3 and I’ve found it very cool and also very confusing. But, I’m looking forward to learning more and more about it. I’ve been following a few profiles and I’ve seen that they’ve uploaded newer versions of their jar Files. My question is, How do I update them so I can take advantage of the latest changes?? I’ve looked on many sites for the last few days and have not found any clear or definite answers of the process I would take, via command lines… Thanks!
Excellent explanation! This guide is great. I was able to setup my dev environment bang, bang , bang. I appreciate the work and care that you put into this guide. Cheers!
This is a fantastic article. Thank you for taking the time to create it!
What a great post!!! Man the windows-raspberry connectivity and share folder, amazing!!!
Thank you
on https://github.com/nodesource/distributions
to install on debian based there are two options:
# Using Ubuntu
curl -sL https://deb.nodesource.com/setup_4.x | sudo -E bash –
sudo apt-get install -y nodejs
# Using Debian, as root
curl -sL https://deb.nodesource.com/setup_4.x | bash –
apt-get install -y nodejs
Hi, thanks for the tutorial! Setting up a server for a simple Node.js script is just what I need!
I can’t seem to connect to my pi 3 remotely though. I’ve connected to the wifi and installed tightvncserver, srdp, and samba. At that point I try “ping raspi” but it responds with “Ping request could not find host raspi. Please check the name and try again.” I checked that the name is correct, but I’m still getting nothing. I’m afraid I’m still a bit of a noob when it comes to the particulars of networking and such, so any help would be appreciated.
I’ll proceed to the Node.js installation in the meantime. Thanks!
Correction: I guess the two computers weren’t on the same network. Once I made sure they were, the remote connection worked. What would you recommend if we need to connect to the pi from a computer that is _not_ on the same network?
Hi Joshua, it depends what kind of network connection you are seeking. If you want to connect via Remote Desktop on a different network, see this article for a couple of options. Then again, I don’t think it’s a great idea from a security standpoint to expose your RasPi remote desktop port on the public Internet. If you are wanting to access a web server running on your RasPi remotely, you can see my article on Making Your Raspberry Pi Web Server Available on the Internet with Node.js which describes the use of localtunnel. As another option to localtunnel, you can also use ngrok.
Just wanted to pile on that I appreciate the time and effort in putting this together. I’ve used this as a resource many times and directed others to it!
Hi Dave,
I think your article might save my sanity. I am trying to use node.js with RaZberry (z-wave) on a Pi3.
This seems to require node.js and the Google V8 engine. What is the relationship between V8 and node.js? Are they the same thing?
Hi Alan – yes, Google V8 is the JavaScript engine that Node.js uses by default to compile and execute JavaScript code. There are other JavaScript engines such as Microsoft’s ChakraCore, but Google V8 is the default. If you follow my tutorial, you will be installing Node.js running the V8 engine.
When I follow the guide on a raspberry pi 3, I get v0.12.6 with node -v. I did try apt-get update and apt-get dist-upgrade. I am runinng Pixel.
Hi!
curl command –
curl -sL https://deb.nodesource.com/setup_7.x | sudo -E bash –
– fails; see below. Thoughts?
…
Ign http://archive.raspberrypi.org jessie/ui Translation-en_US
Ign http://archive.raspberrypi.org jessie/ui Translation-en
Reading package lists… Done
## Installing packages required for setup: apt-transport-https…
+ apt-get install -y apt-transport-https > /dev/null 2>&1
Error executing command, exiting
Because I’m an optimist – I ran it again – without any intermediate steps – and it completed without error. Still curious to understand why. Thanks!
Hi Charles, I’m glad you persevered and got it working! I’m not sure why you experienced the error. Thanks for documenting your issue in case anyone else experiences it. Hopefully they will be optimists too. 🙂
Hi Dave, nice tutorial, easy to follow. However, when I ping from my Windows machine, I am not reaching the raspberry pi. I double-checked I am on the same wireless network as the pi and I have installed xrdp, samba, and tightvncserver. On the pi, I ran “ip addr” and I believe it told me the IP address from DHCP, which I can ping from the windows machine, but when I use the pi’s name, it doesn’t work. When I ping the pi using its name from a terminal window on the pi, I get back the local machine 127.0.1.1.
I am using my phone’s mobile hotspot so I can see the pi’s name as the connection.
Do you have any thoughts about how to get this working? Thanks!
Hi Joe, the magic of your Windows machine being able to resolve the PI host name without any configuration per se is a result of installing Samba on the Pi. Be sure you have Samba installed. Also, be sure that your Windows machine is not using your phone’s mobile hotspot since it will then be on a different network than your Pi. Hope you are able to get it working!
I see your blog needs some unique & fresh articles.
Writing manually is time consuming, but there is solution for this hard
task. Just search for: Miftolo’s tools rewriter
I’ve been having trouble with NOOBS and downloading a git repository for a smart mirror, so when I found your tutorial here, it was a life saver! However, I seem to be having some problems at a certain point. I was only able to get as far as `$ sudo apt full-upgrade`, during which it fails. It runs for a while then towards the end it says
dpkg: error while cleaning up: unable to restore backup version of ‘/usr/lib/locale/C.UTF-8/LC_MEASUREMENT’: Read-only file system
dpkg: error while cleaning up: unable to restore backup version of ‘/usr/lib/locale/C.UTF-8/LC_TELEPHONE’: Read-only file system
dpkg: error while cleaning up: unable to restore backup version of ‘/usr/lib/locale/C.UTF-8/LC_ADDRESS’: Read-only file system
dpkg: error while cleaning up: unable to restore backup version of ‘/usr/lib/locale/C.UTF-8/LC_NAME’: Read-only file system
dpkg: error while cleaning up: unable to restore backup version of ‘/usr/lib/locale/C.UTF-8/LC_PAPER’: Read-only file system
dpkg: error while cleaning up: unable to restore backup version of ‘/usr/lib/locale/C.UTF-8/LC_MESSAGES/SYS_LC_MESSAGES’: Read-only file system
dpkg: error while cleaning up: unable to restore backup version of ‘/usr/lib/locale/C.UE: Sub-process /usr/bin/dpkg returned an error code (2)’
E: Problem executing scrpits DPkg::Post-Invoke ‘usr/bin/test -e /usr/share/dbus-1/system-services/org.freedesktop.PackageKit.service && /usr/bin/gdbus call –system –dest org.freedesktop.PackageKit –object path /org/freedesktop/PackageKit –timeout 4 –method org.freedesktop.PackageKit.StateHasChanged cache-update > /dev/null; /bin/echo > /dev/null’
E:Sub-process returned an error code
My entire desktop has gone grey, all icons at the top (cmd, chromium, woflram, etc.) are just blank file images that don’t do anything…
Do you have any advice on fixing this? Do you think it could be a problem with the sd card itself and I need to get a new one?
Sorry for the sloppy formatting, tried to edit to make it look nicer but it seems I’m not able to 🙁
Hi Joe, I have not experienced this issue nor heard of others experiencing anything similar. I think you’re on the right track in suspecting a bad SD card. Another possibility is that the Raspbian image got corrupted during the download process. I recommend that you at least re-download the Raspbian image file and re-write it to the SD card. You’ll probably find you need a new SD card too.
Hi!
I didn’t skip any steps but still my raspberry pi 3 showing error
pi@raspberrypi:~ $ node
bash: /usr/local/bin/node: cannot execute binary file: Exec format error
Please help!
Great article, thank you for writing it. I have a rPi 3 Model B and I’d like to be able to install the most recent version of node that will run on it. You reference the script at https://deb.nodesource.com/setup_8.x in order to get version 8 of node. What about in the future when version 9 comes out? Is there any script you can run that will get you the absolute latest version of node whether that’s 8, 9, or higher?
Thanks DaveJ, i reference your article to upgrade the node for my Raspberry Pi control Room Temprature with Heater and Fan https://github.com/polease/HomeAutomation
Hello and thanks for the amazing help!
But I got a problem. At the part where open leafpad to edit the smb.conf file it says: No protocol specified leafpad: Cannot open display:. What do i have to do to fix it?
Worked great! This tutorial was amazing. Thank you!!!
I just want to let you know that you helped me a lot with this tutorial. Thank you so much!!
Thanks, needed that debian package repository.
Great Article really helpful.
Thanks for simple instruction for working raspi…Keep it up
Thanks Dave for this excellent tutorial for beginners as me just entering in raspberry world.
For concerned readers: i encoutered problems when trying to save smb.conf file. I replaced leafpad with nano, and did not add the ampersand at the end. Then i was able to edit the file and save it.
This Ansible snippet will to the Node install:
– name: Get repo update for Nodejs 9.x
get_url: url=”https://deb.nodesource.com/setup_9.x” dest=/home/pi/node9repoupdate.sh
– name: Run the repo update for Nodejs 9.x
command: sh /home/pi/node9repoupdate.sh
sudo: yes
– name: Install Nodejs 9.x
apt: name=nodejs
sudo: yes
You are amazing. I have referenced this thing 20+ times.
Thanks for your kind words! Glad to hear it has been helpful to you a number of times. I find myself referencing it too as I build new RPi systems. 🙂
hello. Nice tutorial, it was really helpfull but, when I enter my “\\”myraspname” it keeps telling me that it cannot find the directory or volume syntax is incorrect
can anyone tell me why?
This is the best install for Raspberry Pi on the web so far. Thanx for taking the time for this; it’s flawless!
it should be
>nodejs -v
great article, really helpful getting me up to speed. one issue though seems to be the xRDP isn’t working right at the moment (at least from macOS and iOS – there are some bugs open for it), so had to revert to realVNC 🙁
This article was great! Very thorough and organized. Thank you very much.
Very thorough and well-written tutorial! When I tried to access the network share by typing the host name in the Run dialog, I got the following error:
“You can’t access this shared folder because your organization’s security policies block unauthenticated guest access.”
This article seems to be related: https://support.microsoft.com/en-us/help/4046019/guest-access-in-smb2-disabled-by-default-in-windows-10-and-windows-ser
Enabling the group policy setting mentioned in the article is a workaround but I’m unsure of the security implications. I am still prompted for the credentials I configured for the SMB share before I am able to access the files.
Hi Owen! Thanks for sharing your experience. It sounds like Windows is trying to connect using guest access for some reason. I’m thinking that if you configure the PI share in
smb.confas I have specified withonly guest=No, the Samba share should force Windows to prompt for credentials when typing the \\RASPI in the Run dialog. You can then enter “RASPI\pi” for the user name and also enter the password you created with smbpasswd as outlined in the steps. Feel free to email me so we can continue to discuss if you are still experiencing issues. Perhaps there is something that needs to be updated in this tutorial based on recent changes in Samba or Windows.Hi Dave!
No matter what I do, I’m stuck on v8.11 🙁
I followed your tutorial step by step and still node -v raises damned v8.11 instead of v10x or v11x… No error, everything run just fine!
Note: I’m running raspbian desktop on Hyper-v on Win10.
Any clue?
Thanks!
Very good question, Nico. Thanks for providing that data point that you are running the Raspbian Desktop on a VM rather than on a Raspberry Pi. If you do a
uname -mfrom the terminal, it will tell you about the machine hardware (armv7, etc.) I’m guessing it will be something likei386. If you look at the NodeSource Node.js Binary Distributions page, you will see what architectures they support. I see that i386 (32-bit) is not available for Node.js 10 and later, and this may be the issue you are experiencing.Hi Dave!
Thanks a lot for your prompt reply!
You are absolutely right about no longer i386 32-bit support, but in my case, uname -v raises x86_64 wich means 64-bit (same as amd64).
Just in case, I double checked NodeSource link you provided but found nothing that could enlighteng me…
The most frustrating thing here is that I don’t even get an error message during any of the installation steps…
Of course, I would really appreciate any other suggestion, link or what you think might help me.
Cheers!
Nico.
Hi Nico, I did some more research and installed the Raspberry Pi desktop using VirtualBox. I also worked with NodeSource and they were very helpful in providing insights too. It turns out that the RPi Desktop runs 32-bit userland code only. Although the
uname -moutput ofx86_64might lead us to believe it is running in 64-bit mode, adpkg --print-architectureyields a value ofi386indicating the userland code runs as 32-bit. If you install a Linux OS that supports full 64-bit such as Lubuntu, Ubuntu MATE, etc., you will be able to install the latest versions of Node from the NodeSource repositories. The Node Foundation stopped supporting 32-bit Node starting with Node 10.x.Hi Dave!
It’s clar now… I really appreciate your help!
By the way, I’m also working on an experimental “low-bugdet” board with a 32-bit architecture: ARM Cortex-A8. Since it’s basically a ARMv7-A it’s supossed that will run LTS Node on a 32-bit OS, right? (my fingers are crossed right now…)
Once again, many thanks for your help!
Cheers,
Nico.
Hi Nico, it might work if you go with a Debian-based distribution. Please see this page for a list of Linux distros supported by NodeSource. For ARMV7 processors, they support the Debian “armhf” (ARM hard float) architecture. If you run
uname -aand seearm71and you rundpkg --print-architectureand seearmhf, it just might work.Good Morning,
does anyone know why i can’t update to the latest Node JS, right now, to 11.9.0?
I tried the automatic update through the homebridge app, the manually Option to copy the files in the right folder and the apt install method. It always update me to 11.6.0 with NPM 6.5.0-next. I could update my NPM manually to 7.5.0 by NPM Install method.
Thank you very much
Best Greetings
CyberChris
hey, i’m following your instructions, but i get stuck at the part where you ask us to type into the terminal
C:\> ping RASPI
i type in the hostname i created, and my output is Bash c:> not found
i’m very new to programing and coding so i don’t really know how to trouble shoot this part.
Hi Adam, sorry if my tutorial was unclear. The intent here is to run the command from the Windows command prompt. The “C:\>” represents the DOS command prompt and you type “ping RASPI” to run the ping command and confirm the Windows machine is able to see your Raspberry Pi system on the network. To get to the Windows command prompt, click in the search area in the bottom left corner of your screen near the Start button and type “command prompt”. Click “Command Prompt” in the menu that appears and then you will be positioned to type “ping RASPI” and hit the Enter key to run the command.
Just wanted to say I completed your tutorial, and I thought it was well written and easy to follow. I was looking for a way to upgrade node on my new pi, but having a remote connection makes a lot of sense and I’m glad I can now do without wires. Appreciate you having this up here.
Hi Dave, I did everything as described on a PI 3 B+ The step “curl -sL https://deb.nodesource.com/setup_12.x | sudo -E bash -” does not react at all. and the next step also saying nodeJS is the newest version 8.11.1 , what am I doing wrong? Can I uninstall the current NodeJS and reinstall , Regards
Hi Johann, when you run “
curl -sL https://deb.nodesource.com/setup_12.x | sudo -E bash -“, you should definitely see feedback on the terminal. Try running “curl https://deb.nodesource.com/setup_12.x” first to ensure you have Internet access (this command should return many lines) and then rerun the full command and proceed with the next steps from there.Hi Dave,
I am getting the following error on the last command ( sudo apt install -y nodejs )
The following packages have unmet dependencies:
nodejs : Depends: libstdc++6 (>= 5.2) but 4.9.2-10+deb8u2 is to be installed
E: Unable to correct problems, you have held broken packages.
Is there any magic word I’m missing?
Sorry, I’m not a Linux guru…
Thank you!
When I install the latest node from the Node website it gives the following:
$ node
node: /usr/lib/arm-linux-gnueabihf/libstdc++.so.6: version `CXXABI_1.3.9′ not found (required by node)
node: /usr/lib/arm-linux-gnueabihf/libstdc++.so.6: version `GLIBCXX_3.4.21′ not found (required by node)
(there were no problems with all previous versions I’ve installed)
Hi sema, I ran through the steps on the latest Raspbian build (Buster) and did not experience the errors. This may have been a short time anomaly with the Node install script. Please try it again. Be sure to follow all of the steps including the curl command that launches the “https://deb.nodesource.com/setup_12.x” Node install script.
It took me some time to return here 🙂
The problem was that I had a Jessie Raspbian build.
Seems to work ok on Stretch.
Good afternoon Dave. firstly I would like to thank you for the article. it has been a big help. Im totally new to Pi, and need Nod.js for an application that I need to run signalk. its the best article on installing node.js I found.
Have node.js installed, and signal K. but i’m having difficulties with establishing a desktop connection. followed your instructions.
this machine is running win 8 but it should be similar. I can establish a connection to the Pi (3) but all I get is a blue screen with a tab on the top. cannot do anything.
might you have any suggestions?
Thank you
Alan
Did you have any luck Alan?
Mark
Hi Alan, I ran through a complete install following my tutorial with Raspbian Buster released on 2019-Jul-10 and I was not able to reproduce your issue. (I need to update some of the steps in this tutorial to reflect the new Buster release, but the steps are generally the same.) I am able to remote desktop in from a Win 10 machine, and I don’t think it would be different on a Win 8 machine. Perhaps you can run through the steps in the tutorial again, especially the “Prepare Remote Desktop” section which is critical in your context. Hopefully it will work for you then!
Have you tried to install johnny-five on a raspberry pi 4? The node install works perfectly for me but I get the “prebuild-install WARN install No prebuilt binaries found (target=10.16.3 runtime=node arch=arm libc= platform=linux) ” errpr followed by sundry warnings an error messages. Any thoughts? Using Buster on Raspberry Pi 4 B 4G.
Thanks!
Hi Kofi, I receive the same error messages when I attempt to install johnny-five on Raspbian Buster on a Pi 3 B+; therefore, it’s likely more of a Buster issue rather than a Pi 4 issue. I recommend that you file an issue on the Johnny-Five GitHub repo.
I couldn’t get windows file share working. When I type “sudo smbpasswd -a pi” and the press enter, I can’t type in a password. No keys work except the enter. Please help! I am new to this and I have no idea why this isn’t working.
Not to worry, Joey. You are very close to getting it working. When you launch the smbpasswd command, type your password, hit enter, and type it again when prompted. You won’t see any visual feedback such as a “*” for each character of your password being typed; however, your password will be stored in the system.
Works great, thanks Dave. You have a new follower..
I have a camper trailer and I want to run all the lighting, water pump, etc. to be controlled by my pi. I will be using node.js to control the GPIOs to relays and i want to set it up so that the controls will be accessable from a web browser. The idea being that you would have to connect to the pi via wifi and then your browser dispays a selection of buttons to activate various functions (which i will create a basic HTML/CSS page for). I am hoping to use node.js for the bulk of the operation to send the status of a GPIO pin back to the client and also activate the different GPIOs to control my camper. It will also change the HTML code for my display. The added bonus is to hook the pi into a monitor and be able to plug in a usb to watch movies or listen to music. I was going to use python, PHP, Javascript and HTML but node.js should be able to do it all shouldn’t it?
Thanks again for the great tutorial
Daryl, sounds like a fun project to control your lighting, water pump, etc. on your camper trailer! You could certainly make it happen with Python (and Flask, for example), but Node.js is also a good option. This GitHub repo looks like it could provide you with some inspiration and starter code. It uses the Node Express web server which is very flexible, powerful, and popular.
I am having the same problem as Sema above
The following packages have unmet dependencies:
nodejs : Depends: libstdc++6 (>= 5.2) but 4.9.2-10+deb8u2 is to be installed
E: Unable to correct problems, you have held broken packages.
I am running Jessie and am afraid to upgrade to Stretch for fear of losing my home automation system. I did run a full upgrade on Jessie though. Any help would be appreciated. Thanks.
Hi – I linked to your site in my git repo as I originally used your site when learning to install node on a pi. ty
https://github.com/prichardsondev/ioct
I don’t understand.. Is it “how to install nodejs on raspberry” or “how to fully install raspbian, configure it, then install nodejs” ?
A waste of time, a waste of space on google.
The latest download link for Raspberyy Pi OS is https://www.raspberrypi.org/software/operating-systems/
Hello,
I’m having issues getting nodejs and npm on my Pi. I get the following error:
The following packages have unmet dependencies:
nodejs : Depends: libstdc++6 (>=5.2) but 4.9.2-10+deb8u2 is to be installed
E: Unable to correct problems, you have held broken packages.
Any help would be great! I have been struggling with this for over a week off and on.
i just want to say that i use this guide for setting up samba connections and it has helped me for the past 3 years, thank you for keeping this site up and helping me through out my programming career