At SitePoint, we use Trello extensively. Sure, it has its quirks and could use an improvement or two in various areas, but for the most part, it’s revolutionized the collaborative experience of not only staff, but also authors and their editors.
I recently found myself needing to export card titles from a specific list for a non member. By default, Trello only supports full board exports to JSON and that’s something that crashes my tab on a board of over 100 members with hundreds of cards. There’s a small army of Trello extensions in the store, and yet curiously, none that export lists in any manner.
Let’s make a Chrome extension that can do this for us! If you’re in a rush and just want to see the end result, see the Github repo for the final version of this tutorial’s code.
Building a Chrome Extension
I figured the best approach would be an extension because a separate application doing only these exports might be too much. Besides, Trello has a nifty API which we can use to get everything we need. I also figured it would be a nice transition back into extension development, something I hadn’t done for a while.
Bootstrapping
I’ll be reusing my trusty ChromeSkel repo – a skeleton extension I built a long time ago to make getting started with Chrome Extension development easier. For reference, if you’d like to see some other Chrome Extension tutorials I’ve written in the past, see here and here.
We begin by cloning the repo to any folder.
git clone https://github.com/Swader/ChromeSkel_a.gitTo see if it works, load it into Chrome. Go into the extensions tab and click “Load Unpacked Extension”. If the option isn’t there, make sure you check the “Developer Mode” checkbox in the top right corner.
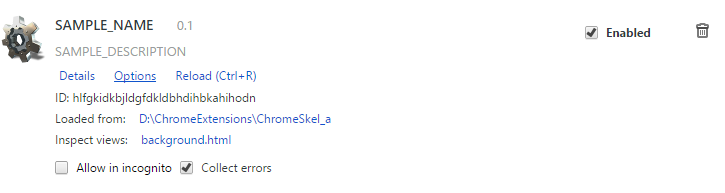
Once loaded, it should appear in your extension list.
Authentication
While we could simply harvest the data on the screen with a Chrome extension and parse that, Trello has proven to be unreliable at times and tends to crash on highly populated boards. This is why we’ll only use the Chrome extension’s integration with the trello.com domain to create new context menu options on lists (an “Export Cards” option), and we’ll perform the whole logic in the background page, fetching the data through the API.
Key and Secret
To generate an application key for Trello, please visit https://trello.com/1/appKey/generate while logged in. This will provide you with a key and secret you can use with your account. In the remainder of this tutorial, please consider {{KEY}} to be this key, and replace the content accordingly.
Once you have your key, in the scripts subfolder, create a file key.js:
// key.js
var APP_KEY = '{{KEY}}';
While you’re at it, you can delete the fragments and fancy-settings folders. We won’t be needing them.
Workflow and Manifest
The idea of the extension’s workflow is as follows:
- given a user opens a Trello board
- check if said user authorized the extension to use his Trello account
- if yes, proceed
- if no, open a settings page with an authorization button which lets them complete the procedure
- once authorized, close the settings page automatically and keep the extension authorized
For an extension to automatically open a new tab with some content, we need to mark that content as a “web accessible resource”.
For this purpose, create the folder settings, which will contain our settings page, and update the manifest of the extension to look like this:
{
    "name": "Trello Helper",
    "version": "0.1",
    "manifest_version" : 2,
    "description": "Trello Helper adds some much needed functionality to Trello. The current version focuses on exporting card information from lists.",
    "background" : {
        "page" : "background.html",
        "persistent": false
    },
    "page_action" :
    {
        "default_icon": {
            "19": "icons/19.png",
            "38": "icons/38.png"
        }
    },
    "content_scripts": [
        {
            "matches": ["https://trello.com/b/*"],
            "js": [
                "lib/jquery-2.1.1.min.js",
                "scripts/main.js"
            ],
            "run_at": "document_idle"
        }
    ],
    "permissions": [
        "tabs"
    ],
    "icons": {
        "16": "icons/16.png",
        "48": "icons/48.png",
        "128": "icons/128.png"
    },
    "web_accessible_resources": [
        "settings/index.html"
    ],
    "options_page": "settings/index.html"
}
Most of this should be familiar. We set the version, give some metadata, define icons and declare an event page, load some prerequisite content scripts (we need jQuery for the Trello JS client library) and finally define the “web_accessible_resources” so we can use the settings page we’ll be building. We also limit the effects of the extension to https://trello.com/b/*, meaning only board URLs.
Settings and authorization
To build our settings page, we write a simple HTML page. For demonstration purposes, I’ll keep it extremely simple in this case. We’ll use Foundation to style it (right now, only for the buttons, but we’ll work on making a better settings page in future posts), so download a Foundation essentials bundle, and unarchive its contents into /settings, so that index.html falls into that folder. You should have a folder structure such as this one:
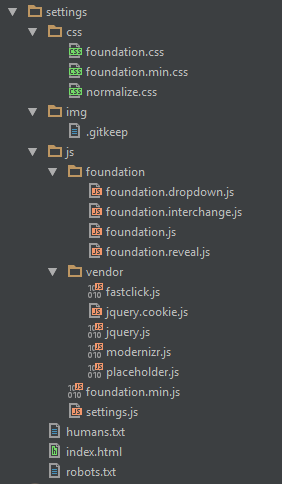
If you have some extra folders that aren’t visible in my screenshot, feel free to delete them. Create the file settings/js/settings.js, leave it empty for now.
Ok, let’s get down to business. So the assumption is that the user ends up on this page by either going to “Options” in the Extensions tab, or by trying to use the extension when being unauthenticated. Let’s build a fairly basic HTML page with two divs – one for when the user is authenticated with a “Log out” button, and one for when he’s still unauthenticated and needs to click an Authorize button. Replace the contents of index.html with this:
<!doctype html>
<html class="no-js" lang="en">
<head>
    <meta charset="utf-8"/>
    <meta name="viewport" content="width=device-width, initial-scale=1.0"/>
    <title>Trello Helper Settings</title>
    <link rel="stylesheet" href="css/foundation.css"/>
    <script src="js/vendor/modernizr.js"></script>
</head>
<body>

<div class="row">
    <div class="large-12 columns">
        <h1>Trello Helper Settings</h1>
    </div>
</div>

<div class="row">
    <div class="large-12 columns">
        <div class="panel" id="trello_helper_loggedout" style="display: none">
            <p>To get going, you'll need to authorize the extension to use your Trello account.</p>

            <p>Do it by clicking the big Authorize button below.</p>

            <a href="#" class="medium success button" id="trello_helper_login">Authorize</a><br/>
        </div>
        <div class="panel" id="trello_helper_loggedin" style="display: none">
            <p>You are already authorized. If something doesn't work, try logging out using the button below, and logging back in.</p>

            <a href="#" class="medium success button" id="trello_helper_logout">Log out</a><br/>
        </div>

    </div>
</div>

<script src="../scripts/key.js"></script>
<script src="js/vendor/jquery.js"></script>
<script src="js/settings.js"></script>
</body>
</html>
We have our two divs, the log in and log out button, and we pull in the JS we’ll need. In this case, we’re using Foundation’s default included jQuery, but it really doesn’t matter if you choose to use your own downloaded one elsewhere in the project, in case you fetched a more up to date one like I did (more on that later).
Now let’s add in some logic. Open settings.js and give it this content:
function init() {

    // Message and button containers
    var lout = $("#trello_helper_loggedout");
    var lin = $("#trello_helper_loggedin");

    // Log in button
    $("#trello_helper_login").click(function () {

    });

    // Log out button
    $("#trello_helper_logout").click(function () {

    });

    if (!localStorage.trello_token) {
        $(lout).show();
        $(lin).hide();
    } else {
        $(lout).hide();
        $(lin).show();
    }
}
$(document).ready(init);
By reading the docs, we can find out that a trello_token will exist in localStorage when a client app is authenticated. This means we can use it as an indicator on when to show each of our divs. In the init function, we grab the divs, add click handlers to the buttons (no logic there yet) and finally, we hide the appropriate div, according to the trello_token.
When a user is authenticated, for example, they get a screen like this one:
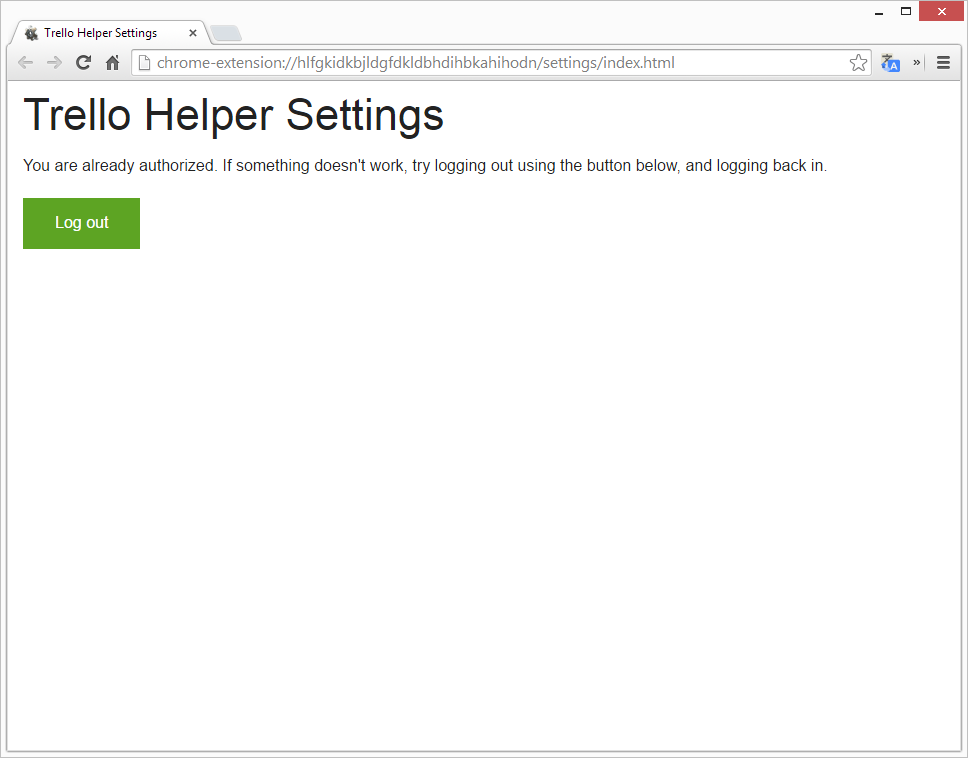
Let’s fetch the Trello JS client now.
The Trello documentation isn’t really written with Chrome extensions in mind, and recommends attaching the key to the URL while retrieving the JS client library from their domain, like so:
<script src="https://api.trello.com/1/client.js?key=substitutewithyourapplicationkey"></script>We can’t really do that, seeing as we’re dealing with the closed environment of an extension, and seeing as it would make much more sense to have it available locally for performance reasons. Therefore, we visit the above URL but without the key param:
https://api.trello.com/1/client.jsSave the contents of this file into lib/trello_client.js, then make sure our settings page loads it, by adding it to the scripts section near the ending <body> tag, like so:
<script src="js/vendor/jquery.js"></script>
<script src="../lib/trello_client.js"></script>
<script src="js/settings.js"></script>
This will make sure we have the Trello object available in our JavaScript, letting us use its methods. Let’s handle logging out first. Change the click handler of the logout button to be this:
$("#trello_helper_logout").click(function () {
        Trello.deauthorize();
        location.reload();
    });
That’s all there is to deauthorizing with Trello. We call the method and reload the page we’re on (the settings screen, that is).
Now, let’s handle logging in, which is a tad more complex.
// Log in button
    $("#trello_helper_login").click(function () {
        Trello.setKey(APP_KEY);
        Trello.authorize(
            {
                name: "Trello Helper Extension",
                type: "redirect",
                expiration: "never",
                interactive: true,
                scope: {read: true, write: false},
                success: function () {
                    // Can't do nothing, we've left the page
                },
                error: function () {
                    alert("Failed to authorize with Trello.")
                }
            });
    });
Following the logic of the online docs, we see that the Trello object has a setKey method, which we aptly use to set it. Then, we call into action the authorize method. According to the documentation, using a type popup instead of redirect will require the user to manually paste a secret key into the app when it’s received, which is not something we’re looking for. If we use redirect, however, the page will redirect to authentication and back once done. The interactive field, when set to false, negates both the popup and the redirect and instead only checks if the localStorage.trello_token value exists. As per the docs, we need to first call the regular authorize with a redirect, and then, once returned to the settings page, we need to call it again but with interactive set to false, which will make it grab the token the previous redirecting provided. It’s all a bit convoluted, but it works.
There’s another problem, though. If we call the non-interactive authorize immediately after the settings page opens, then we’ll cause an error on the page because the redirect after authorization didn’t happen yet. An alternative is adding another button “Confirm” or something like that to our settings page which appears after the redirect from Trello back to our settings page, letting the user initiate the non-interactive authorization manually. This seems a bit like a UX nightmare, though. In the end, I opted for a third solution.
Save the following code into lib/hashSearch.js.
/*
As found on: http://stackoverflow.com/questions/3729150/retrieve-specific-hash-tags-value-from-url
 */

var HashSearch = new function () {
    var params;

    this.set = function (key, value) {
        params[key] = value;
        this.push();
    };

    this.remove = function (key, value) {
        delete params[key];
        this.push();
    };


    this.get = function (key, value) {
        return params[key];
    };

    this.keyExists = function (key) {
        return params.hasOwnProperty(key);
    };

    this.push= function () {
        var hashBuilder = [], key, value;

        for(key in params) if (params.hasOwnProperty(key)) {
            key = escape(key), value = escape(params[key]); // escape(undefined) == "undefined"
            hashBuilder.push(key + ( (value !== "undefined") ? '=' + value : "" ));
        }

        window.location.hash = hashBuilder.join("&");
    };

    (this.load = function () {
        params = {}
        var hashStr = window.location.hash, hashArray, keyVal
        hashStr = hashStr.substring(1, hashStr.length);
        hashArray = hashStr.split('&');

        for(var i = 0; i < hashArray.length; i++) {
            keyVal = hashArray[i].split('=');
            params[unescape(keyVal[0])] = (typeof keyVal[1] != "undefined") ? unescape(keyVal[1]) : keyVal[1];
        }
    })();
}
As grabbed from a StackOverflow answer, this small utility helps us grab the value of a specific hash from the URL.
When you authorize with Trello through redirect mode, it will redirect back to the page it came from but with a token in the URL. This token will be the auth token the Trello JS client needs. It therefore stands to reason that if we can detect the presence of this token in the URL, we can conclude that we’re dealing with a redirect from Trello and can thus automatically and safely trigger the non-interactive authorize protocol.
After you add hashSearch to the settings page like so…
<script src="../scripts/key.js"></script>
<script src="js/vendor/jquery.js"></script>
<script src="../lib/trello_client.js"></script>
<script src="../lib/hashSearch.js"></script>
<script src="js/settings.js"></script>
… the settings.js file should, in the end, look like this:
function init() {

    // Check if page load is a redirect back from the auth procedure
    if (HashSearch.keyExists('token')) {
        Trello.authorize(
            {
                name: "Trello Helper Extension",
                expiration: "never",
                interactive: false,
                scope: {read: true, write: false},
                success: function () {},
                error: function () {
                    alert("Failed to authorize with Trello.")
                }
            });
    }

    // Message and button containers
    var lout = $("#trello_helper_loggedout");
    var lin = $("#trello_helper_loggedin");

    // Log in button
    $("#trello_helper_login").click(function () {
        Trello.setKey(APP_KEY);
        Trello.authorize(
            {
                name: "Trello Helper Extension",
                type: "redirect",
                expiration: "never",
                interactive: true,
                scope: {read: true, write: false},
                success: function () {
                    // Can't do nothing, we've left the page
                },
                error: function () {
                    alert("Failed to authorize with Trello.")
                }
            });
    });

    // Log out button
    $("#trello_helper_logout").click(function () {
        Trello.deauthorize();
        location.reload();
    });

    if (!localStorage.trello_token) {
        $(lout).show();
        $(lin).hide();
    } else {
        $(lout).hide();
        $(lin).show();
    }
}
$(document).ready(init);
You can now try the extension out. Load the extensions tab, click the Options link and test Authentication and logging out. Everything should work fine.
Conclusion
In this part, we built the basics of our extension, implementing authentication through a custom Foundation-powered settings screen and using Trello’s JavaScript client library.
In the next part, we’ll build the whole logic behind the extension and wrap things up.
Frequently Asked Questions (FAQs) about Building a Trello Chrome Extension with API Authentication
How can I get started with building a Trello Chrome extension?
To get started with building a Trello Chrome extension, you need to have a basic understanding of JavaScript and Chrome’s extension development environment. You will also need to create a Trello account and generate an API key and token. This will allow your extension to interact with Trello’s API. Once you have these prerequisites, you can start building your extension by creating a manifest file and adding the necessary scripts and HTML files.
What is the purpose of the manifest file in a Chrome extension?
The manifest file is a crucial component of a Chrome extension. It’s a JSON file that provides important information about your extension such as its name, version, permissions, and the scripts it uses. Chrome uses this information to properly load and run your extension.
How can I use Trello’s API in my Chrome extension?
To use Trello’s API in your Chrome extension, you need to generate an API key and token from Trello’s developer platform. These credentials allow your extension to make authorized requests to Trello’s API. You can then use JavaScript to make API calls from your extension, allowing it to interact with Trello data.
Can I add custom functionality to my Trello Chrome extension?
Yes, you can add custom functionality to your Trello Chrome extension. This can be done by adding additional scripts to your extension and using Trello’s API to interact with Trello data. For example, you could add a feature that allows users to create new Trello cards directly from your extension.
How can I debug my Trello Chrome extension?
Chrome provides a range of tools for debugging extensions. You can use the ‘Inspect views’ option in the extension management page to open a developer tools window for your extension. This allows you to debug your scripts, view console output, and inspect the DOM of your extension’s pages.
How can I publish my Trello Chrome extension?
Once you’ve built your Trello Chrome extension, you can publish it to the Chrome Web Store. You’ll need to create a developer account, pay a one-time registration fee, and follow the store’s guidelines for publishing extensions.
What are the best practices for building a Trello Chrome extension?
When building a Trello Chrome extension, it’s important to follow best practices for security, performance, and user experience. This includes using HTTPS for all network communications, minimizing the use of background scripts, and providing a clear and intuitive user interface.
Can I use other APIs in my Trello Chrome extension?
Yes, you can use other APIs in your Trello Chrome extension. This allows you to integrate additional functionality into your extension. However, you’ll need to ensure that you follow the terms of use for any APIs you use and handle user data responsibly.
How can I update my Trello Chrome extension?
You can update your Trello Chrome extension by making changes to your extension’s files and then uploading the updated version to the Chrome Web Store. Chrome will automatically update installed extensions to the latest version.
Can I monetize my Trello Chrome extension?
Yes, you can monetize your Trello Chrome extension. The Chrome Web Store allows developers to charge for their extensions, either as a one-time purchase or a subscription. You can also monetize your extension through in-app purchases or advertising.
 Bruno Skvorc
Bruno is a blockchain developer and technical educator at the Web3 Foundation, the foundation that's building the next generation of the free people's internet. He runs two newsletters you should subscribe to if you're interested in Web3.0: Dot Leap covers ecosystem and tech development of Web3, and NFT Review covers the evolution of the non-fungible token (digital collectibles) ecosystem inside this emerging new web. His current passion project is RMRK.app, the most advanced NFT system in the world, which allows NFTs to own other NFTs, NFTs to react to emotion, NFTs to be governed democratically, and NFTs to be multiple things at once.