Detect Problems in JavaScript Automatically with ESLint
When writing JavaScript, I spend a lot of time fixing basic mistakes. I often rename a variable and test my app, and then find I didn’t rename the variable in one spot. I rename functions, same thing. I type things wrong, and again waste time clicking around in the browser.
The feeling is always the same – Why did I make this mistake again? I’ve been programming for over 15 years, and I still keep doing this.
This is why I love ESLint. It’s like programming together with someone else who pays better attention to this than I do. “Hey, you forgot to rename that”. “Hey, you shouldn’t do that”.
ESLint is a tool that analyses your code and points out any issues it finds. It can find bugs, potential problem areas, poor coding styles and stylistic issues. Best of all it’s highly configurable, so if you don’t agree with it on something, you can tell it to shut up about it.
Let me show you a real-life example of how using ESLint will benefit you.
Install and configuration
Before going further, we must install ESLint. As with most JS tools today, you need nodejs to do so. Once you have it set up, run…
npm install -g eslint
This will make the program eslint available from command line.
A real-life example
To explain ESLint’s benefits, I’ll show you a real-life example from a codebase I worked on. We’ll go through the code, and we can look at what ESLint does with it to make our lives easier.
The example JavaScript file is shown below. Don’t worry about the use of AngularJS in it – you will be able to use these techniques with any library or framework.
var module = angular.module('uploader', []);
/**
 * XMLHttpRequest wrapper that supports file upload progress since $http doesn't
 *
 * Usage similar to $http, returns a promise from the send method
 */
module.service('uploader', ['$q', function($q) {
  function readyStateChange(deferred, xhr) {
    if(xhr.readyState == 4) {
      if(xhr.status == 200) {
        deferred.resolve(JSON.parse(xhr.responseText));
      }
      else {
        deferred.reject('HTTP status ' + xhr.status);
      }
    }
  }

  function onProgress(deferred, xhr, ev) {
    if(ev.lengthComputable) {
      deferred.notify({ loaded: ev.loaded, total: ev.total });
    }
  }

  return {
    send: function(url, data) {
      var fd = new FormData();
      for(var k in data) {
        fd.append(k, data[k]);
      }

      var d = $q.defer();

      var xhr = new XMLHttpRequest();

      xhr.open('POST', url, true);
      xhr.onreadystatechange = readyStateChange.bind({}, d, xhr);
      xhr.upload.onprogress = onProgress.bind({}, d, xhr);
      xhr.send(fd);

      return d.promise;
    }
  };
}]);
This is a basic component for uploading files. The code is functional, but let’s see what happens when we let ESLint have a go at it.
A typical starting point with ESLint is to first analyse your code with it and look at the output. Below is the ESLint output for the example module.
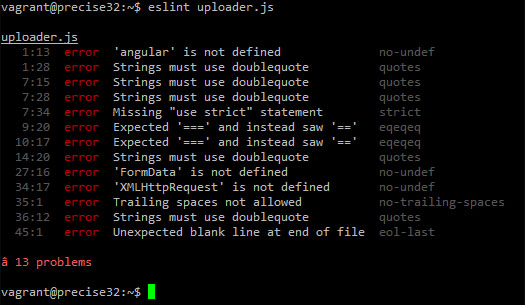
At this point, the output contains errors that shouldn’t be there, such as Angular is not defined, and XMLHttpRequest is not defined.
Why is ESLint complaining about XMLHttpRequest? Surely it should not do that, because XMLHttpRequest is standard. Well, XMLHttpRequest is only standard in the browser. Other environments, such as NodeJS, might not have it. Therefore the first step is to tell ESLint our code is going to run in the browser.
To do that, we’ll create a configuration file called .eslintrc, which we can use to tell ESLint what to do. Below you’ll see our first version of the .eslintrc file.
{
  "env": {
    "browser": 1
  }
}
ESLint can be configured using JSON. Here, we are telling it that the environment is browser. The browser environment stops ESLint from giving errors about things like XMLHttpRequest or window. If you wanted to run this in NodeJS, you would include "node": 1 in addition, which does the same except for Node-builtins.
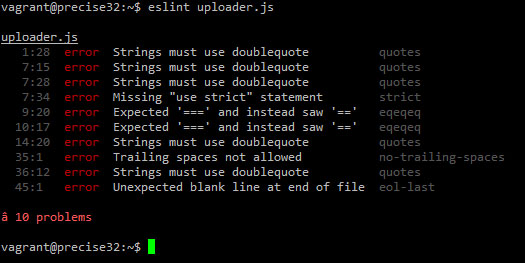
Let’s re-run eslint and find out what it says now.

The errors about the browser environment are gone, but there’s another that we don’t want:
{
  "env": {
    "browser": 1
  },

  "globals": {
    "angular": 1
  }
}
The globals field configures global variables. In this case, we define angular, but if you’re using jQuery or Backbone or Underscore or anything else, you can add $ or Backbone or _ in the same way.
Re-run eslint, and the error is gone.
There’s still some things I want to change. I prefer using single-quotes for strings, so I’m going to add a rule to fix that.
{
  "env": {
    "browser": 1
  },

  "globals": {
    "angular": 1
  },

  "rules": {
    "quotes": [2, "single"]
  }
}
The rules property configures ESLint’s rules. The quotes rule defines if ESLint gives an error for quote style, and which style is allowed. The number 2 makes it an error. Setting it to 1 would make it a warning, which appears differently in the output. "single" tells ESLint I want to allow single quotes only.
The codebase for this example doesn’t use strict mode or require triple-equals, so I’ll add those rules in as well.
In order to know which rule to configure, you can look at the output.
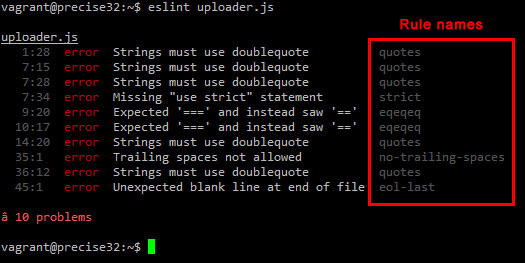
From this we can see for “use strict” the rule is “strict”, and for === the rule is “eqeqeq”. We can add those two into the configuration:
{
  "env": {
    "browser": 1
  },

  "globals": {
    "angular": 1
  },

  "rules": {
    "quotes": [2, "single"],
    "eqeqeq": 0,
    "strict": 0
  }
}
Setting a rule to 0 makes ESLint ignore it.
The remaining errors are easy to fix. We’ll remove the trailing spaces from line 35 and remove the blank line from the end of file.
Catching errors
The example code now passes ESLint without errors. Let’s introduce some changes to make things more interesting.
Remember I said I often rename a variable and then forget to rename it everywhere? Let’s see how ESLint deals with that. I’ll rename xhr into request…
var request = new XMLHttpRequest();

request.open('POST', url, true);
request.onreadystatechange = readyStateChange.bind({}, d, xhr);
request.upload.onprogress = onProgress.bind({}, d, xhr);
request.send(fd);
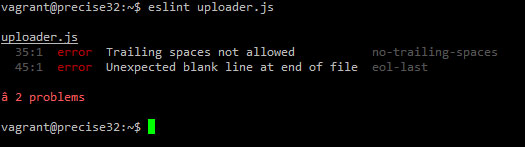
Did you notice a bug at a glance? I left in two cases of xhr. Let’s see what happens when we run ESLint.
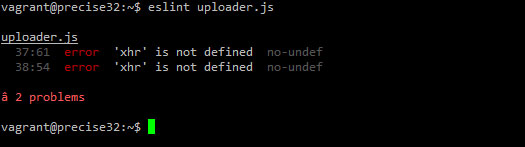
ESLint points out two undefined variables, which in this case are caused by the rename. Now we can now spot this easily without spending time clicking around in the browser.
We can also throw in a syntax error just for fun:
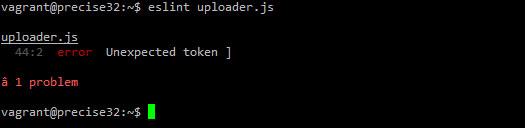
These are just two examples of what ESLint can catch. The list of built-in rules is very long, and you can even write custom rules or install plugins.
Recommendations
ESLint can be a very valuable tool, but like any tool, you need to use it to get the benefits.
My five recommendations for you to get most out of ESLint are:
- Check the documentation for more information
- Run it against your project and configure it to suit your coding style
- Install additional plugins for the libraries you use to make ESLint even more useful
- Automate ESLint so you’ll never forget to run it
- Get instant feedback by integrating it into your editor or IDE
To make things really easy for you, I’ve created a 5-step guide for these steps. You can get the 5-step guide from my website.
ESLint gives us a basic safety-net. It will catch many easy to make mistakes, and it’s very helpful when working in teams to enforce a coding style. But for a tighter safety-net, you should invest in unit tests. That, however, is a topic for another time.


About Jani Hartikainen
Jani Hartikainen has spent over 10 years building web applications. His clients include companies like Nokia and hot super secret startups. When not programming or playing games, Jani writes about JavaScript and high quality code on his site.


What`s the difference between ESLint and JSHint?
They seem to do the same tricks
Basically JSHint is an older tool which does the same job, but ESLint does the job better.
With ESLint, you can configure everything to work the way you want. You can also get new rules (such as AngularJS or Backbone rules), which makes it possible for ESLint to detect more problems.
The only advantage JSHint has is it’s slightly faster.
isn’t one of the other differences the way it’s implemented? ESLint uses Esprima where JSHint uses progressive parser and therefore you can use it in your editor as to constantly check your syntax (might be wrong, but this is what i found: http://www.nczonline.net/blog/2013/07/16/introducing-eslint/)
Thanks Jani Hartikainen for this wonderful article.
Thanks Jani for the in-depth explanation. Is this tool available as a Grunt task?
Yep, grunt-eslint is available on npm https://www.npmjs.com/package/grunt-eslint
Note that a lot of the most painful issues that eslint finds for you, including the bug you used as an example, would be picked up by the JavaScript engine itself if you just used strict mode.
Maybe so, but it would still require you to go into the browser and click around to make the page execute this specific bit of code. ESLint will save you time because you don’t have to do that
Very nice! I have used JSHint and JSLint previously. Is ESLint and JSLint related in any ways?
To my knowledge, they have no direct relation. The author of ESLint was frustrated by the lack of custom rules in JSHint, and discussed the possibility of adding that feature into JSHint, but they came into the conclusion it wouldn’t be feasible.
You can read about the history here http://www.nczonline.net/blog/2013/07/16/introducing-eslint/
Thanks for this article. Some rules for ANgularJS project : https://www.npmjs.com/package/eslint-plugin-angular
is it possible to automate it in command line ?, e.g. on file save to get it run and output the problems.
To not remember to run it each time I finished editing file.
The easiest way to do this would probably be using grunt-contrib-watch.
First, you would set up an eslint task using grunt-eslint, and then you can use grunt-contrib-watch to run it automatically when files change.
https://www.npmjs.com/package/grunt-eslint
https://www.npmjs.com/package/grunt-contrib-watch
Hi Jani, thanks for a great tutorial – unfortunately it looks like it’s already outdated a bit.
E_net4 says: (http://stackoverflow.com/questions/34644177/eslint-no-output)
Starting from version 1.0.0 of ESLint, all linting rules are turned off by default.
I got mine working as expected using an
.eslintrcwith the following:{ "extends": "eslint:recommended" }I have had this issue using eslint on a react project and the docs for eslint are web1 looking…
So I found you david yet again to the rescue or your readers..how can I add an ignore rule for this error…
Parsing error: The keyword ‘import’ is reserved