This article was peer reviewed by Chris Perry and Thomas Greco. Thanks to all of SitePoint’s peer reviewers for making SitePoint content the best it can be!
Vue.js 1.0 was released at the end of October and packs some awesome new features. While most of the library looks and feels the same as it always has, there are a few changes that are worth noting. In this article, we’ll explore some of the changes and how you can use them to be more productive and expressive when creating apps with Vue.js.
If you’re not sure what Vue.js is, you might want to read this first: Getting Started With Vue.js
Vue.js 1.0 Design Goals
If you’ve tried Vue.js before, your experience might be that it’s similar to other frameworks, but is a lighter-weight alternative that’s easier to use. This is true in many ways, and Vue is certainly loved for its ability to serve solely as the view layer for applications. Using it as the view layer, you can implement Single Page App features with very little overhead. However, the Vue.js ecosystem goes way beyond the view layer and makes it possible to craft large-scale SPAs easily.
With the release of version 1.0, Vue.js aims to provide developers a pleasant experience writing large applications and to ensure that the patterns it uses promotes maintainability. Tooling has improved, syntax has been polished, and with the advancements in this release, Vue.js wants to show that it can contend with heavyweight JavaScript frameworks, even if it isn’t backed by a large enterprise.
What Is Different for Developers?
Directive Syntax and v-for
If you’ve rendered a list with Vue.js, you’ve seen the v-repeat directive that is used to iterate over an array and display its data on the screen. With Vue.js 1.0, this has changed to v-for. While the API is mostly the same, we can no longer simply point the directive to an array and template out the data based on property names. Instead, we now have to use an alias for the array’s current element.
<!-- Before -->
<p v-repeat="people">{{firstname}}</p>

<!-- Afer -->
<p v-for="person in people">{{person.firstname}}</p>
The real difference here shows up under the hood. The v-for directive is a ton faster, and will really make a difference when rendering large collections.
With Vue.js 1.0, you’ll notice a few differences with syntax. Namely, shorthands have been introduced which help to make HTML templates a bit more concise. We can now handle events with the @ shorthand.
<!-- Before -->
<div v-on:mouseover="changeColor()"></div>

<!-- After -->
<div @mouseover="changeColor()"></div>
This syntax works for all events.
We can also use the : shorthand in place of v-bind.
<!-- Before -->
<select v-model="firstname">
 <option v-bind:value="{ name: Ryan }">Ryan</option>>
</select>

<!-- After -->
<select v-model="firstname">
 <option :value="{ name: Ryan }">Ryan</option>>
</select>
Again, not a huge change, but anything at all that helps to declutter markup is a win!
Tooling
Vue.js 1.0 syncs up some great tools that provide an awesome development experience. When using build tools like Webpack or Browserify for Vue.js apps, the development experience will be much smoother thanks to some upgrades. Two of these upgrades that are worth mentioning are hot module replacement and no-hassle ES6.
The vue-loader component loader for Webpack and vueify transform for Browserify let us write special components with a .vue extension. With these components, we can keep <template>, <script>, and <style> all within the same file, which is great for maintainability. Vue.js 1.0 improvements make working with these even easier.
Hot Module Replacement
Hot module replacement means that when we make changes to our .vue components, the parts of the build that are affected are swapped out and replaced with the changes immediately. The beauty of this is that we don’t need to reload the page, which is helpful when we want to keep the app at its current state but still be able to see the changes. It is effectively a replacement for live-reload.
ES6
ES6 support for .vue components used to require additional setup, but it now comes without any hassle. Those who haven’t become acquainted with ES6 might not consider this to be an important feature; however, if you are writing ES6, you’ll find it to be a big help to have it ready to go.
Example – Starting a Large-Scale Vue App
The easiest way to start a component-based app with Vue.js is to set up a package.json file and install everything using npm. Let’s build a sample app with Webpack to see how we can get going. The app will let us fetch a list of GitHub users.
You can get the full code for this app on our GitHub repo.
Initial Setup
mkdir vue-github-users && cd vue-github-users
touch package.json
Within the package.json file, add the dependencies we’ll need. The file should look like this:
{
  "name": "vue-github-users",
  "version": "0.0.1",
  "scripts": {
    "dev": "webpack-dev-server --inline --hot"
  },
  "devDependencies": {
    "babel-core": "^6.1.2",
    "babel-loader": "^6.1.0",
    "babel-plugin-transform-runtime": "^6.1.2",
    "babel-preset-es2015": "^6.1.2",
    "babel-runtime": "^6.0.14",
    "css-loader": "^0.21.0",
    "style-loader": "^0.13.0",
    "vue-hot-reload-api": "^1.2.1",
    "vue-html-loader": "^1.0.0",
    "vue-loader": "^7.0.1",
    "webpack": "^1.12.3",
    "webpack-dev-server": "^1.12.1"
  },
  "dependencies": {
    "bootstrap": "^3.3.5",
    "vue-resource": "^0.1.17",
    "vue-router": "^0.7.5",
    "vue": "^1.0.7"
  }
}
There are quite a few dependencies there, and many of them are related to transpiling ES6 to ES5. Notice that we’re bringing in vue-hot-reload-api which is what lets us take advantage of hot module replacement.
We have a script set up called dev which runs the Webpack development server and specifies that we want hot module replacement. When we go to start the app, we just need to type npm run dev in the console.
Next, let’s install everything.
npm installWe need to set up our Webpack configuration to get vue-loader and bundling to work. We do this with a webpack.config.js file at the root of our project.
// webpack.config.js

module.exports = {
  // the main entry of our app
  entry: './src/index.js',
  // output configuration
  output: {
    path: __dirname + '/build/',
    publicPath: 'build/',
    filename: 'build.js'
  },
  // how modules should be transformed
  module: {
    loaders: [
      // process *.vue files using vue-loader
      { test: /\.vue$/, loader: 'vue' },
      // process *.js files using babel-loader
      // the exclude pattern is important so that we don't
      // apply babel transform to all the dependencies!
      { test: /\.js$/, loader: 'babel', exclude: /node_modules/ }
    ]
  },
  // configure babel-loader.
  // this also applies to the JavaScript inside *.vue files
  babel: {
    presets: ['es2015'],
    plugins: ['transform-runtime']
  }
}
Here we’ve said that the entry point for the app will be an index.js file in the src directory. We’ve also specified that everything should be bundled and output to a file called build.js. The vue-loader setup is taken care of in the module.loaders array where we have rules for processing .vue files and tranforming ES6 to ES5.
Application Files
With the inital setup in place, lets start the actual application. The first thing we’ll need is an index.html file for the app.
<!-- index.html -->

<!doctype html>
<html>
  <head>
    <meta charset="utf-8">
    <title>Vue GitHub Users</title>
    <link rel="stylesheet" type="text/css" href="node_modules/bootstrap/dist/css/bootstrap.min.css">
  </head>
  <body>
    <div id="app"></div>
    <script src="build/build.js"></script>
  </body>
</html>
All of our app’s content will be displayed within the app div, and we’ll see later how this works. Below the div tag, we’re bringing in the build.js file that will have all of our scripts bundled.
Next, let’s set up the src/index.js entry point.
// src/index.js

import Vue from 'vue'
import App from './components/App.vue'
import Home from './components/Home.vue'
import Users from './components/Users.vue'
import VueRouter from 'vue-router'
import VueResource from 'vue-resource'
Vue.use(VueResource)
Vue.use(VueRouter)

var router = new VueRouter()

// Pointing routes to the components they should use
router.map({
  '/home': {
    component: Home
  },
  'users': {
    component: Users
  },
})

// Any invalid route will redirect to home
router.redirect({
  '*': '/home'
})

router.start(App, '#app')
Navigation
We’re taking full advantage of ES6 right away by importing the items we need. We haven’t yet created the App, Home, or Users components, but we will next.
Setting up routing is easy, and vue-router gives us the option of mapping routes directly to the components they should use, which is what we’ve done here in router.map. To start everything, we just need to call router.start and point the App component to the div with an id of app located in the index.html file.
So why do we have an App and a Home component? The App component will be responsible for housing the navigation bar and exposing an outlet for the other routes, whereas the Home component will just be a simple welcome message.
<!-- src/components/App.vue -->

<template>
  <div id="wrapper">
    <nav class="navbar navbar-default">
      <div class="container">
        <ul class="nav navbar-nav">
          <li><a v-link="'home'">Home</a></li>
          <li><a v-link="'users'">Users</a></li>
        </ul>
      </div>
    </nav>
    <div class="container">
      <router-view></router-view>
    </div>
  </div>
</template>

<!-- src/components/Home.vue -->

<template>
  <h1>Home</h1>
</template>
In the container below the navbar, we have a <router-view>, which is where the content from other components will show up. To navigate between the other views, we’ve set up links to them with v-link on the navbar’s anchor tags. Those links point to the name of our routes, which we have defined in router.map.
Inside these components, we are simply defining a <template>, and that’s because they don’t need to do much except display markup. Let’s set up the Users component next to see how we can work with JavaScript.
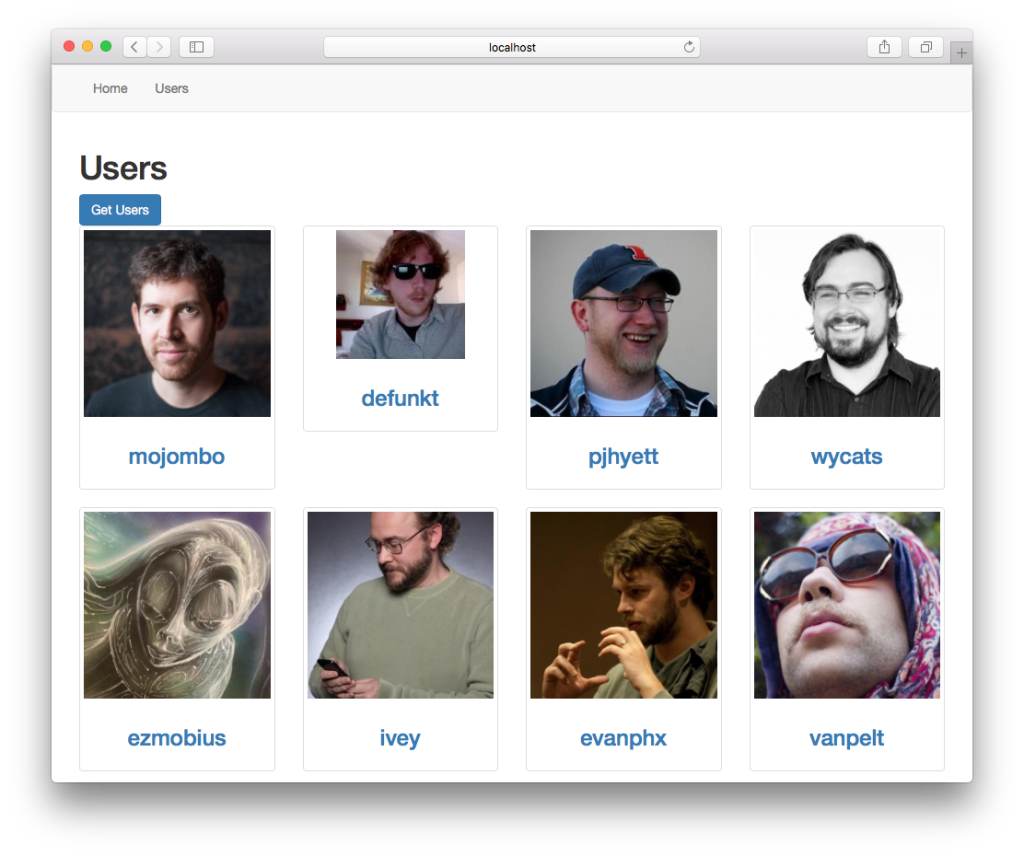
The Users Route
For this component, we’ll need to make an HTTP call to the GitHub API to get a list of users. Sending a GET request to https://api.github.com/users will get us 30 GitHub profiles.
<!-- src/components/Users.vue -->

<template>
  <h1>Users</h1>
  <button class="btn btn-primary" @click="fetchUsers()">
    Get Users
  </button>

  <div class="row">
    <div class="col-xs-6 col-md-3" v-for="user in users">
      <div class="thumbnail">
        <img :src="user.avatar_url" alt="{{ user.login }}">
        <div class="caption">
          <a :href="user.html_url">
            <h3 class="username">{{ user.login }}</h3>
          </a>
        </div>
      </div>
    </div>
  </div>
</template>

<script>
export default {
  data() {
    return {
      users: []
    }
  },

  methods: {
    fetchUsers() {
      this.$http.get('https://api.github.com/users', (data) => {
        this.users = data
      })
      .error((err) => console.log(err))
    }
  }
}
</script>

<style>
.username {
  text-align: center;
}
</style>
There’s a fair bit more going on in this component than the last one. Let’s start with the <script> area. Vue components need to export a plain object that is later converted into a component constructor function. This object will look somewhat like a regular Vue instance, with a few differences.
On the methods object, we have a function called fetchUsers. This method makes a GET request to the GitHub API and sets the returned data on the users array. If there is an error, it is logged to the console.
Within the <template>, we have some structure set up to display the user’s avatar and username with a link to their profile. As you can see, we’re making use of the new shorthand directive syntax with @click on the “Get Users” button, :src on the img tag, and :href on the a tag.
Even though we don’t really need it, we’re setting a style on username to see how we can make use of styles.
Hot Module Replacement in Action
As was mentioned earlier, one of the benefits of using Webpack with vue-loader is that we get hot module replacement for free. We can see this in action by putting our editor and broswer side-by-side. A simple edit to one of the templates will let us see the changes take effect immediately. For example, if we change the h1 in our Users.vue component and save, the new component will be swapped in the changes will be reflected automatically.
<!-- src/components/Users.vue -->

<template>
  <h1>GitHub Users</h1>
  ...
Just by saving, the change can be seen in the browser right away. This is true even if the app is in a state other than the starting state, which is awesome if we are working on something like a form flow that has us several levels deep.
Wrapping Up
Vue.js 1.0 brings a few syntax changes that make templating smoother. The more notable changes are the improvements to other parts of the Vue ecosystem like vue-loader and vueify. Hot module replacement and ES6 make for a very pleasant development experience.
Vue.js continues to provide an elegant and simple approach to Single Page App development. If you’re still deciding which framework to use for your next project, I highly recommend you give Vue a shot. You won’t be disappointed!
 Ryan Chenkie
Ryan is a full-stack developer from Canada who works for Auth0 as a Tech Writer where he provides in-depth tutorials and seed projects for the newest frameworks such as Angular 2, React, and Aurelia as well as other modern web technologies. Ryan also writes for his own site and you can get notified about his latest articles by signing up for his mailing list.