How To Set Up An Express API Backend Project With PostgreSQL

Email Newsletter
Weekly tips on front-end & UX.
Trusted by 200,000+ folks.


 Flexible CMS. Headless & API 1st
 Register!
We will take a Test-Driven Development (TDD) approach and the set up Continuous Integration (CI) job to automatically run our tests on Travis CI and AppVeyor, complete with code quality and coverage reporting. We will learn about controllers, models (with PostgreSQL), error handling, and asynchronous Express middleware. Finally, we’ll complete the CI/CD pipeline by configuring automatic deploy on Heroku.
It sounds like a lot, but this tutorial is aimed at beginners who are ready to try their hands on a back-end project with some level of complexity, and who may still be confused as to how all the pieces fit together in a real project.
It is robust without being overwhelming and is broken down into sections that you can complete in a reasonable length of time.
Getting Started
The first step is to create a new directory for the project and start a new node project. Node is required to continue with this tutorial. If you don’t have it installed, head over to the official website, download, and install it before continuing.
I will be using yarn as my package manager for this project. There are installation instructions for your specific operating system here. Feel free to use npm if you like.
Open your terminal, create a new directory, and start a Node.js project.
# create a new directory
mkdir express-api-template

# change to the newly-created directory
cd express-api-template

# initialize a new Node.js project
npm init
Answer the questions that follow to generate a package.json file. This file holds information about your project. Example of such information includes what dependencies it uses, the command to start the project, and so on.
You may now open the project folder in your editor of choice. I use visual studio code. It’s a free IDE with tons of plugins to make your life easier, and it’s available for all major platforms. You can download it from the official website.
Create the following files in the project folder:
- README.md
- .editorconfig
Here’s a description of what .editorconfig does from the EditorConfig website. (You probably don’t need it if you’re working solo, but it does no harm, so I’ll leave it here.)
“EditorConfig helps maintain consistent coding styles for multiple developers working on the same project across various editors and IDEs.”
Open .editorconfig and paste the following code:
root = true
[*]
indent_style = space
indent_size = 2
charset = utf-8
trim_trailing_whitespace = false
insert_final_newline = true
The [*] means that we want to apply the rules that come under it to every file in the project. We want an indent size of two spaces and UTF-8 character set. We also want to trim trailing white space and insert a final empty line in our file.
Open README.md and add the project name as a first-level element.
# Express API templateLet’s add version control right away.
# initialize the project folder as a git repository
git init
Create a .gitignore file and enter the following lines:
node_modules/
yarn-error.log
.env
.nyc_output
coverage
build/
These are all the files and folders we don’t want to track. We don’t have them in our project yet, but we’ll see them as we proceed.
At this point, you should have the following folder structure.
EXPRESS-API-TEMPLATE
├── .editorconfig
├── .gitignore
├── package.json
└── README.md
I consider this to be a good point to commit my changes and push them to GitHub.
Starting A New Express Project
Express is a Node.js framework for building web applications. According to the official website, it is a
Fast, unopinionated, minimalist web framework for Node.js.
There are other great web application frameworks for Node.js, but Express is very popular, with over 47k GitHub stars at the time of this writing.
In this article, we will not be having a lot of discussions about all the parts that make up Express. For that discussion, I recommend you check out Jamie’s series. The first part is here, and the second part is here.
Install Express and start a new Express project. It’s possible to manually set up an Express server from scratch but to make our life easier we’ll use the express-generator to set up the app skeleton.
# install the express generator globally
yarn global add express-generator

# install express
yarn add express

# generate the express project in the current folder
express -f
The -f flag forces Express to create the project in the current directory.
We’ll now perform some house-cleaning operations.
- Delete the file index/users.js.
- Delete the folders
public/andviews/. - Rename the file bin/www to bin/www.js.
- Uninstall
jadewith the commandyarn remove jade. - Create a new folder named
src/and move the following inside it: 1. app.js file 2.bin/folder 3.routes/folder inside. - Open up package.json and update the
startscript to look like below.
"start": "node ./src/bin/www"At this point, your project folder structure looks like below. You can see how VS Code highlights the file changes that have taken place.
EXPRESS-API-TEMPLATE
├── node_modules
├── src
|   ├── bin
│   │   ├── www.js
│   ├── routes
│   |   ├── index.js
│   └── app.js
├── .editorconfig
├── .gitignore
├── package.json
├── README.md
└── yarn.lock
Open src/app.js and replace the content with the below code.
var logger = require('morgan');
var express = require('express');
var cookieParser = require('cookie-parser');
var indexRouter = require('./routes/index');
var app = express();

app.use(logger('dev'));
app.use(express.json());
app.use(express.urlencoded({ extended: true }));
app.use(cookieParser());
app.use('/v1', indexRouter);

module.exports = app;
After requiring some libraries, we instruct Express to handle every request coming to /v1 with indexRouter.
Replace the content of routes/index.js with the below code:
var express = require('express');
var router = express.Router();
router.get('/', function(req, res, next) {
  return res.status(200).json({ message: 'Welcome to Express API template' });
});
module.exports = router;
We grab Express, create a router from it and serve the / route, which returns a status code of 200 and a JSON message.
Start the app with the below command:
# start the app
yarn start
If you’ve set up everything correctly you should only see $ node ./src/bin/www in your terminal.
Visit https://localhost:3000/v1 in your browser. You should see the following message:
{
  "message": "Welcome to Express API template"
}
This is a good point to commit our changes.
- The corresponding branch in my repo is 01-install-express.
Converting Our Code To ES6
The code generated by express-generator is in ES5, but in this article, we will be writing all our code in ES6 syntax. So, let’s convert our existing code to ES6.
Replace the content of routes/index.js with the below code:
import express from 'express';

const indexRouter = express.Router();

indexRouter.get('/', (req, res) =>
  res.status(200).json({ message: 'Welcome to Express API template' })
);

export default indexRouter;
It is the same code as we saw above, but with the import statement and an arrow function in the / route handler.
Replace the content of src/app.js with the below code:
import logger from 'morgan';
import express from 'express';
import cookieParser from 'cookie-parser';
import indexRouter from './routes/index';
const app = express();
app.use(logger('dev'));
app.use(express.json());
app.use(express.urlencoded({ extended: true }));
app.use(cookieParser());
app.use('/v1', indexRouter);

export default app;
Let’s now take a look at the content of src/bin/www.js. We will build it incrementally. Delete the content of src/bin/www.js and paste in the below code block.
#!/usr/bin/env node
/**
 * Module dependencies.
 */
import debug from 'debug';
import http from 'http';
import app from '../app';
/**
 * Normalize a port into a number, string, or false.
 */
const normalizePort = val => {
  const port = parseInt(val, 10);
  if (Number.isNaN(port)) {
    // named pipe
    return val;
  }
  if (port >= 0) {
    // port number
    return port;
  }
  return false;
};

/**
 * Get port from environment and store in Express.
 */
const port = normalizePort(process.env.PORT || '3000');
app.set('port', port);

/**
 * Create HTTP server.
 */
const server = http.createServer(app);

// next code block goes here
This code checks if a custom port is specified in the environment variables. If none is set the default port value of 3000 is set on the app instance, after being normalized to either a string or a number by normalizePort. The server is then created from the http module, with app as the callback function.
The #!/usr/bin/env node line is optional since we would specify node when we want to execute this file. But make sure it is on line 1 of src/bin/www.js file or remove it completely.
Let’s take a look at the error handling function. Copy and paste this code block after the line where the server is created.
/**
 * Event listener for HTTP server "error" event.
 */
const onError = error => {
  if (error.syscall !== 'listen') {
    throw error;
  }
  const bind = typeof port === 'string' ? `Pipe ${port}` : `Port ${port}`;
  // handle specific listen errors with friendly messages
  switch (error.code) {
    case 'EACCES':
      alert(`${bind} requires elevated privileges`);
      process.exit(1);
      break;
    case 'EADDRINUSE':
      alert(`${bind} is already in use`);
      process.exit(1);
      break;
    default:
      throw error;
  }
};

/**
 * Event listener for HTTP server "listening" event.
 */
const onListening = () => {
  const addr = server.address();
  const bind = typeof addr === 'string' ? `pipe ${addr}` : `port ${addr.port}`;
  debug(`Listening on ${bind}`);
};
/**
 * Listen on provided port, on all network interfaces.
 */
server.listen(port);
server.on('error', onError);
server.on('listening', onListening);
The onError function listens for errors in the http server and displays appropriate error messages. The onListening function simply outputs the port the server is listening on to the console. Finally, the server listens for incoming requests at the specified address and port.
At this point, all our existing code is in ES6 syntax. Stop your server (use Ctrl + C) and run yarn start. You’ll get an error SyntaxError: Invalid or unexpected token. This happens because Node (at the time of writing) doesn’t support some of the syntax we’ve used in our code.
We’ll now fix that in the following section.
Configuring Development Dependencies: babel, nodemon, eslint, And prettier
It’s time to set up most of the scripts we’re going to need at this phase of the project.
Install the required libraries with the below commands. You can just copy everything and paste it in your terminal. The comment lines will be skipped.
# install babel scripts
yarn add @babel/cli @babel/core @babel/plugin-transform-runtime @babel/preset-env @babel/register @babel/runtime @babel/node --dev
This installs all the listed babel scripts as development dependencies. Check your package.json file and you should see a devDependencies section. All the installed scripts will be listed there.
The babel scripts we’re using are explained below:
@babel/cli | A required install for using babel. It allows the use of Babel from the terminal and is available as ./node_modules/.bin/babel. |
@babel/core | Core Babel functionality. This is a required installation. |
@babel/node | This works exactly like the Node.js CLI, with the added benefit of compiling with babel presets and plugins. This is required for use with nodemon. |
@babel/plugin-transform-runtime | This helps to avoid duplication in the compiled output. |
@babel/preset-env | A collection of plugins that are responsible for carrying out code transformations. |
@babel/register | This compiles files on the fly and is specified as a requirement during tests. |
@babel/runtime | This works in conjunction with @babel/plugin-transform-runtime. |
Create a file named .babelrc at the root of your project and add the following code:
{
  "presets": ["@babel/preset-env"],
  "plugins": ["@babel/transform-runtime"]
}
Let’s install nodemon
# install nodemon
yarn add nodemon --dev
nodemon is a library that monitors our project source code and automatically restarts our server whenever it observes any changes.
Create a file named nodemon.json at the root of your project and add the code below:
{
  "watch": [
    "package.json",
    "nodemon.json",
    ".eslintrc.json",
    ".babelrc",
    ".prettierrc",
    "src/"
  ],
  "verbose": true,
  "ignore": ["*.test.js", "*.spec.js"]
}
The watch key tells nodemon which files and folders to watch for changes. So, whenever any of these files changes, nodemon restarts the server. The ignore key tells it the files not to watch for changes.
Now update the scripts section of your package.json file to look like the following:
# build the content of the src folder
"prestart": "babel ./src --out-dir build"

# start server from the build folder
"start": "node ./build/bin/www"

# start server in development mode
"startdev": "nodemon --exec babel-node ./src/bin/www"prestartscripts builds the content of thesrc/folder and puts it in thebuild/folder. When you issue theyarn startcommand, this script runs first before thestartscript.startscript now serves the content of thebuild/folder instead of thesrc/folder we were serving previously. This is the script you’ll use when serving the file in production. In fact, services like Heroku automatically run this script when you deploy.yarn startdevis used to start the server during development. From now on we will be using this script as we develop the app. Notice that we’re now usingbabel-nodeto run the app instead of regularnode. The--execflag forcesbabel-nodeto serve thesrc/folder. For thestartscript, we usenodesince the files in thebuild/folder have been compiled to ES5.
Run yarn startdev and visit https://localhost:3000/v1. Your server should be up and running again.
The final step in this section is to configure ESLint and prettier. ESLint helps with enforcing syntax rules while prettier helps for formatting our code properly for readability.
Add both of them with the command below. You should run this on a separate terminal while observing the terminal where our server is running. You should see the server restarting. This is because we’re monitoring package.json file for changes.
# install elsint and prettier

yarn add eslint eslint-config-airbnb-base eslint-plugin-import prettier --dev
Now create the .eslintrc.json file in the project root and add the below code:
{
  "env": {
    "browser": true,
    "es6": true,
    "node": true,
    "mocha": true
  },
  "extends": ["airbnb-base"],
  "globals": {
    "Atomics": "readonly",
    "SharedArrayBuffer": "readonly"
  },
  "parserOptions": {
    "ecmaVersion": 2018,
    "sourceType": "module"
  },
  "rules": {
    "indent": ["warn", 2],
    "linebreak-style": ["error", "unix"],
    "quotes": ["error", "single"],
    "semi": ["error", "always"],
    "no-console": 1,
    "comma-dangle": [0],
    "arrow-parens": [0],
    "object-curly-spacing": ["warn", "always"],
    "array-bracket-spacing": ["warn", "always"],
    "import/prefer-default-export": [0]
  }
}
This file mostly defines some rules against which eslint will check our code. You can see that we’re extending the style rules used by Airbnb.
In the "rules" section, we define whether eslint should show a warning or an error when it encounters certain violations. For instance, it shows a warning message on our terminal for any indentation that does not use 2 spaces. A value of [0] turns off a rule, which means that we won’t get a warning or an error if we violate that rule.
Create a file named .prettierrc and add the code below:
{
  "trailingComma": "es5",
  "tabWidth": 2,
  "semi": true,
  "singleQuote": true
}
We’re setting a tab width of 2 and enforcing the use of single quotes throughout our application. Do check the prettier guide for more styling options.
Now add the following scripts to your package.json:
# add these one after the other

"lint": "./node_modules/.bin/eslint ./src"

"pretty": "prettier --write '**/*.{js,json}' '!node_modules/**'"

"postpretty": "yarn lint --fix"
Run yarn lint. You should see a number of errors and warnings in the console.
The pretty command prettifies our code. The postpretty command is run immediately after. It runs the lint command with the --fix flag appended. This flag tells ESLint to automatically fix common linting issues. In this way, I mostly run the yarn pretty command without bothering about the lint command.
Run yarn pretty. You should see that we have only two warnings about the presence of alert in the bin/www.js file.
Here’s what our project structure looks like at this point.
EXPRESS-API-TEMPLATE
├── build
├── node_modules
├── src
|   ├── bin
│   │   ├── www.js
│   ├── routes
│   |   ├── index.js
│   └── app.js
├── .babelrc
├── .editorconfig
├── .eslintrc.json
├── .gitignore
├── .prettierrc
├── nodemon.json
├── package.json
├── README.md
└── yarn.lock
You may find that you have an additional file, yarn-error.log in your project root. Add it to .gitignore file. Commit your changes.
- The corresponding branch at this point in my repo is 02-dev-dependencies.
Settings And Environment Variables In Our .env File
In nearly every project, you’ll need somewhere to store settings that will be used throughout your app e.g. an AWS secret key. We store such settings as environment variables. This keeps them away from prying eyes, and we can use them within our application as needed.
I like having a settings.js file with which I read all my environment variables. Then, I can refer to the settings file from anywhere within my app. You’re at liberty to name this file whatever you want, but there’s some kind of consensus about naming such files settings.js or config.js.
For our environment variables, we’ll keep them in a .env file and read them into our settings file from there.
Create the .env file at the root of your project and enter the below line:
TEST_ENV_VARIABLE="Environment variable is coming across"
To be able to read environment variables into our project, there’s a nice library, dotenv that reads our .env file and gives us access to the environment variables defined inside. Let’s install it.
# install dotenv
yarn add dotenv
Add the .env file to the list of files being watched by nodemon.
Now, create the settings.js file inside the src/ folder and add the below code:
import dotenv from 'dotenv';
dotenv.config();
export const testEnvironmentVariable = process.env.TEST_ENV_VARIABLE;
We import the dotenv package and call its config method. We then export the testEnvironmentVariable which we set in our .env file.
Open src/routes/index.js and replace the code with the one below.
import express from 'express';
import { testEnvironmentVariable } from '../settings';

const indexRouter = express.Router();

indexRouter.get('/', (req, res) => res.status(200).json({ message: testEnvironmentVariable }));

export default indexRouter;
The only change we’ve made here is that we import testEnvironmentVariable from our settings file and use is as the return message for a request from the / route.
Visit https://localhost:3000/v1 and you should see the message, as shown below.
{
  "message": "Environment variable is coming across."
}
And that’s it. From now on we can add as many environment variables as we want and we can export them from our settings.js file.
This is a good point to commit your code. Remember to prettify and lint your code.
- The corresponding branch on my repo is 03-env-variables.
Writing Our First Test
It’s time to incorporate testing into our app. One of the things that give the developer confidence in their code is tests. I’m sure you’ve seen countless articles on the web preaching Test-Driven Development (TDD). It cannot be emphasized enough that your code needs some measure of testing. TDD is very easy to follow when you’re working with Express.js.
In our tests, we will make calls to our API endpoints and check to see if what is returned is what we expect.
Install the required dependencies:
# install dependencies

yarn add mocha chai nyc sinon-chai supertest coveralls --dev
Each of these libraries has its own role to play in our tests.
mocha | test runner |
chai | used to make assertions |
nyc | collect test coverage report |
sinon-chai | extends chai’s assertions |
supertest | used to make HTTP calls to our API endpoints |
coveralls | for uploading test coverage to coveralls.io |
Create a new test/ folder at the root of your project. Create two files inside this folder:
- test/setup.js
- test/index.test.js
Mocha will find the test/ folder automatically.
Open up test/setup.js and paste the below code. This is just a helper file that helps us organize all the imports we need in our test files.
import supertest from 'supertest';
import chai from 'chai';
import sinonChai from 'sinon-chai';
import app from '../src/app';

chai.use(sinonChai);
export const { expect } = chai;
export const server = supertest.agent(app);
export const BASE_URL = '/v1';
This is like a settings file, but for our tests. This way we don’t have to initialize everything inside each of our test files. So we import the necessary packages and export what we initialized — which we can then import in the files that need them.
Open up index.test.js and paste the following test code.
import { expect, server, BASE_URL } from './setup';

describe('Index page test', () => {
  it('gets base url', done => {
    server
      .get(`${BASE_URL}/`)
      .expect(200)
      .end((err, res) => {
        expect(res.status).to.equal(200);
        expect(res.body.message).to.equal(
          'Environment variable is coming across.'
        );
        done();
      });
  });
});
Here we make a request to get the base endpoint, which is / and assert that the res.body object has a message key with a value of Environment variable is coming across.
If you’re not familiar with the describe, it pattern, I encourage you to take a quick look at Mocha’s “Getting Started” doc.
Add the test command to the scripts section of package.json.
"test": "nyc --reporter=html --reporter=text --reporter=lcov mocha -r @babel/register"This script executes our test with nyc and generates three kinds of coverage report: an HTML report, outputted to the coverage/ folder; a text report outputted to the terminal and an lcov report outputted to the .nyc_output/ folder.
Now run yarn test. You should see a text report in your terminal just like the one in the below photo.
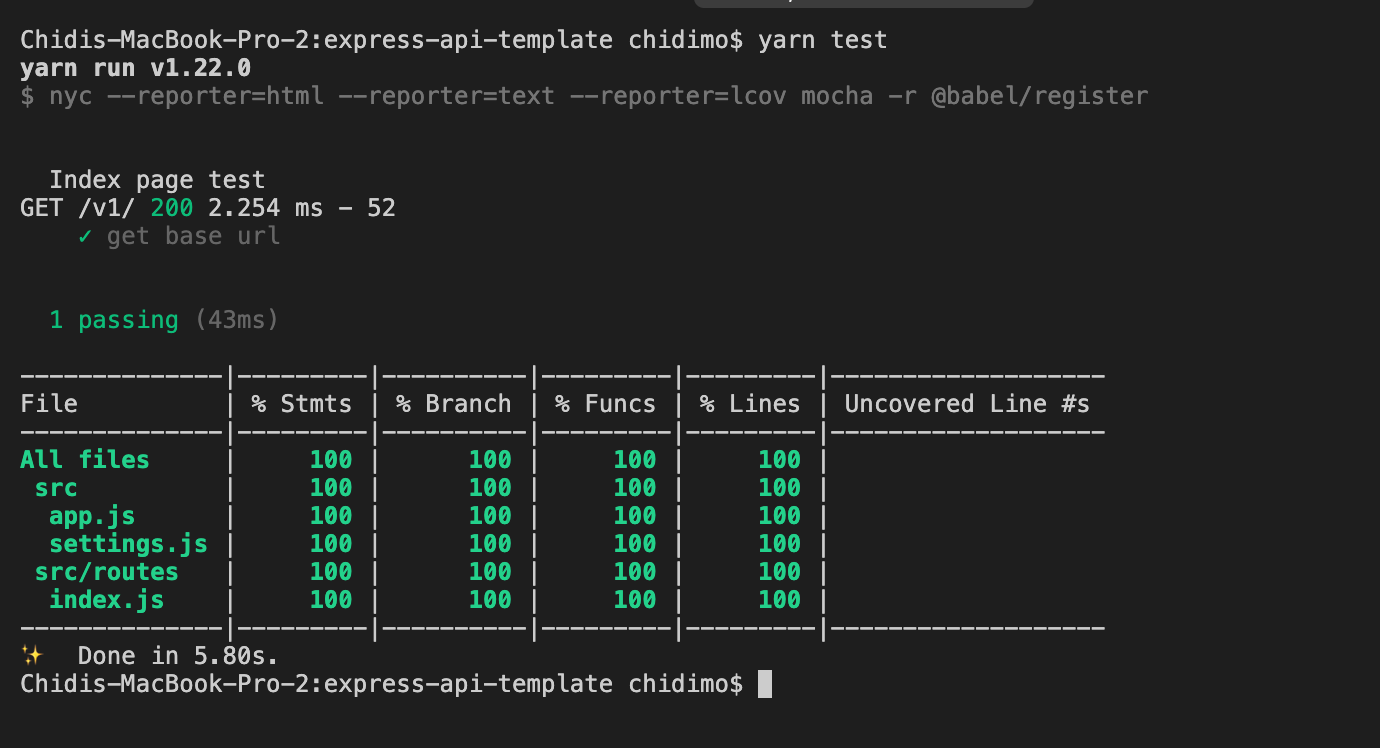
Notice that two additional folders are generated:
.nyc_output/coverage/
Look inside .gitignore and you’ll see that we’re already ignoring both. I encourage you to open up coverage/index.html in a browser and view the test report for each file.
This is a good point to commit your changes.
- The corresponding branch in my repo is 04-first-test.
Continuous Integration(CD) And Badges: Travis, Coveralls, Code Climate, AppVeyor
It’s now time to configure continuous integration and deployment (CI/CD) tools. We will configure common services such as travis-ci, coveralls, AppVeyor, and codeclimate and add badges to our README file.
Let’s get started.
Travis CI
Travis CI is a tool that runs our tests automatically each time we push a commit to GitHub (and recently, Bitbucket) and each time we create a pull request. This is mostly useful when making pull requests by showing us if the our new code has broken any of our tests.
- Visit travis-ci.com or travis-ci.org and create an account if you don’t have one. You have to sign up with your GitHub account.
- Hover over the dropdown arrow next to your profile picture and click on
settings. - Under
Repositoriestab clickManage repositories on Githubto be redirected to Github. - On the GitHub page, scroll down to
Repository accessand click the checkbox next toOnly select repositories. - Click the
Select repositoriesdropdown and find theexpress-api-templaterepo. Click it to add it to the list of repositories you want to add totravis-ci. - Click
Approve and installand wait to be redirected back totravis-ci. - At the top of the repo page, close to the repo name, click on the
build unknownicon. From the Status Image modal, select markdown from the format dropdown. - Copy the resulting code and paste it in your README.md file.
- On the project page, click on
More options>Settings. UnderEnvironment Variablessection, add theTEST_ENV_VARIABLEenv variable. When entering its value, be sure to have it within double quotes like this"Environment variable is coming across." - Create .travis.yml file at the root of your project and paste in the below code (We’ll set the value of
CC_TEST_REPORTER_IDin the Code Climate section).
language: node_js
env:
  global:
    - CC_TEST_REPORTER_ID=get-this-from-code-climate-repo-page
matrix:
  include:
  - node_js: '12'
cache:
  directories: [node_modules]
install:
  yarn
after_success: yarn coverage
before_script:
  - curl -L https://codeclimate.com/downloads/test-reporter/test-reporter-latest-linux-amd64 > ./cc-test-reporter
  - chmod +x ./cc-test-reporter
  - ./cc-test-reporter before-build
script:
  - yarn test
after_script:
  - ./cc-test-reporter after-build --exit-code $TRAVIS_TEST_RESUL
First, we tell Travis to run our test with Node.js, then set the CC_TEST_REPORTER_ID global environment variable (we’ll get to this in the Code Climate section). In the matrix section, we tell Travis to run our tests with Node.js v12. We also want to cache the node_modules/ directory so it doesn’t have to be regenerated every time.
We install our dependencies using the yarn command which is a shorthand for yarn install. The before_script and after_script commands are used to upload coverage results to codeclimate. We’ll configure codeclimate shortly. After yarn test runs successfully, we want to also run yarn coverage which will upload our coverage report to coveralls.io.
Coveralls
Coveralls uploads test coverage data for easy visualization. We can view the test coverage on our local machine from the coverage folder, but Coveralls makes it available outside our local machine.
- Visit coveralls.io and either sign in or sign up with your Github account.
- Hover over the left-hand side of the screen to reveal the navigation menu. Click on
ADD REPOS. - Search for the
express-api-templaterepo and turn on coverage using the toggle button on the left-hand side. If you can’t find it, click onSYNC REPOSon the upper right-hand corner and try again. Note that your repo has to be public, unless you have a PRO account. - Click details to go to the repo details page.
- Create the .coveralls.yml file at the root of your project and enter the below code. To get the
repo_token, click on the repo details. You will find it easily on that page. You could just do a browser search forrepo_token.
repo_token: get-this-from-repo-settings-on-coveralls.ioThis token maps your coverage data to a repo on Coveralls. Now, add the coverage command to the scripts section of your package.json file:
"coverage": "nyc report --reporter=text-lcov | coveralls"
This command uploads the coverage report in the .nyc_output folder to coveralls.io. Turn on your Internet connection and run:
yarn coverage
This should upload the existing coverage report to coveralls. Refresh the repo page on coveralls to see the full report.
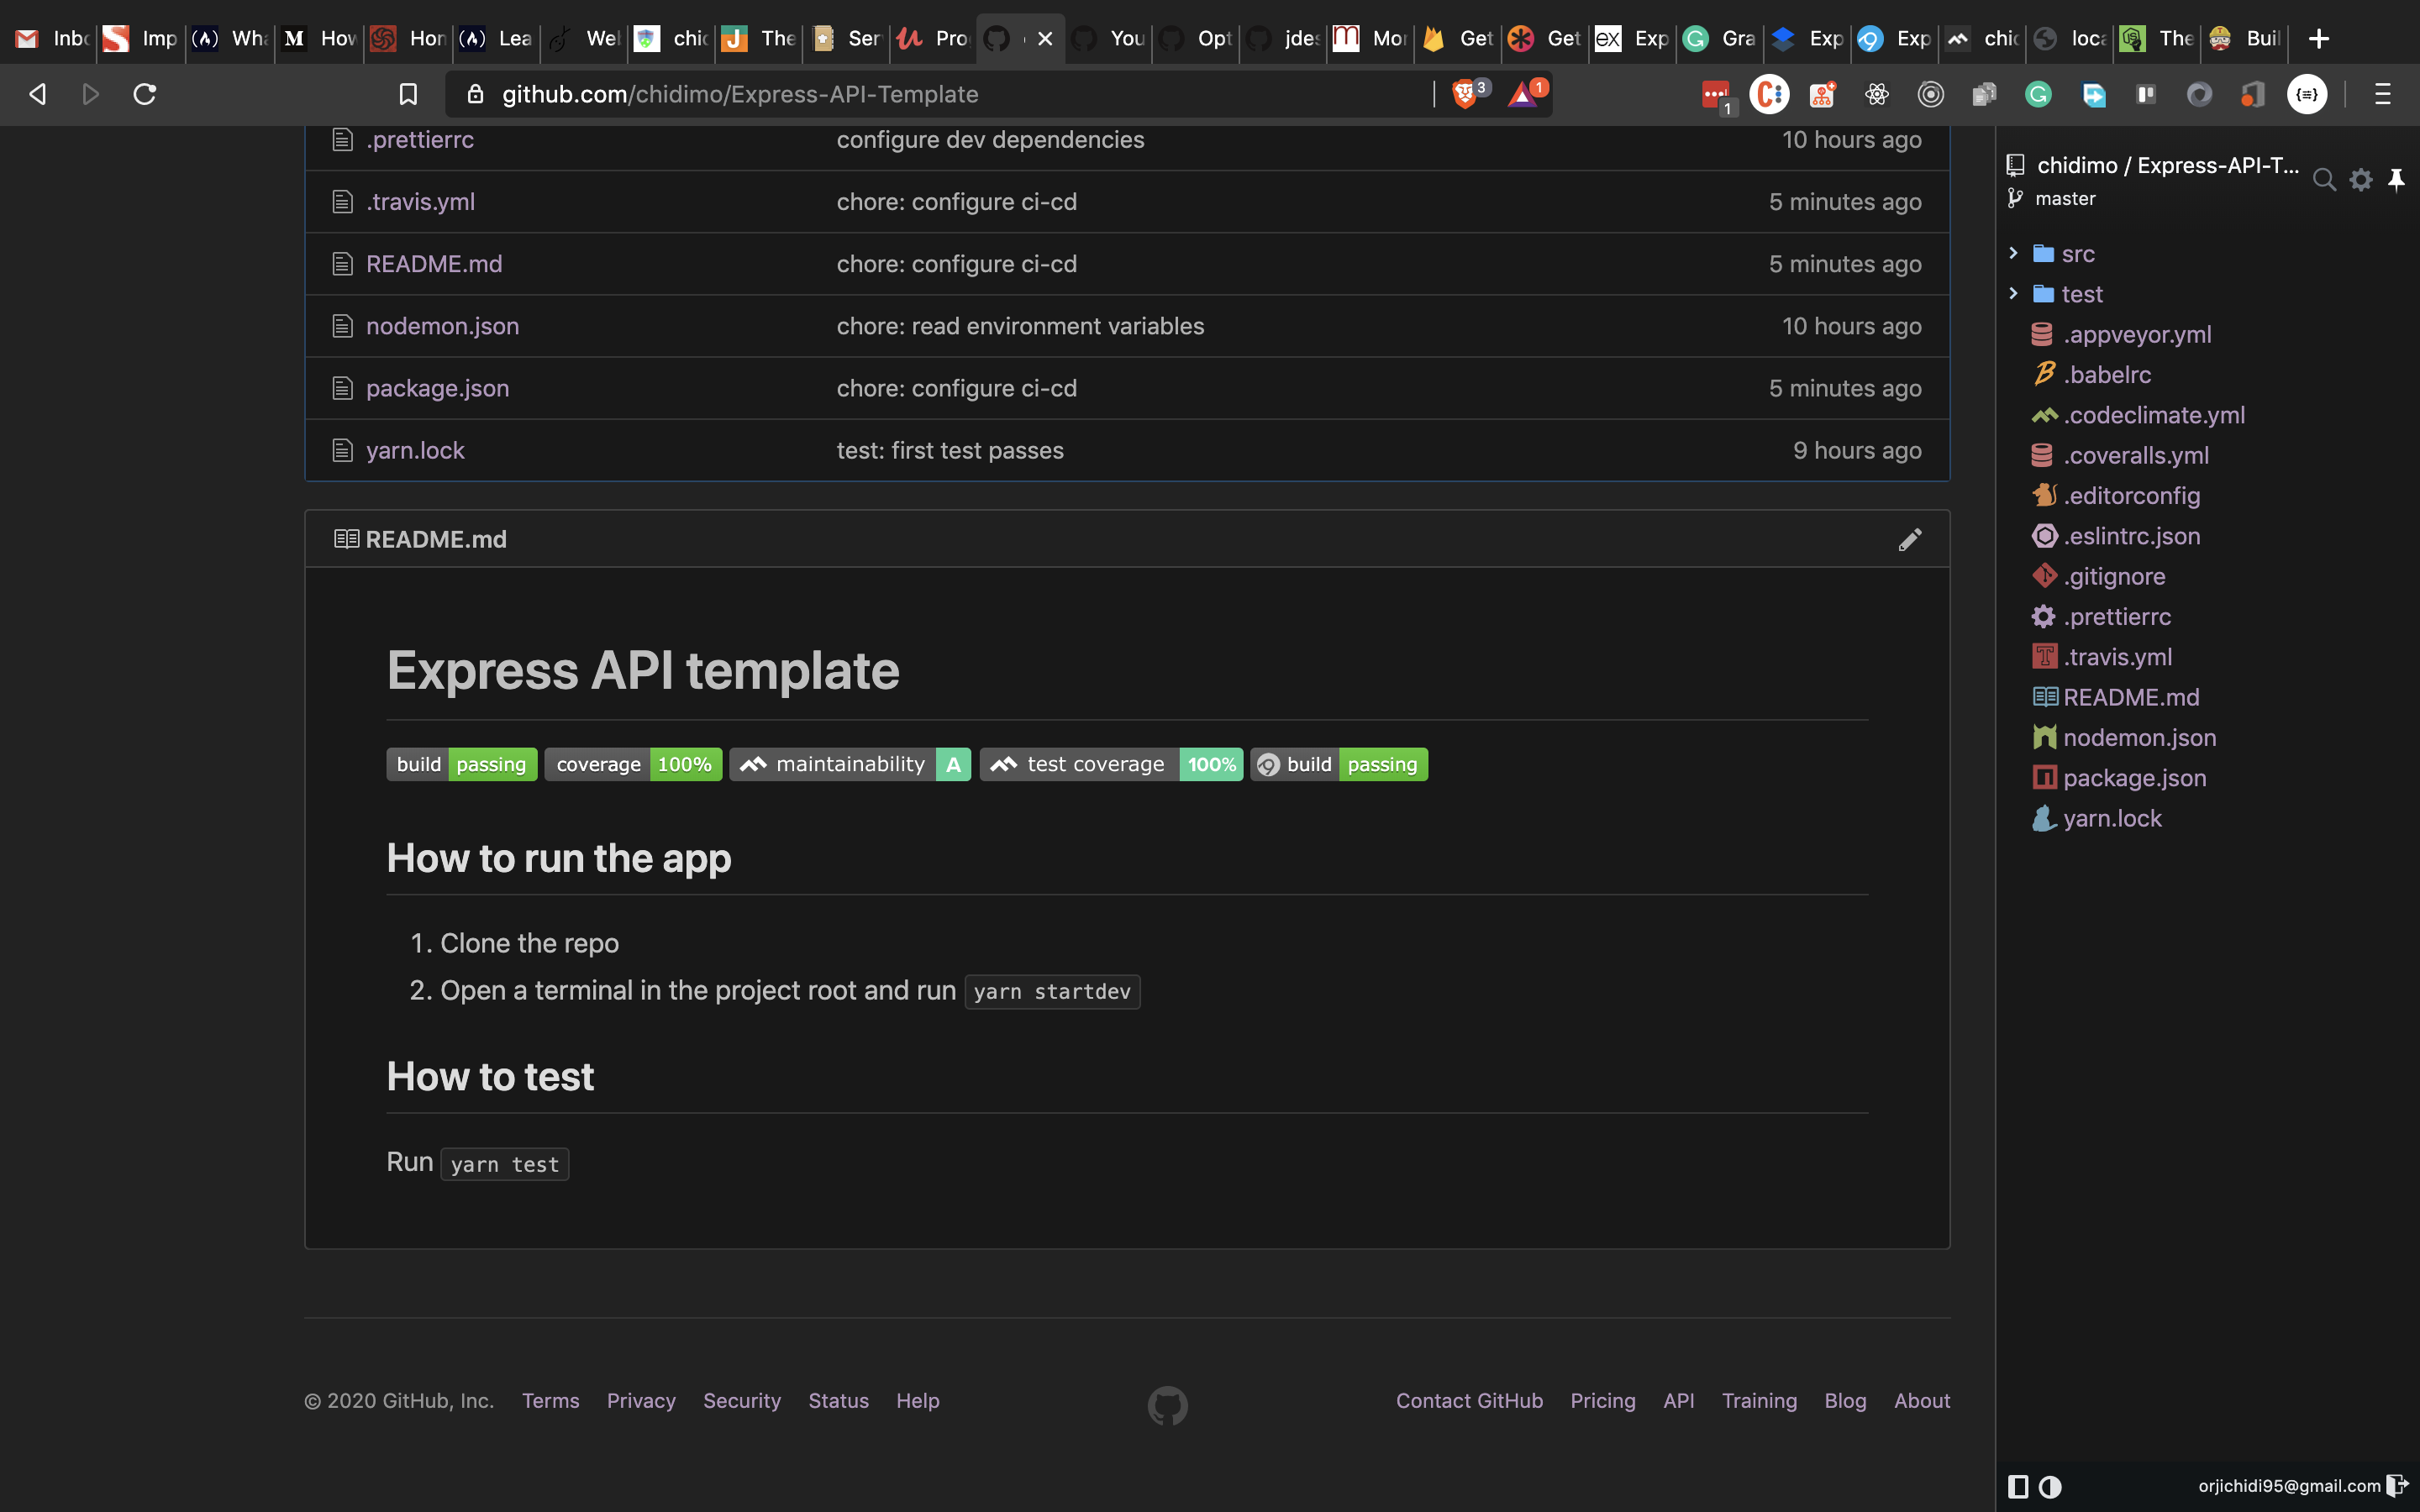
On the details page, scroll down to find the BADGE YOUR REPO section. Click on the EMBED dropdown and copy the markdown code and paste it into your README file.
Code Climate
Code Climate is a tool that helps us measure code quality. It shows us maintenance metrics by checking our code against some defined patterns. It detects things such as unnecessary repetition and deeply nested for loops. It also collects test coverage data just like coveralls.io.
- Visit codeclimate.com and click on ‘Sign up with GitHub’. Log in if you already have an account.
- Once in your dashboard, click on
Add a repository. - Find the
express-api-templaterepo from the list and click onAdd Repo. - Wait for the build to complete and redirect to the repo dashboard.
- Under
Codebase Summary, click onTest Coverage. Under theTest coveragemenu, copy theTEST REPORTER IDand paste it in your .travis.yml as the value ofCC_TEST_REPORTER_ID. - Still on the same page, on the left-hand navigation, under
EXTRAS, click on Badges. Copy themaintainabilityandtest coveragebadges in markdown format and paste them into your README.md file.
It’s important to note that there are two ways of configuring maintainability checks. There are the default settings that are applied to every repo, but if you like, you could provide a .codeclimate.yml file at the root of your project. I’ll be using the default settings, which you can find under the Maintainability tab of the repo settings page. I encourage you to take a look at least. If you still want to configure your own settings, this guide will give you all the information you need.
AppVeyor
AppVeyor and Travis CI are both automated test runners. The main difference is that travis-ci runs tests in a Linux environment while AppVeyor runs tests in a Windows environment. This section is included to show how to get started with AppVeyor.
- Visit AppVeyor and log in or sign up.
- On the next page, click on
NEW PROJECT. - From the repo list, find the
express-api-templaterepo. Hover over it and clickADD. - Click on the
Settingstab. Click onEnvironmenton the left navigation. AddTEST_ENV_VARIABLEand its value. Click ‘Save’ at the bottom of the page. - Create the appveyor.yml file at the root of your project and paste in the below code.
environment:
  matrix:
  - nodejs_version: "12"
install:
  - yarn
test_script:
  - yarn test
build: off
This code instructs AppVeyor to run our tests using Node.js v12. We then install our project dependencies with the yarn command. test_script specifies the command to run our test. The last line tells AppVeyor not to create a build folder.
Click on the Settings tab. On the left-hand navigation, click on badges. Copy the markdown code and paste it in your README.md file.
Commit your code and push to GitHub. If you have done everything as instructed all tests should pass and you should see your shiny new badges as shown below. Check again that you have set the environment variables on Travis and AppVeyor.
Now is a good time to commit our changes.
- The corresponding branch in my repo is 05-ci.
Adding A Controller
Currently, we’re handling the GET request to the root URL, /v1, inside the src/routes/index.js. This works as expected and there is nothing wrong with it. However, as your application grows, you want to keep things tidy. You want concerns to be separated — you want a clear separation between the code that handles the request and the code that generates the response that will be sent back to the client. To achieve this, we write controllers. Controllers are simply functions that handle requests coming through a particular URL.
To get started, create a controllers/ folder inside the src/ folder. Inside controllers create two files: index.js and home.js. We would export our functions from within index.js. You could name home.js anything you want, but typically you want to name controllers after what they control. For example, you might have a file usersController.js to hold every function related to users in your app.
Open src/controllers/home.js and enter the code below:
import { testEnvironmentVariable } from '../settings';

export const indexPage = (req, res) => res.status(200).json({ message: testEnvironmentVariable });
You will notice that we only moved the function that handles the request for the / route.
Open src/controllers/index.js and enter the below code.
// export everything from home.js
export * from './home';
We export everything from the home.js file. This allows us shorten our import statements to import { indexPage } from '../controllers';
Open src/routes/index.js and replace the code there with the one below:
import express from 'express';
import { indexPage } from '../controllers';
const indexRouter = express.Router();

indexRouter.get('/', indexPage);

export default indexRouter;
The only change here is that we’ve provided a function to handle the request to the / route.
You just successfully wrote your first controller. From here it’s a matter of adding more files and functions as needed.
Go ahead and play with the app by adding a few more routes and controllers. You could add a route and a controller for the about page. Remember to update your test, though.
Run yarn test to confirm that we’ve not broken anything. Does your test pass? That’s cool.
This is a good point to commit our changes.
- The corresponding branch in my repo is 06-controllers.
Connecting The PostgreSQL Database And Writing A Model
Our controller currently returns hard-coded text messages. In a real-world app, we often need to store and retrieve information from a database. In this section, we will connect our app to a PostgreSQL database.
We’re going to implement the storage and retrieval of simple text messages using a database. We have two options for setting a database: we could provision one from a cloud server, or we could set up our own locally.
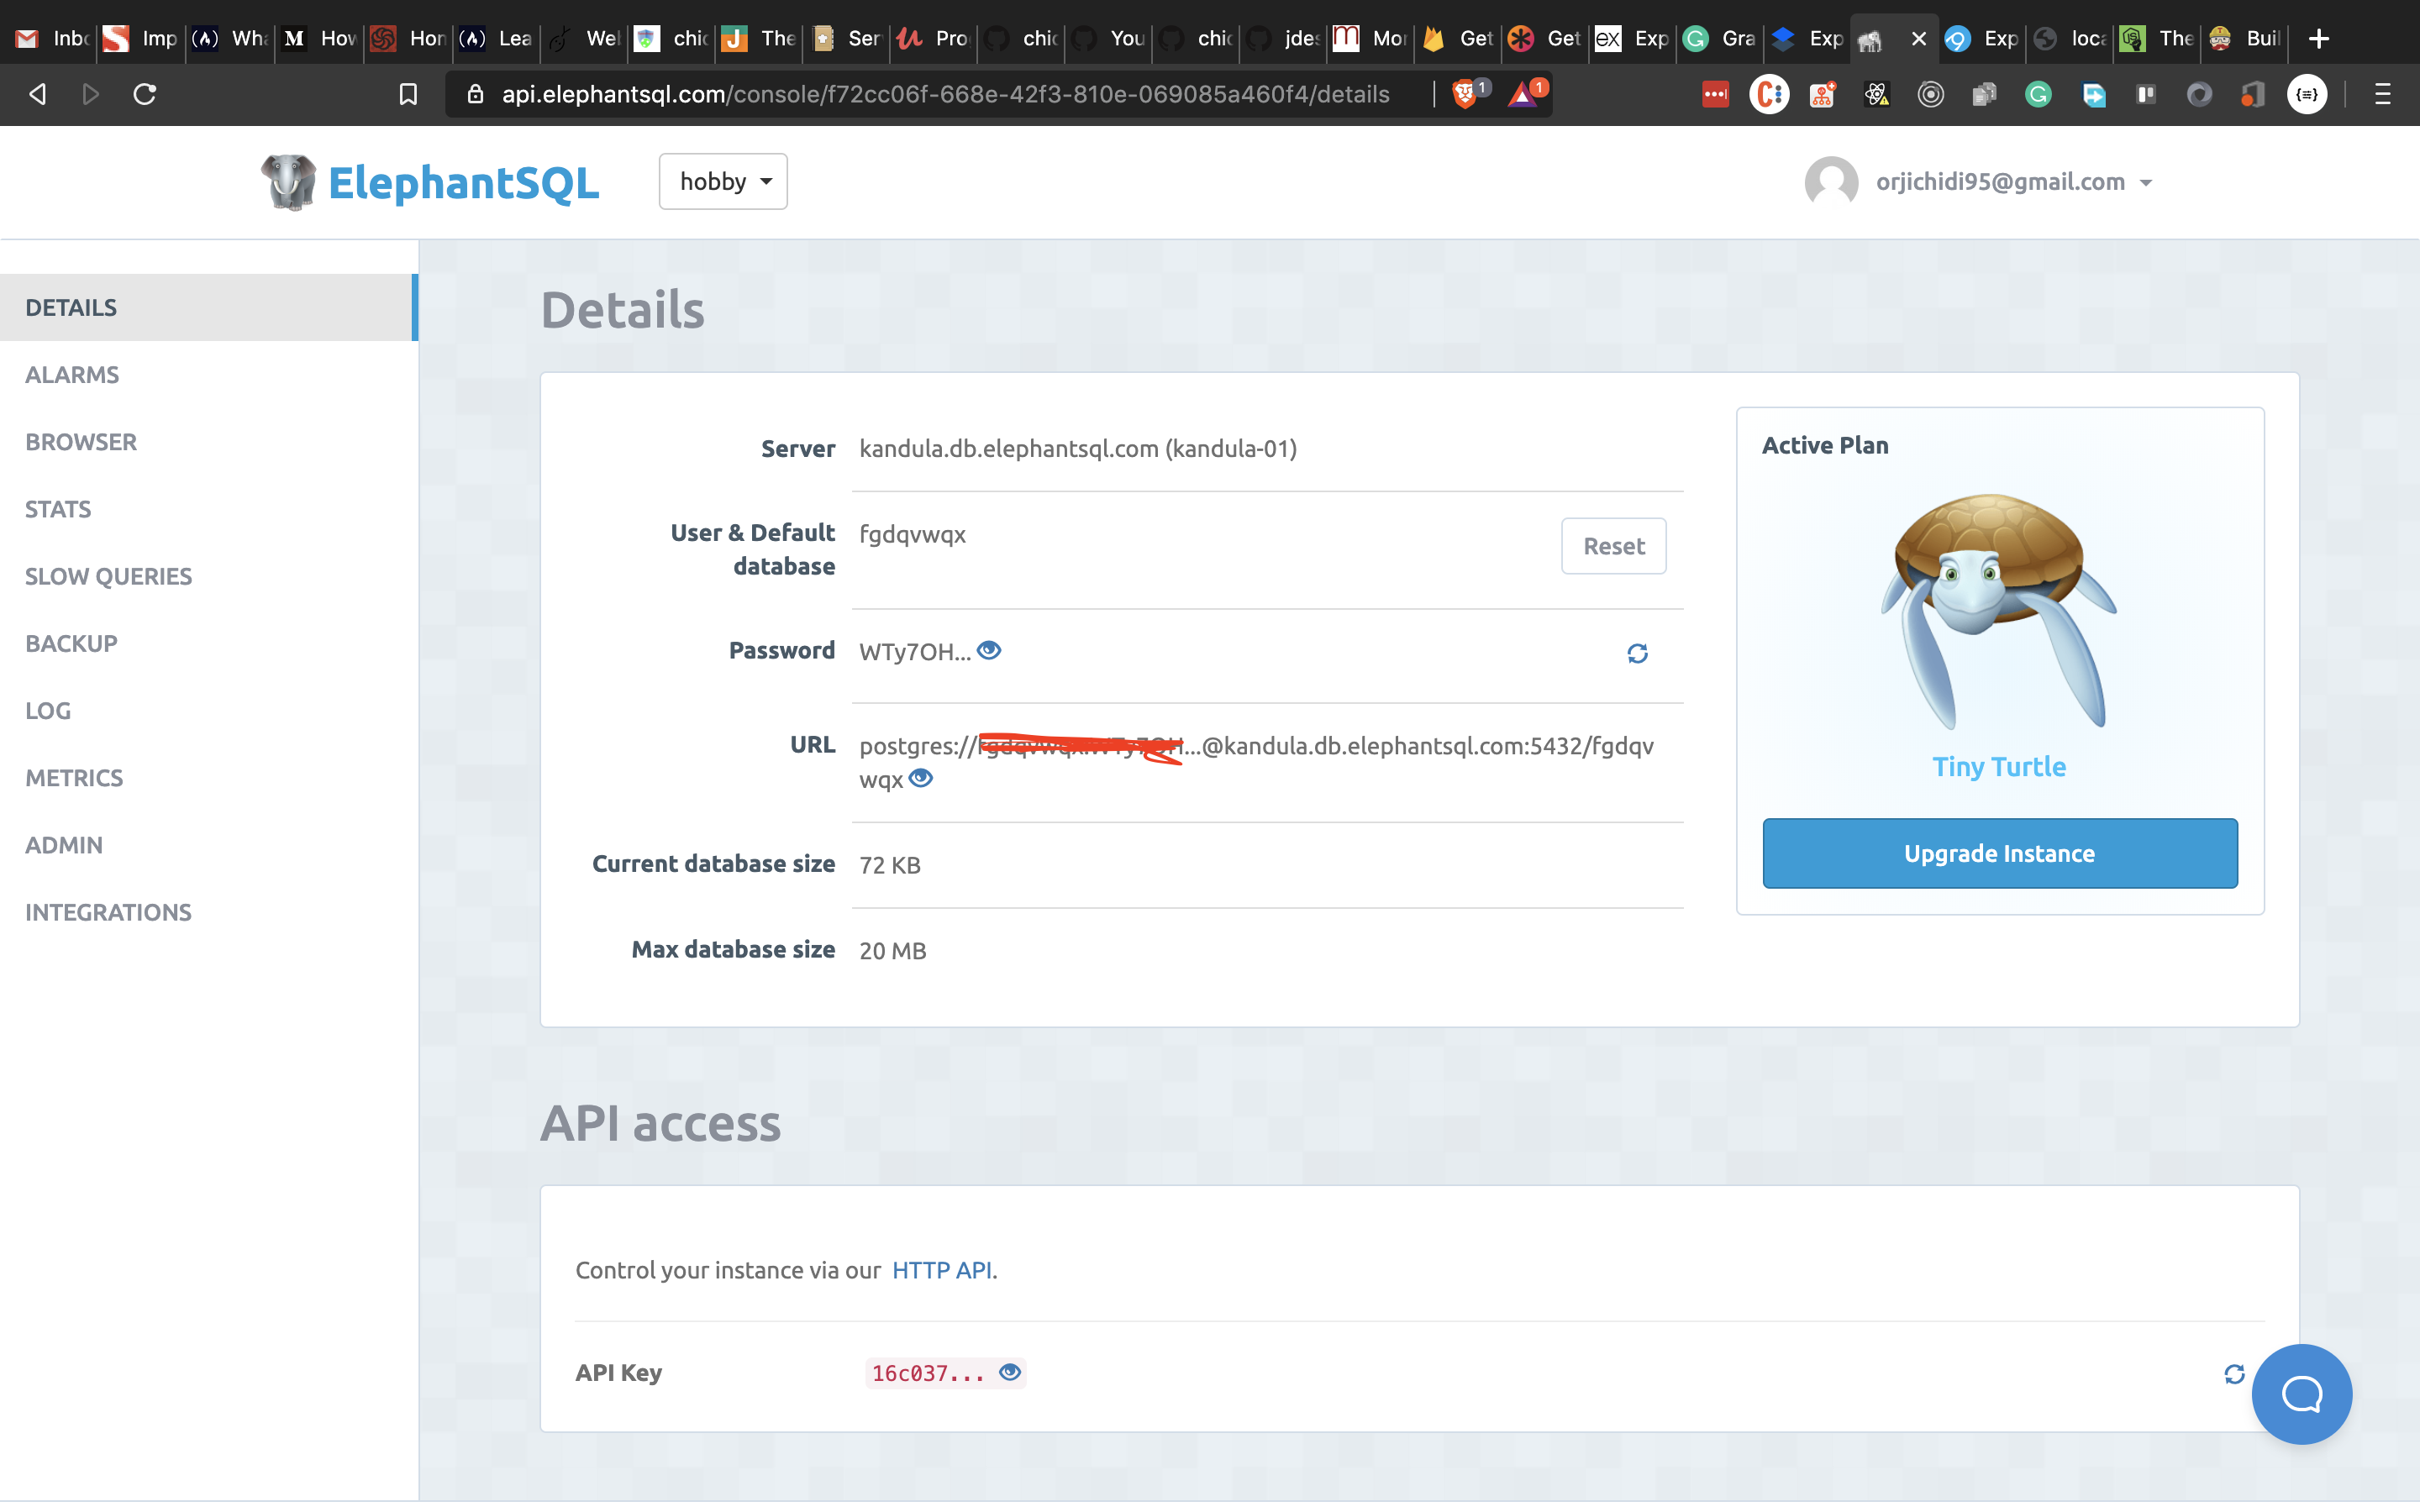
I would recommend you provision a database from a cloud server. ElephantSQL has a free plan that gives 20MB of free storage which is sufficient for this tutorial. Visit the site and click on Get a managed database today. Create an account (if you don’t have one) and follow the instructions to create a free plan. Take note of the URL on the database details page. We’ll be needing it soon.
If you would rather set up a database locally, you should visit the PostgreSQL and PgAdmin sites for further instructions.
Once we have a database set up, we need to find a way to allow our Express app to communicate with our database. Node.js by default doesn’t support reading and writing to PostgreSQL database, so we’ll be using an excellent library, appropriately named, node-postgres.
node-postgres executes SQL queries in node and returns the result as an object, from which we can grab items from the rows key.
Let’s connect node-postgres to our application.
# install node-postgres
yarn add pg
Open settings.js and add the line below:
export const connectionString = process.env.CONNECTION_STRING;Open your .env file and add the CONNECTION_STRING variable. This is the connection string we’ll be using to establish a connection to our database. The general form of the connection string is shown below.
CONNECTION_STRING="postgresql://dbuser:dbpassword@localhost:5432/dbname"If you’re using elephantSQL you should copy the URL from the database details page.
Inside your /src folder, create a new folder called models/. Inside this folder, create two files:
- pool.js
- model.js
Open pools.js and paste the following code:
import { Pool } from 'pg';
import dotenv from 'dotenv';
import { connectionString } from '../settings';
dotenv.config();

export const pool = new Pool({ connectionString });
First, we import the Pool and dotenv from the pg and dotenv packages, and then import the settings we created for our postgres database before initializing dotenv. We establish a connection to our database with the Pool object. In node-postgres, every query is executed by a client. A Pool is a collection of clients for communicating with the database.
To create the connection, the pool constructor takes a config object. You can read more about all the possible configurations here. It also accepts a single connection string, which I will use here.
Open model.js and paste the following code:
import { pool } from './pool';

class Model {
  constructor(table) {
    this.pool = pool;
    this.table = table;
    this.pool.on('error', (err, client) => `Error, ${err}, on idle client${client}`);
  }

  async select(columns, clause) {
    let query = `SELECT ${columns} FROM ${this.table}`;
    if (clause) query += clause;
    return this.pool.query(query);
  }
}

export default Model;
We create a model class whose constructor accepts the database table we wish to operate on. We’ll be using a single pool for all our models.
We then create a select method which we will use to retrieve items from our database. This method accepts the columns we want to retrieve and a clause, such as a WHERE clause. It returns the result of the query, which is a Promise. Remember we said earlier that every query is executed by a client, but here we execute the query with pool. This is because, when we use pool.query, node-postgres executes the query using the first available idle client.
The query you write is entirely up to you, provided it is a valid SQL statement that can be executed by a Postgres engine.
The next step is to actually create an API endpoint to utilize our newly connected database. Before we do that, I’d like us to create some utility functions. The goal is for us to have a way to perform common database operations from the command line.
Create a folder, utils/ inside the src/ folder. Create three files inside this folder:
- queries.js
- queryFunctions.js
- runQuery.js
We’re going to create functions to create a table in our database, insert seed data in the table, and to delete the table.
Open up queries.js and paste the following code:
export const createMessageTable = `
DROP TABLE IF EXISTS messages;
CREATE TABLE IF NOT EXISTS messages (
  id SERIAL PRIMARY KEY,
  name VARCHAR DEFAULT '',
  message VARCHAR NOT NULL
  )
  `;

export const insertMessages = `
INSERT INTO messages(name, message)
VALUES ('chidimo', 'first message'),
      ('orji', 'second message')
`;

export const dropMessagesTable = 'DROP TABLE messages';
In this file, we define three SQL query strings. The first query deletes and recreates the messages table. The second query inserts two rows into the messages table. Feel free to add more items here. The last query drops/deletes the messages table.
Open queryFunctions.js and paste the following code:
import { pool } from '../models/pool';
import {
  insertMessages,
  dropMessagesTable,
  createMessageTable,
} from './queries';

export const executeQueryArray = async arr => new Promise(resolve => {
  const stop = arr.length;
  arr.forEach(async (q, index) => {
    await pool.query(q);
    if (index + 1 === stop) resolve();
  });
});

export const dropTables = () => executeQueryArray([ dropMessagesTable ]);
export const createTables = () => executeQueryArray([ createMessageTable ]);
export const insertIntoTables = () => executeQueryArray([ insertMessages ]);
Here, we create functions to execute the queries we defined earlier. Note that the executeQueryArray function executes an array of queries and waits for each one to complete inside the loop. (Don’t do such a thing in production code though). Then, we only resolve the promise once we have executed the last query in the list. The reason for using an array is that the number of such queries will grow as the number of tables in our database grows.
Open runQuery.js and paste the following code:
import { createTables, insertIntoTables } from './queryFunctions';

(async () => {
  await createTables();
  await insertIntoTables();
})();
This is where we execute the functions to create the table and insert the messages in the table. Let’s add a command in the scripts section of our package.json to execute this file.
"runQuery": "babel-node ./src/utils/runQuery"Now run:
yarn runQuery
If you inspect your database, you will see that the messages table has been created and that the messages were inserted into the table.
If you’re using ElephantSQL, on the database details page, click on BROWSER from the left navigation menu. Select the messages table and click Execute. You should see the messages from the queries.js file.
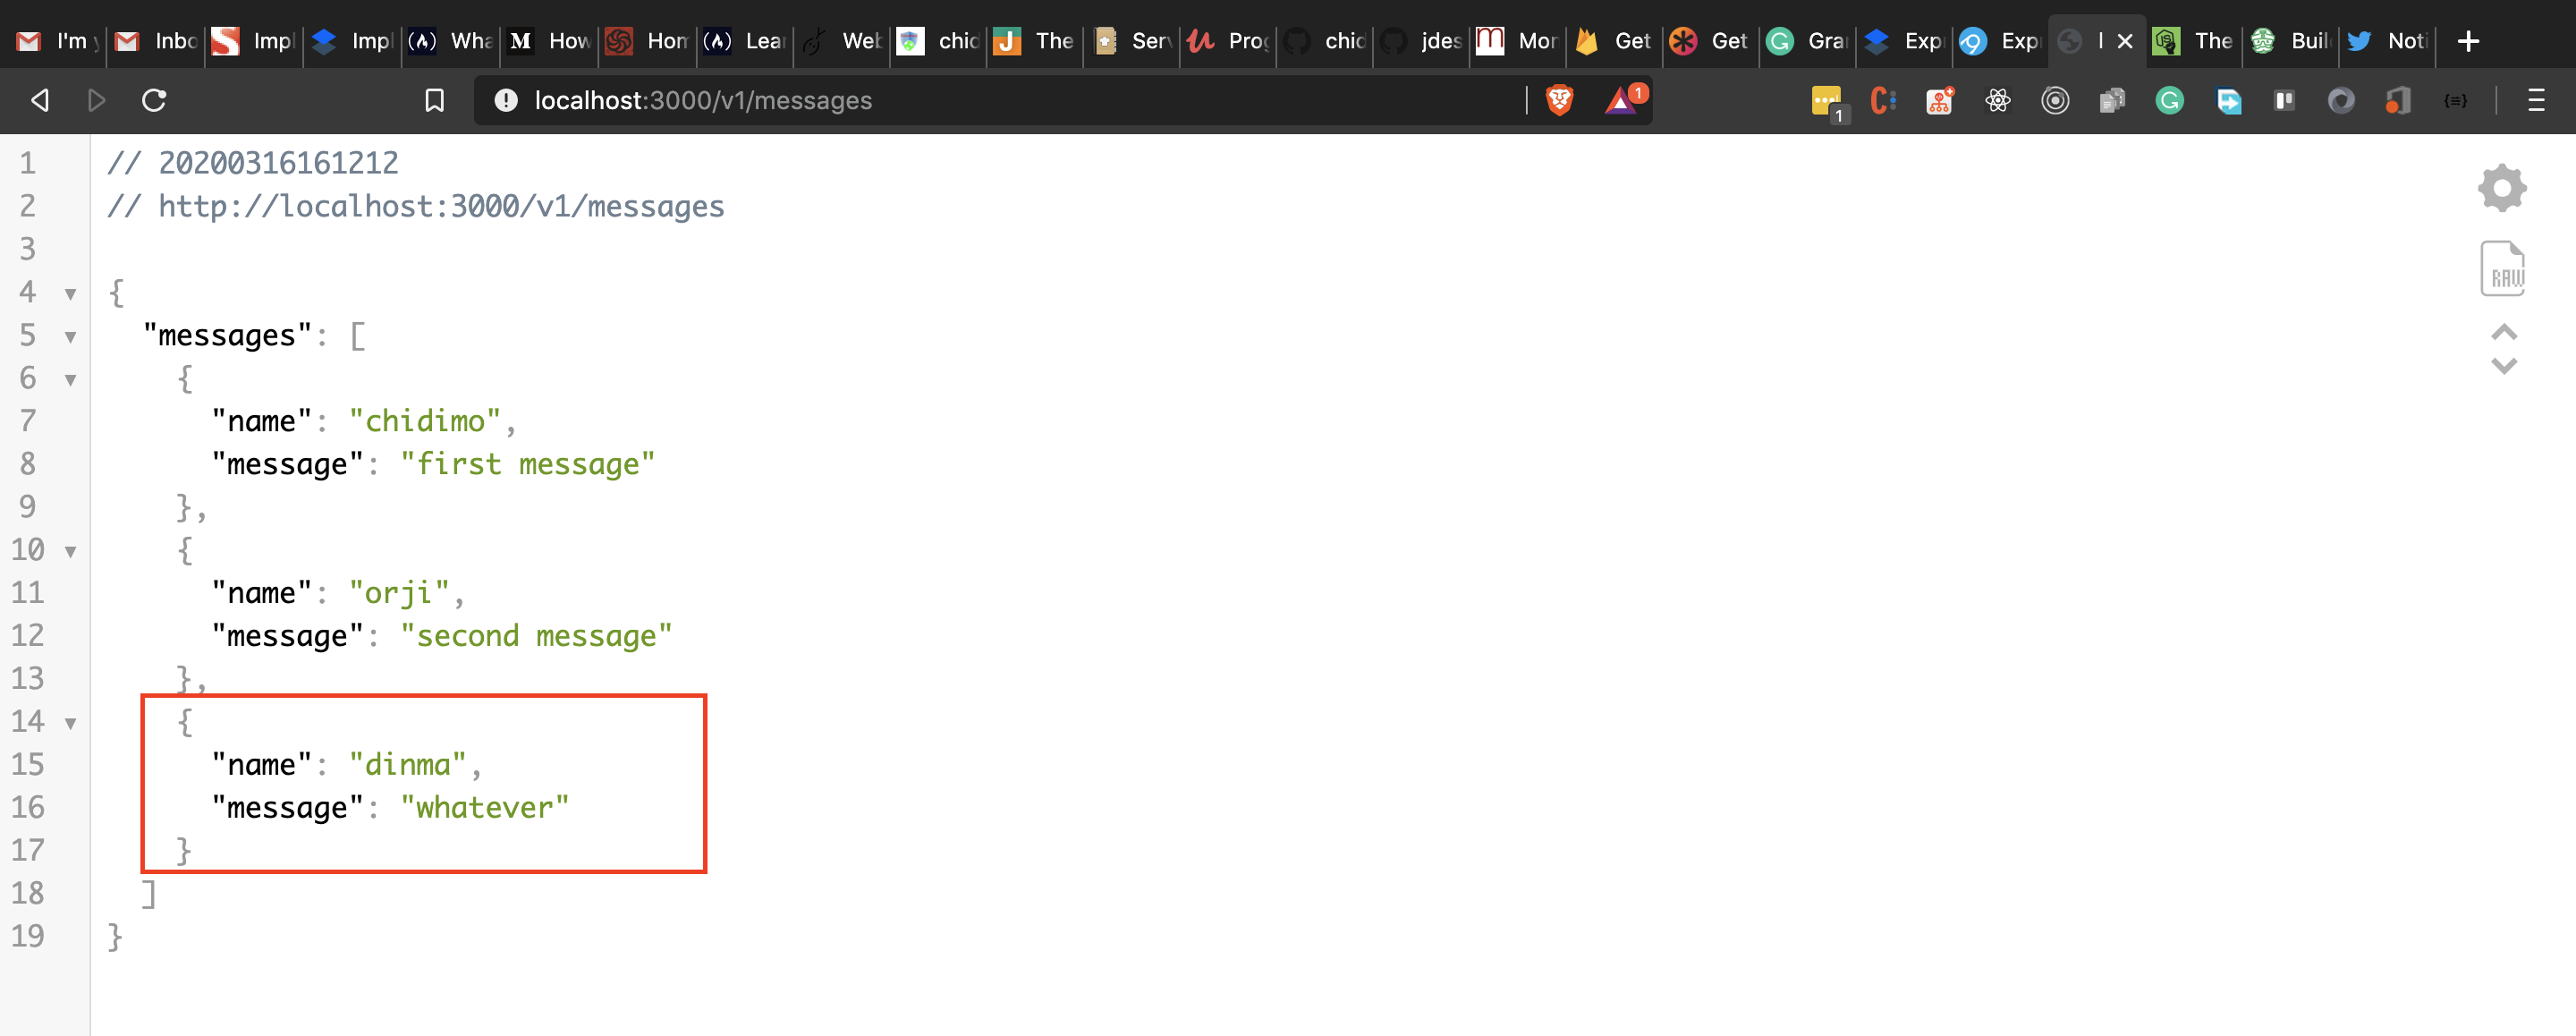
Let’s create a controller and route to display the messages from our database.
Create a new controller file src/controllers/messages.js and paste the following code:
import Model from '../models/model';

const messagesModel = new Model('messages');
export const messagesPage = async (req, res) => {
  try {
    const data = await messagesModel.select('name, message');
    res.status(200).json({ messages: data.rows });
  } catch (err) {
    res.status(200).json({ messages: err.stack });
  }
};
We import our Model class and create a new instance of that model. This represents the messages table in our database. We then use the select method of the model to query our database. The data (name and message) we get is sent as JSON in the response.
We define the messagesPage controller as an async function. Since node-postgres queries return a promise, we await the result of that query. If we encounter an error during the query we catch it and display the stack to the user. You should decide how choose to handle the error.
Add the get messages endpoint to src/routes/index.js and update the import line.
# update the import line
import { indexPage, messagesPage } from '../controllers';
# add the get messages endpoint
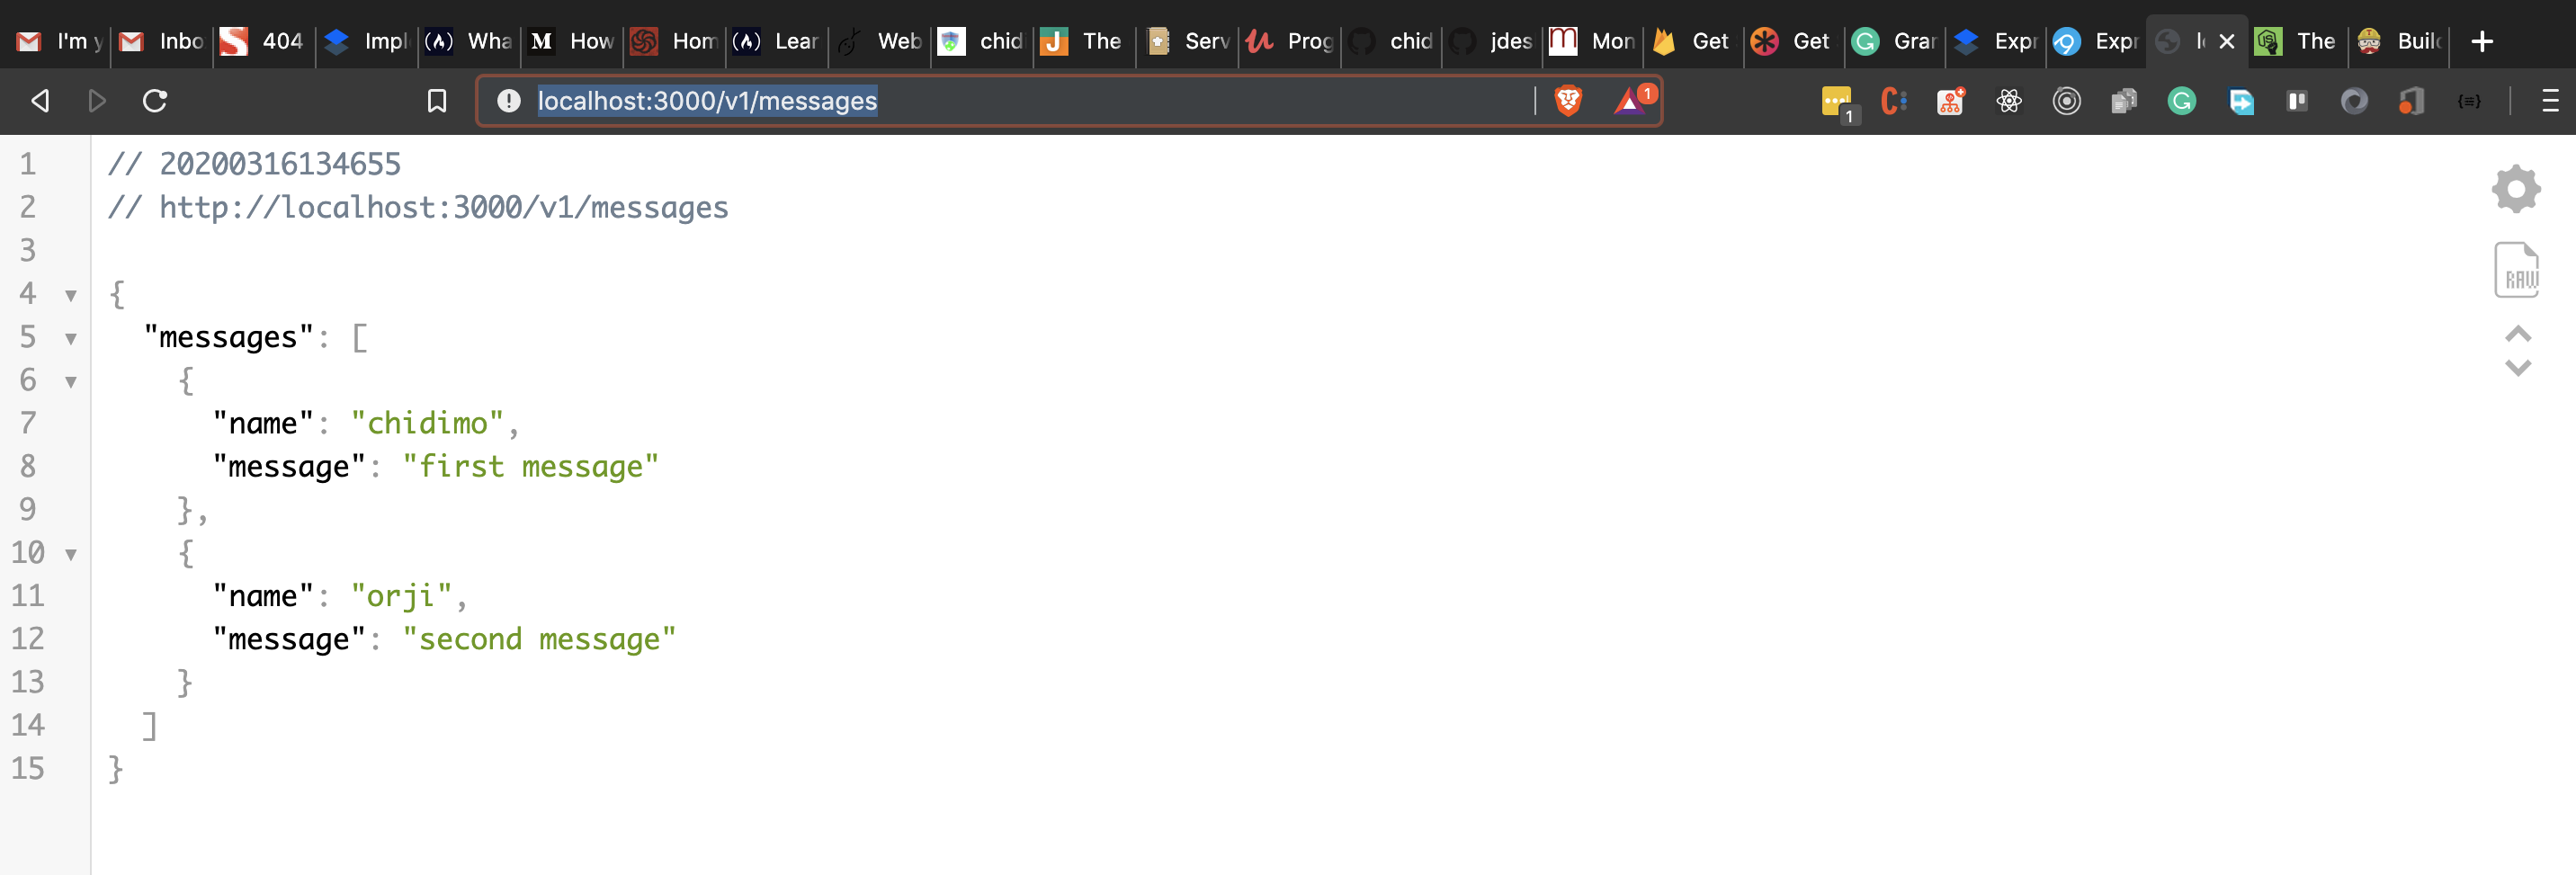
indexRouter.get('/messages', messagesPage)Visit https://localhost:3000/v1/messages and you should see the messages displayed as shown below.
Now, let’s update our test file. When doing TDD, you usually write your tests before implementing the code that makes the test pass. I’m taking the opposite approach here because we’re still working on setting up the database.
Create a new file, hooks.js in the test/ folder and enter the below code:
import {
  dropTables,
  createTables,
  insertIntoTables,
} from '../src/utils/queryFunctions';

before(async () => {
  await createTables();
  await insertIntoTables();
});

after(async () => {
  await dropTables();
});
When our test starts, Mocha finds this file and executes it before running any test file. It executes the before hook to create the database and insert some items into it. The test files then run after that. Once the test is finished, Mocha runs the after hook in which we drop the database. This ensures that each time we run our tests, we do so with clean and new records in our database.
Create a new test file test/messages.test.js and add the below code:
import { expect, server, BASE_URL } from './setup';
describe('Messages', () => {
  it('get messages page', done => {
    server
      .get(`${BASE_URL}/messages`)
      .expect(200)
      .end((err, res) => {
        expect(res.status).to.equal(200);
        expect(res.body.messages).to.be.instanceOf(Array);
        res.body.messages.forEach(m => {
          expect(m).to.have.property('name');
          expect(m).to.have.property('message');
        });
        done();
      });
  });
});
We assert that the result of the call to /messages is an array. For each message object, we assert that it has the name and message property.
The final step in this section is to update the CI files.
Add the following sections to the .travis.yml file:
services:
  - postgresql
addons:
  postgresql: "10"
  apt:
    packages:
    - postgresql-10
    - postgresql-client-10
before_install:
  - sudo cp /etc/postgresql/{9.6,10}/main/pg_hba.conf
  - sudo /etc/init.d/postgresql restart
This instructs Travis to spin up a PostgreSQL 10 database before running our tests.
Add the command to create the database as the first entry in the before_script section:
# add this as the first line in the before_script section

- psql -c 'create database testdb;' -U postgres
Create the CONNECTION_STRING environment variable on Travis, and use the below value:
CONNECTION_STRING="postgresql://postgres:postgres@localhost:5432/testdb"Add the following sections to the .appveyor.yml file:
before_test:
  - SET PGUSER=postgres
  - SET PGPASSWORD=Password12!
  - PATH=C:\Program Files\PostgreSQL\10\bin\;%PATH%
  - createdb testdb
services:
  - postgresql101
Add the connection string environment variable to appveyor. Use the below line:
CONNECTION_STRING=postgresql://postgres:Password12!@localhost:5432/testdbNow commit your changes and push to GitHub. Your tests should pass on both Travis CI and AppVeyor.
- The corresponding branch in my repo is 07-connect-postgres.
Note: I hope everything works fine on your end, but in case you should be having trouble for some reason, you can always check my code in the repo!
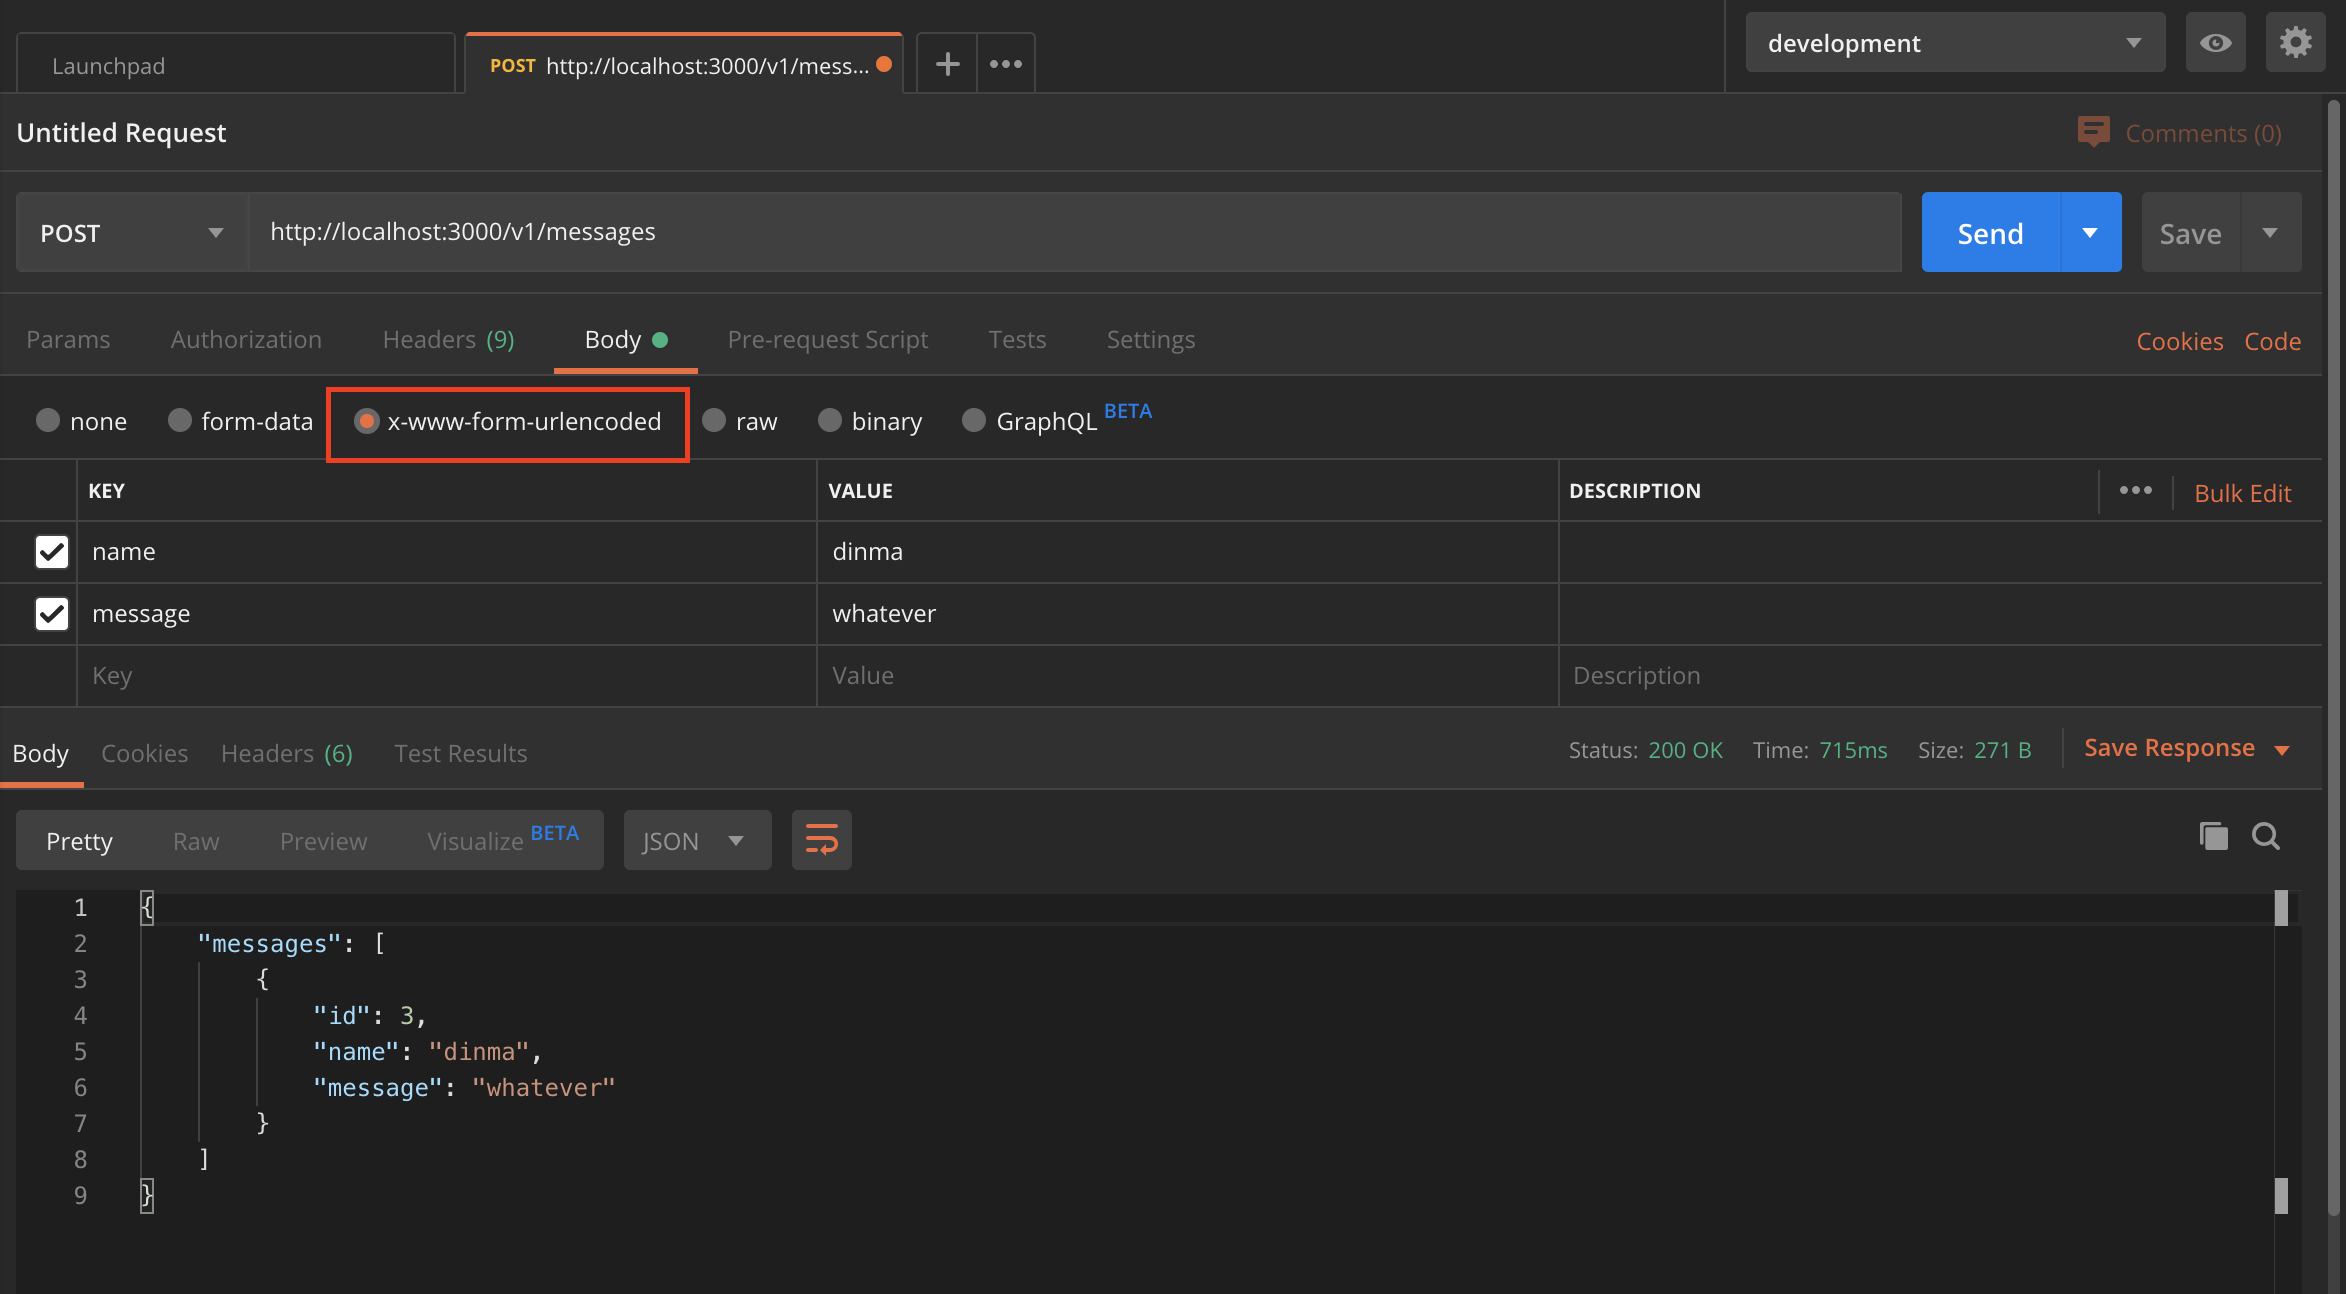
Now, let’s see how we can add a message to our database. For this step, we’ll need a way to send POST requests to our URL. I’ll be using Postman to send POST requests.
Let’s go the TDD route and update our test to reflect what we expect to achieve.
Open test/message.test.js and add the below test case:
it('posts messages', done => {
  const data = { name: 'some name', message: 'new message' };
  server
    .post(`${BASE_URL}/messages`)
    .send(data)
    .expect(200)
    .end((err, res) => {
      expect(res.status).to.equal(200);
      expect(res.body.messages).to.be.instanceOf(Array);
      res.body.messages.forEach(m => {
        expect(m).to.have.property('id');
        expect(m).to.have.property('name', data.name);
        expect(m).to.have.property('message', data.message);
      });
      done();
    });
});
This test makes a POST request to the /v1/messages endpoint and we expect an array to be returned. We also check for the id, name, and message properties on the array.
Run your tests to see that this case fails. Let’s now fix it.
To send post requests, we use the post method of the server. We also send the name and message we want to insert. We expect the response to be an array, with a property id and the other info that makes up the query. The id is proof that a record has been inserted into the database.
Open src/models/model.js and add the insert method:
async insertWithReturn(columns, values) {
  const query = `
        INSERT INTO ${this.table}(${columns})
        VALUES (${values})
        RETURNING id, ${columns}
    `;
  return this.pool.query(query);
}
This is the method that allows us to insert messages into the database. After inserting the item, it returns the id, name and message.
Open src/controllers/messages.js and add the below controller:
export const addMessage = async (req, res) => {
  const { name, message } = req.body;
  const columns = 'name, message';
  const values = `'${name}', '${message}'`;
  try {
    const data = await messagesModel.insertWithReturn(columns, values);
    res.status(200).json({ messages: data.rows });
  } catch (err) {
    res.status(200).json({ messages: err.stack });
  }
};
We destructure the request body to get the name and message. Then we use the values to form an SQL query string which we then execute with the insertWithReturn method of our model.
Add the below POST endpoint to /src/routes/index.js and update your import line.
import { indexPage, messagesPage, addMessage } from '../controllers';

indexRouter.post('/messages', addMessage);
Run your tests to see if they pass.
Open Postman and send a POST request to the messages endpoint. If you’ve just run your test, remember to run yarn query to recreate the messages table.
yarn query
Commit your changes and push to GitHub. Your tests should pass on both Travis and AppVeyor. Your test coverage will drop by a few points, but that’s okay.
- The corresponding branch on my repo is 08-post-to-db.
Middleware
Our discussion of Express won’t be complete without talking about middleware. The Express documentation describes a middlewares as:
“[...] functions that have access to the request object (req), the response object (res), and the next middleware function in the application’s request-response cycle. The next middleware function is commonly denoted by a variable namednext.”
A middleware can perform any number of functions such as authentication, modifying the request body, and so on. See the Express documentation on using middleware.
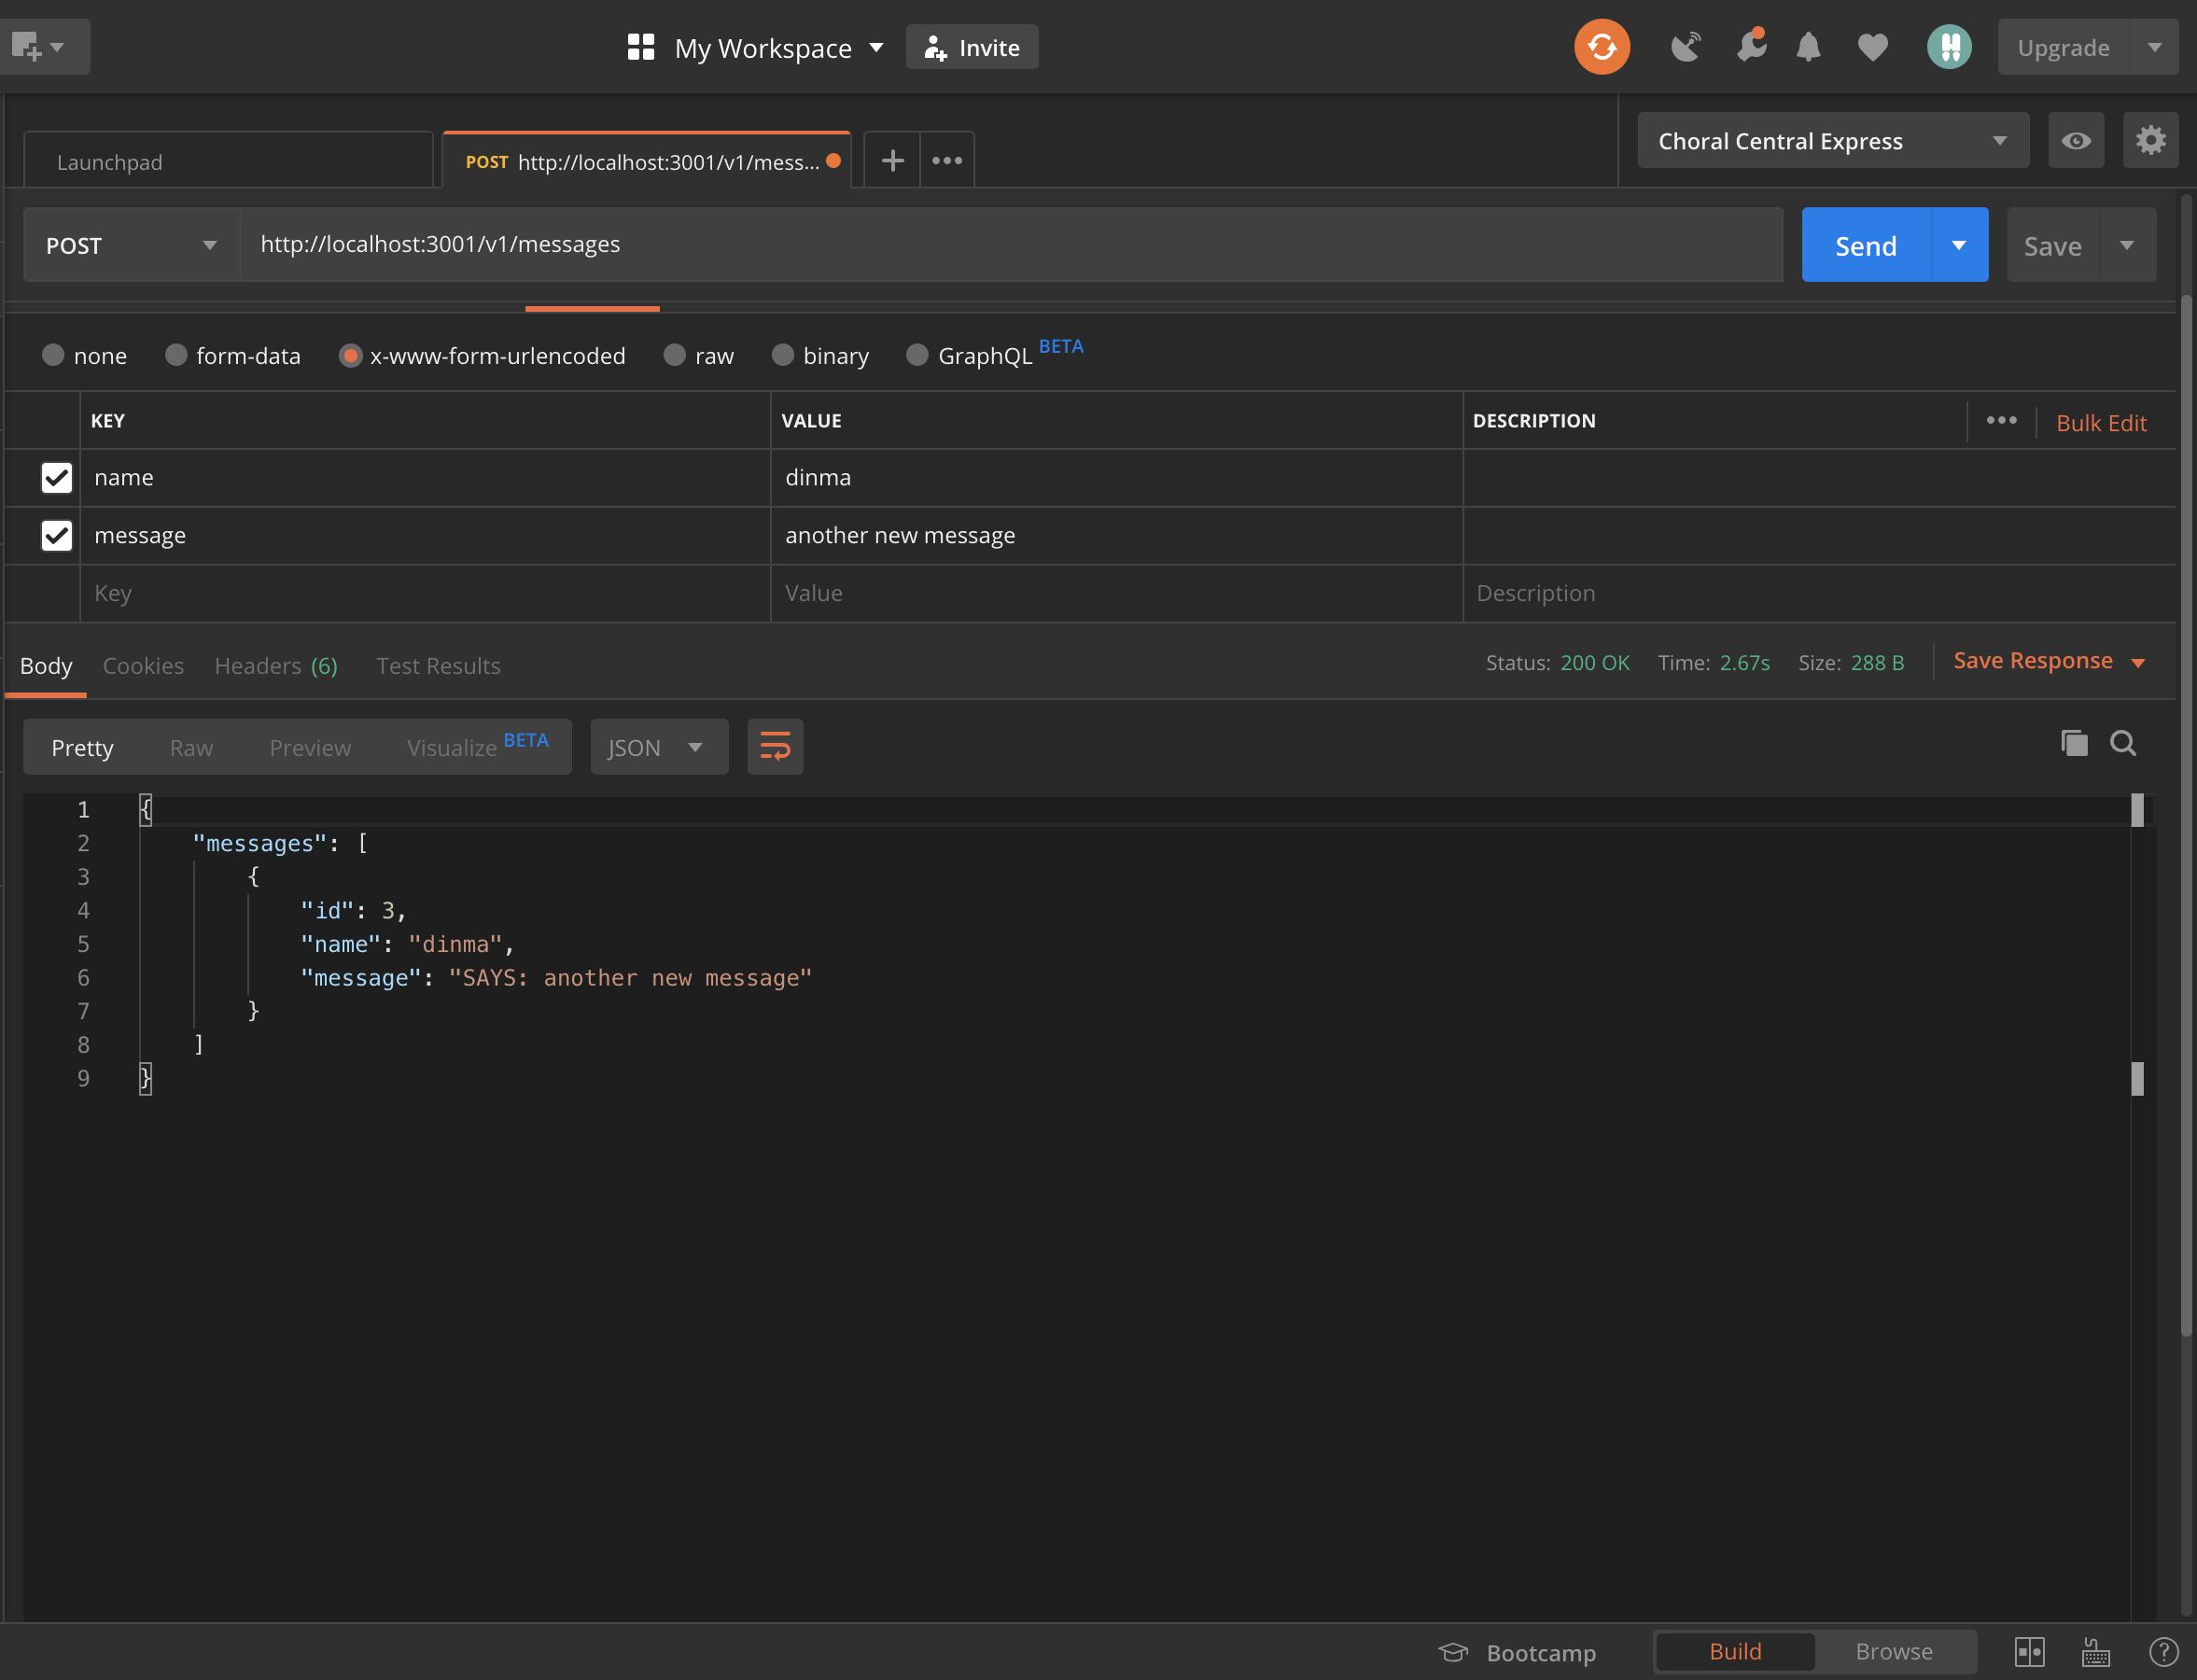
We’re going to write a simple middleware that modifies the request body. Our middleware will append the word SAYS: to the incoming message before it is saved in the database.
Before we start, let’s modify our test to reflect what we want to achieve.
Open up test/messages.test.js and modify the last expect line in the posts message test case:
it('posts messages', done => {
   ...
  expect(m).to.have.property('message', `SAYS: ${data.message}`); # update this line
    ...
});
We’re asserting that the SAYS: string has been appended to the message. Run your tests to make sure this test case fails.
Now, let’s write the code to make the test pass.
Create a new middleware/ folder inside src/ folder. Create two files inside this folder:
- middleware.js
- index.js
Enter the below code in middleware.js:
export const modifyMessage = (req, res, next) => {
  req.body.message = `SAYS: ${req.body.message}`;
  next();
};
Here, we append the string SAYS: to the message in the request body. After doing that, we must call the next() function to pass execution to the next function in the request-response chain. Every middleware has to call the next function to pass execution to the next middleware in the request-response cycle.
Enter the below code in index.js:
# export everything from the middleware file

export * from './middleware';
This exports the middleware we have in the /middleware.js file. For now, we only have the modifyMessage middleware.
Open src/routes/index.js and add the middleware to the post message request-response chain.
import { modifyMessage } from '../middleware';

indexRouter.post('/messages', modifyMessage, addMessage);
We can see that the modifyMessage function comes before the addMessage function. We invoke the addMessage function by calling next in the modifyMessage middleware. As an experiment, comment out the next() line in the modifyMessage middle and watch the request hang.
Open Postman and create a new message. You should see the appended string.
This is a good point to commit our changes.
- The corresponding branch in my repo is 09-middleware.
Error Handling And Asynchronous Middleware
Errors are inevitable in any application. The task before the developer is how to deal with errors as gracefully as possible.
In Express:
“Error Handling refers to how Express catches and processes errors that occur both synchronously and asynchronously.
If we were only writing synchronous functions, we might not have to worry so much about error handling as Express already does an excellent job of handling those. According to the docs:
“Errors that occur in synchronous code inside route handlers and middleware require no extra work.”
But once we start writing asynchronous router handlers and middleware, then we have to do some error handling.
Our modifyMessage middleware is a synchronous function. If an error occurs in that function, Express will handle it just fine. Let’s see how we deal with errors in asynchronous middleware.
Let’s say, before creating a message, we want to get a picture from the Lorem Picsum API using this URL https://picsum.photos/id/0/info. This is an asynchronous operation that could either succeed or fail, and that presents a case for us to deal with.
Start by installing Axios.
# install axios
yarn add axios
Open src/middleware/middleware.js and add the below function:
export const performAsyncAction = async (req, res, next) => {
  try {
    await axios.get('https://picsum.photos/id/0/info');
    next();
  } catch (err) {
    next(err);
  }
};
In this async function, we await a call to an API (we don’t actually need the returned data) and afterward call the next function in the request chain. If the request fails, we catch the error and pass it on to next. Once Express sees this error, it skips all other middleware in the chain. If we didn’t call next(err), the request will hang. If we only called next() without err, the request will proceed as if nothing happened and the error will not be caught.
Import this function and add it to the middleware chain of the post messages route:
import { modifyMessage, performAsyncAction } from '../middleware';

indexRouter.post('/messages', modifyMessage, performAsyncAction, addMessage);
Open src/app.js and add the below code just before the export default app line.
app.use((err, req, res, next) => {
  res.status(400).json({ error: err.stack });
});

export default app;
This is our error handler. According to the Express error handling doc:
“[...] error-handling functions have four arguments instead of three: (err, req, res, next).”Note that this error handler must come last, after every app.use() call. Once we encounter an error, we return the stack trace with a status code of 400. You could do whatever you like with the error. You might want to log it or send it somewhere.
This is a good place to commit your changes.
- The corresponding branch in my repo is 10-async-middleware.
Deploy To Heroku
- To get started, go to https://www.heroku.com/ and either log in or register.
- Download and install the Heroku CLI from here.
- Open a terminal in the project folder to run the command.
# login to heroku on command line
heroku login
This will open a browser window and ask you to log into your Heroku account.
Log in to grant your terminal access to your Heroku account, and create a new heroku app by running:
#app name is up to you
heroku create app-name
This will create the app on Heroku and return two URLs.
# app production url and git url
https://app-name.herokuapp.com/ | https://git.heroku.com/app-name.git
Copy the URL on the right and run the below command. Note that this step is optional as you may find that Heroku has already added the remote URL.
# add heroku remote url
git remote add heroku https://git.heroku.com/my-shiny-new-app.git
Open a side terminal and run the command below. This shows you the app log in real-time as shown in the image.
# see process logs
heroku logs --tail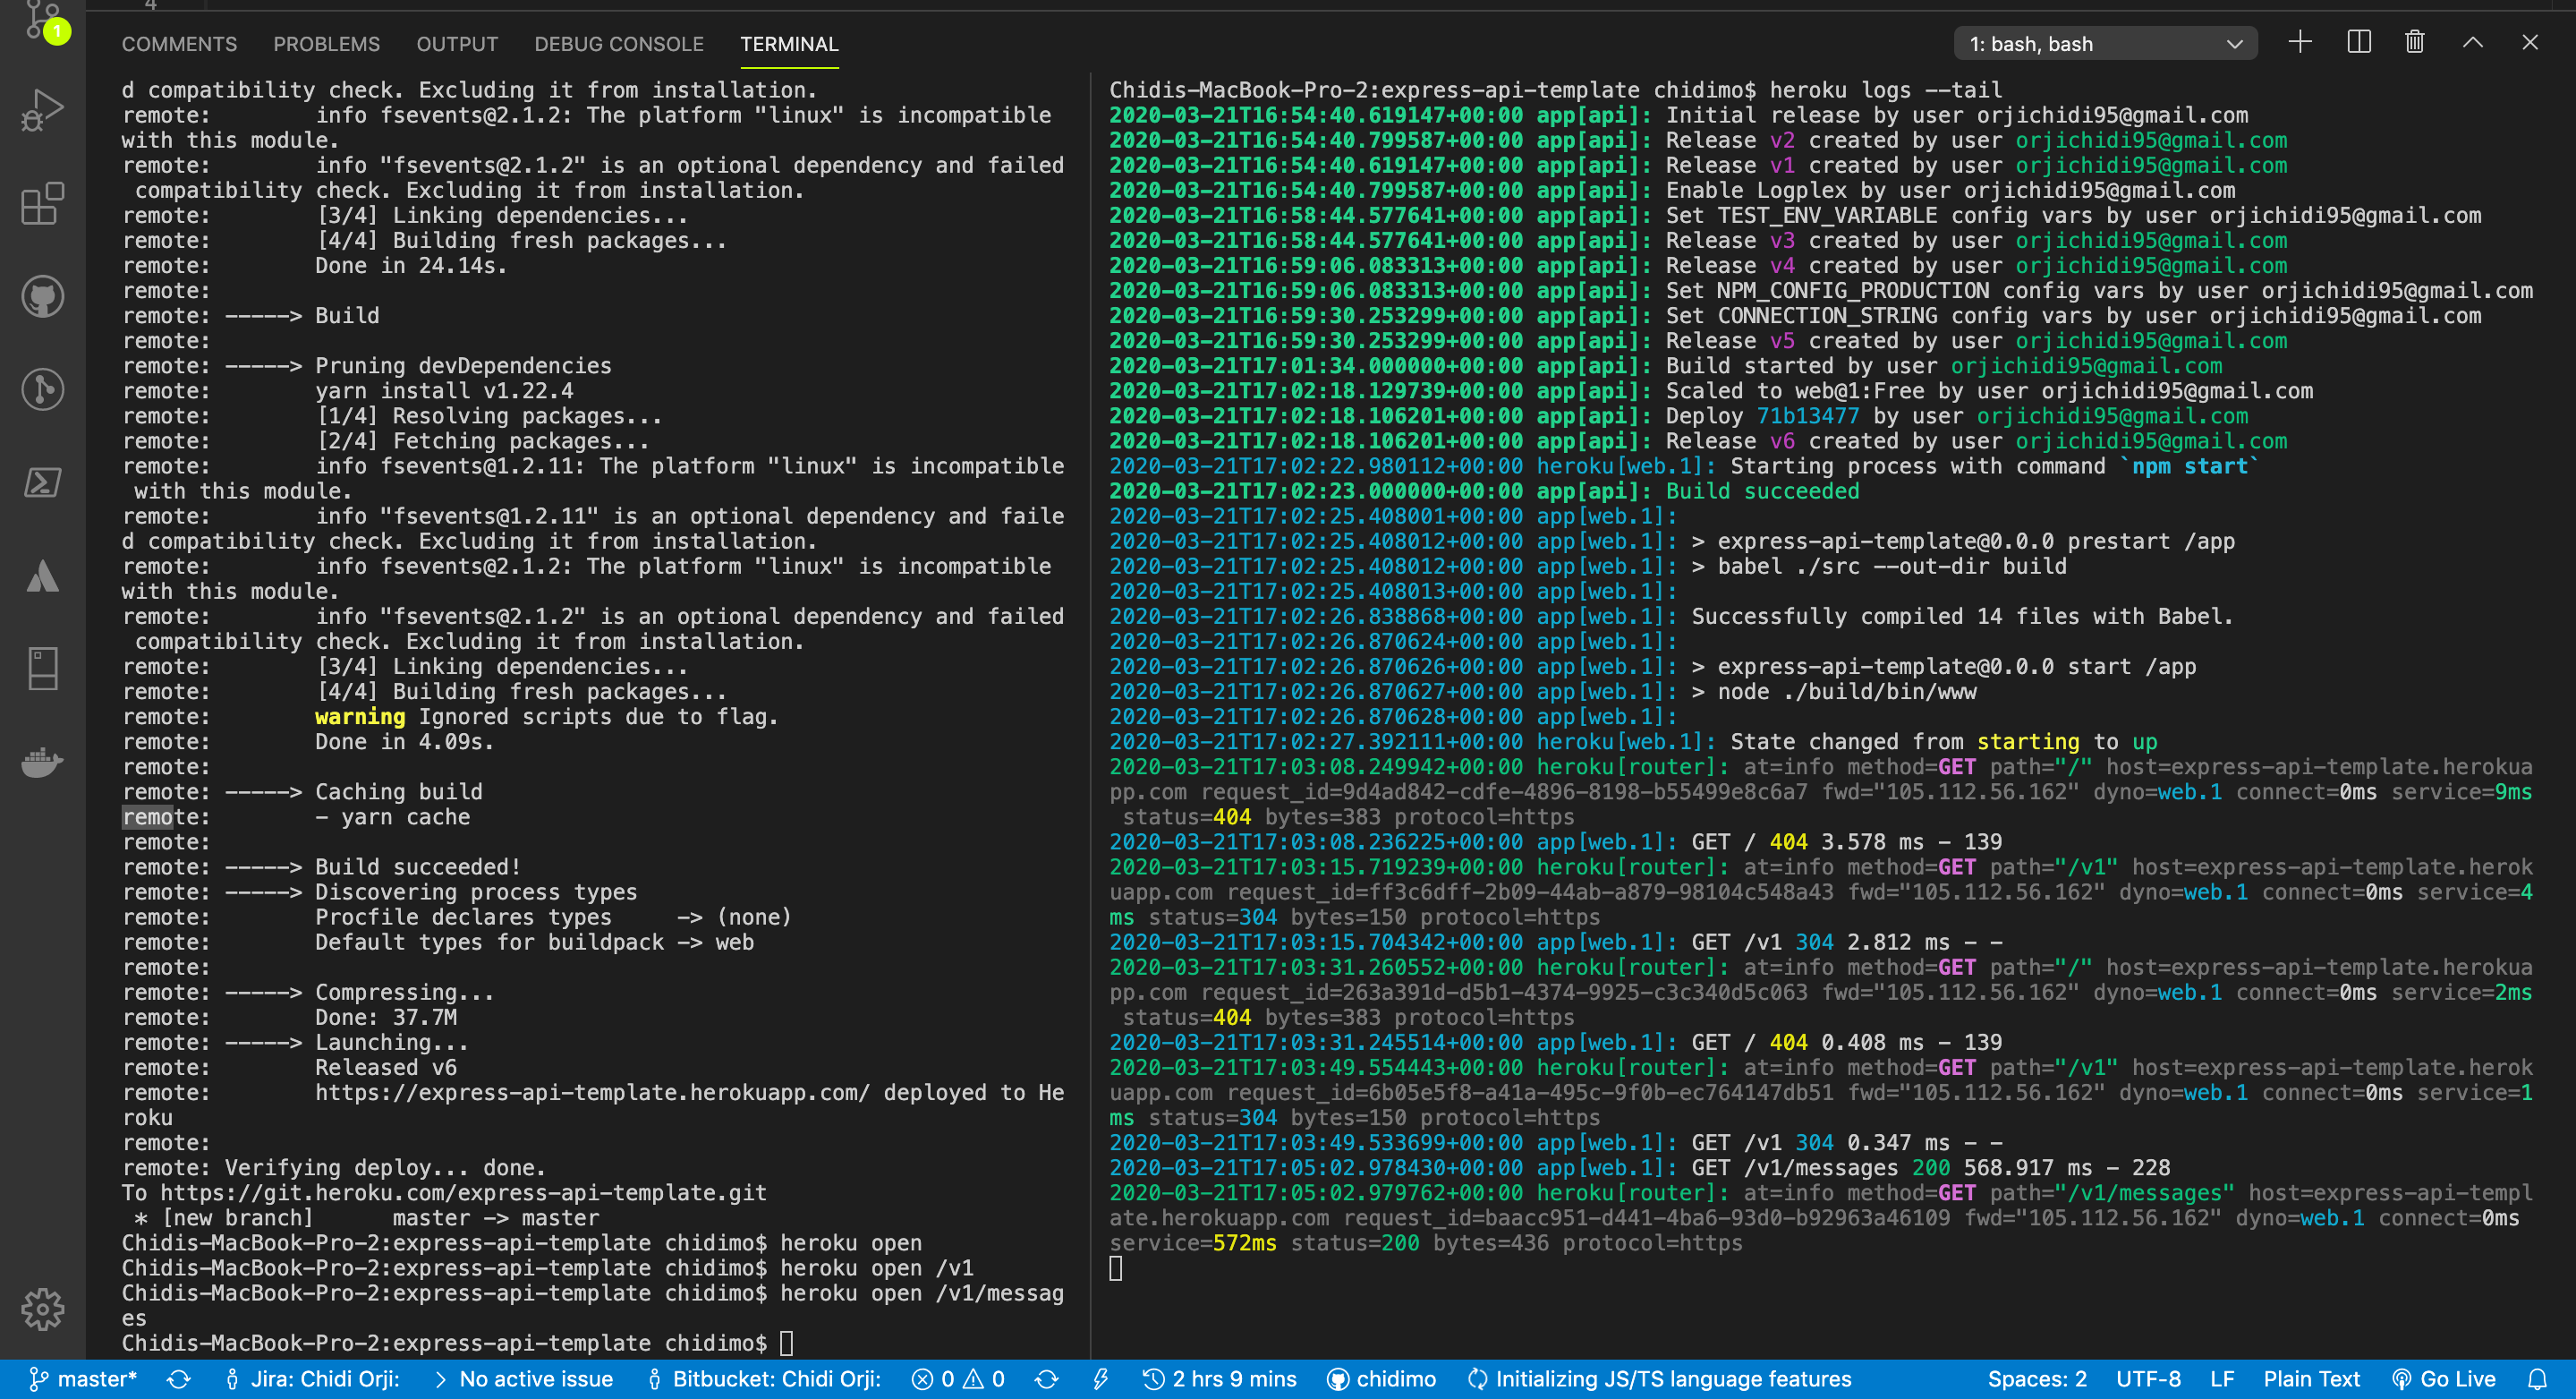
Run the following three commands to set the required environment variables:
heroku config:set TEST_ENV_VARIABLE="Environment variable is coming across."
heroku config:set CONNECTION_STRING=your-db-connection-string-here.
heroku config:set NPM_CONFIG_PRODUCTION=false
Remember in our scripts, we set:
"prestart": "babel ./src --out-dir build",
"start": "node ./build/bin/www",
To start the app, it needs to be compiled down to ES5 using babel in the prestart step because babel only exists in our development dependencies. We have to set NPM_CONFIG_PRODUCTION to false in order to be able to install those as well.
To confirm everything is set correctly, run the command below. You could also visit the settings tab on the app page and click on Reveal Config Vars.
# check configuration variables
heroku config
Now run git push heroku.
To open the app, run:
# open /v1 route
heroku open /v1

# open /v1/messages route
heroku open /v1/messages
If like me, you’re using the same PostgresSQL database for both development and production, you may find that each time you run your tests, the database is deleted. To recreate it, you could run either one of the following commands:
# run script locally
yarn runQuery

# run script with heroku
heroku run yarn runQuery
Continuous Deployment (CD) With Travis
Let’s now add Continuous Deployment (CD) to complete the CI/CD flow. We will be deploying from Travis after every successful test run.
The first step is to install Travis CI. (You can find the installation instructions over here.) After successfully installing the Travis CI, login by running the below command. (Note that this should be done in your project repository.)
# login to travis
travis login --pro

# use this if you’re using two factor authentication
travis login --pro --github-token enter-github-token-here
If your project is hosted on travis-ci.org, remove the --pro flag. To get a GitHub token, visit the developer settings page of your account and generate one. This only applies if your account is secured with 2FA.
Open your .travis.yml and add a deploy section:
deploy:
  provider: heroku
  app:
    master: app-name
Here, we specify that we want to deploy to Heroku. The app sub-section specifies that we want to deploy the master branch of our repo to the app-name app on Heroku. It’s possible to deploy different branches to different apps. You can read more about the available options here.
Run the below command to encrypt your Heroku API key and add it to the deploy section:
# encrypt heroku API key and add to .travis.yml
travis encrypt $(heroku auth:token) --add deploy.api_key --pro
This will add the below sub-section to the deploy section.
api_key:
  secure: very-long-encrypted-api-key-string
Now commit your changes and push to GitHub while monitoring your logs. You will see the build triggered as soon as the Travis test is done. In this way, if we have a failing test, the changes would never be deployed. Likewise, if the build failed, the whole test run would fail. This completes the CI/CD flow.
- The corresponding branch in my repo is 11-cd.
Conclusion
If you’ve made it this far, I say, “Thumbs up!” In this tutorial, we successfully set up a new Express project. We went ahead to configure development dependencies as well as Continuous Integration (CI). We then wrote asynchronous functions to handle requests to our API endpoints — completed with tests. We then looked briefly at error handling. Finally, we deployed our project to Heroku and configured Continuous Deployment.
You now have a template for your next back-end project. We’ve only done enough to get you started, but you should keep learning to keep going. Be sure to check out the Express.js docs as well. If you would rather use MongoDB instead of PostgreSQL, I have a template here that does exactly that. You can check it out for the setup. It has only a few points of difference.
Resources
- “Create Express API Backend With MongoDB ,” Orji Chidi Matthew, GitHub
- “A Short Guide To Connect Middleware,” Stephen Sugden
- “Express API template,” GitHub
- “AppVeyor vs Travis CI,” StackShare
- “The Heroku CLI,” Heroku Dev Center
- “Heroku Deployment,” Travis CI
- “Using middleware,” Express.js
- “Error Handling,” Express.js
- “Getting Started,” Mocha
nyc(GitHub)- ElephantSQL
- Postman
- Express
- Travis CI
- Code Climate
- PostgreSQL
- pgAdmin


